Table of Contents
Advertisement
Quick Links
Advertisement
Table of Contents

Related Manuals for ALK GIZMONDO NAVIGATOR 2006 COPILOT

Summary of Contents for ALK GIZMONDO NAVIGATOR 2006 COPILOT
- Page 1 USER MANUAL...
- Page 2 MANUAL ROAD SAFETY INFORMATION Road traffic laws, the Highway Code and traffic conditions must be observed and respected at all times and take precedence over any instructions or directions given by your Gizmondo Navigator GPS Navigation system. You are responsible for controlling your vehicle (or other means of transport) and you MUST exercise proper control of your vehicle (or other means of transport) at ALL times. For safety reasons it is important that you key in your destination and set up your trip on your Gizmondo Navigator GPS Navigation system whilst your vehicle (or other means of transport) is stationary BEFORE starting your journey.
-
Page 3: Table Of Contents
MANUAL Contents Page: Gizmondo Navigator Overview Setting up your Gizmondo Planning your first trip 2 - 6 Entering a Home Address Entering a Work Address Favourites Junction Postcode 10 - 11 Finding Points of Interest Map Preview of a POI Pick a Map Navigating Through Gizmondo Navigator Screens Driver Safety/2D or 3D/Itinerary Screens... -
Page 4: Gizmondo Navigator Overview
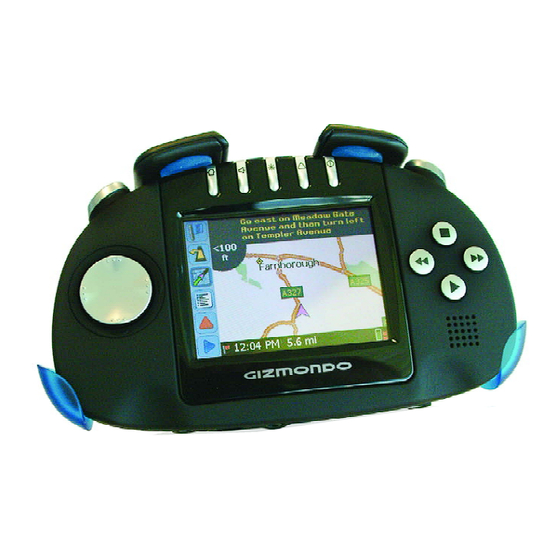
MANUAL Gizmondo Navigator Overview Welcome to Gizmondo Navigator! Gizmondo Navigator will provide you with accurate, turn-by-turn spoken directions and street-level maps that guide you to any destination you specify. If you take a wrong turn, Gizmondo Navigator instantly re-calculates your route. Let Gizmondo Navigator guide you — and never get lost again! In-vehicle Hardware Setup: Gizmondo Navigator uses Gizmondo’s built-in GPS satellite receiver to calculate your exact position on a map. -
Page 5: Setting Up Your Gizmondo
MANUAL Setup your Gizmondo and Charge the battery Follow the nstructions in the Gizmondo Quick Start Guide Insert your Gizmondo Navigator SD Card Insert your Gizmondo Navigator 2006 SD Card into the slot in the base of your Gizmondo with the label towards the back of the device. - Page 6 MANUAL 1) Entering an address - Move around the menu screens using the left/right/up/down D-Pad controls on left hand side of Gizmondo - Press to select options on-screen ‘Going To’ From the Welcome Screen, select Select ‘New Trip’ ‘Address’. The ‘Select Stop’ screen will now be displayed. You will be offered a choice of address entry options. Select - Enter letters and numbers using the text input grid in the right hand corner of the screen - Move around the text grid using the Gizmondo D-Pad.
- Page 7 MANUAL Country Enter a Enter Country - In the screen, enter the country name using the text grid. - A matching country will be displayedbelow the yellow box. - Select from the text grid - The correct country should be displayed in the yellow box. Press to continue Postcode, Town or City Enter a...
- Page 8 MANUAL Name your destination (optional) - You can skip these choices by pressing select from the text grid, followed by - Or you can create a name for your destination using the text pad - Press to continue. Going To Enter destination Your destination will be displayed in the screen.
- Page 9 MANUAL Next Turn Instruction Next Turn Directional Arrow Distance to Next Turn GPS Status: Green = 3D Fix Yellow = 2D Fix ETA and Red = No Fix Distance to Next Stop To return to the Going To screen to edit your trip at any time, use the D-pad to scroll up to the Going To icon from...
-
Page 10: Entering A Home Address
MANUAL Entering a Home Address To modify your home address, choose the following from the Welcome screen Options > Favourites, or press the R shoulder button from other screens (See page 23 for tools menu options). With the D-pad, scroll down your list of favourite destinations until you find your home address. -
Page 11: Entering A Work Address
MANUAL Entering a Work Address To modify your work address, choose the following from the Welcome screen Options > Favourites, or press the R shoulder button from other screens (See page 23 for tools menu options). With the D-pad, scroll down your list of favourite destinations until you find your work address. -
Page 12: Favourites
MANUAL Favourites In the Select Stop screen, use the D-pad to choose Favourite icon. A scrollable list will appear, providing quick access to the last 50 destinations that were entered. Select a Favourite using the button to enter it as a destination. Home Work To change which Favourite destination is assigned to the... -
Page 13: Postcode
MANUAL Postcode The postcode option on the address entry menu is a shortcut for the UK postcodes only. In order to use postcodes in other regions, use the regular address entry screens. In the Select Stop screen, use In the Enter Postcode screen type a full or partial postcode using the text the D-pad to choose the input panel. - Page 14 MANUAL Once the address has been matched, you have the option of assigning a name to the desti- nation. Select in the text input grid followed by fast forward. After entering a destination, you will be taken to the Going To screen. The destination you just entered will be listed as the first stop on your trip.
-
Page 15: Finding Points Of Interest
MANUAL Finding Points of Interest In the first POI screen you have the option to choose a Category and Type of POI. Use the left and right cursors on the D-pad to toggle through the various options on the Category and Type lists. To narrow your search and cut down In the Select Stop screen, on the time it takes, you can also type the first few letters of a use the D-pad to choose the... -
Page 16: Map Preview Of A Poi
MANUAL Map Preview of a POI: To preview a POI on the map before you decide to enter it as a destination, use the D-pad to highlight it on the match list and then press the L Shift button on the Gizmondo to display a . -
Page 17: Pick A Map
MANUAL Pick From Map Choose Pick From Map in the Select Stop screen to pinpoint a precise location near a City or Postcode, Favourite destination, Point of Interest (POI) Current GPS Location. Highlight one of the following four options from the Where would you like to start your search? screen to find a destination near: City or Postcode. -
Page 18: Navigating Through Gizmondo Navigator Screens
MANUAL Navigating Through Gizmondo Navigator Screens Several Gizmondo Navigator screens can be accessed from the menu bar on the left hand side of the screen. Use the menu bar and press D-pad to scroll up and down the button to make a selection. menu bar Going To - The Going To icon takes you back to the Going To screen where you can edit your trip as detailed on p. -
Page 19: Driver Safety/2D Or 3D/Itinerary Screens
MANUAL Driver Safety/2D or 3D/Itinerary screens You can choose from three different views which can be accessed from the left hand menu in driving mode using the D-Pad button. NOTE: It is not safe to attempt to alter settings on your Gizmondo device while you are driving. Either have a passenger make changes, or pull over to a safe area. -
Page 20: 2D Or 3D Screens
MANUAL 2D or 3D Screens To see your current position in either a 2D or 3D map view, use the D-pad to 2D or 3D view scroll down to the icon found in the menu bar on the left hand side of the screen. -
Page 21: Itinerary Screen
MANUAL Itinerary Screen Itinerary To view your detailed Turn by Turn Itinerary for a trip, use the D-pad to scroll down to the icon found in the menu bar on the left hand side of the screen. The Itinerary lists all roads you will be traveling on if you have entered at least one destination. The Trip Itinerary is a scrollable set of driving directions for the current trip. -
Page 22: Trip Editing And Waypoints
MANUAL Trip Editing and Waypoints To get to the Going To screen from the guidance screens at any time, use the D-pad to scroll up to the Going To icon in the Going To menu bar on the left hand side of the screen. Select and press . -
Page 23: Re-Arranging Stops
MANUAL Re-arranging Stops To re-arrange the order in which stops are listed on your trip, select one of the stops in the Going To screen and press move up move down Select from the pop-up menu to change the stop order. Optimising Stops To rearrange the stops on your trip in the most efficient order (quickest/shortest route), select one of the stops in the Going To Optimise Stops... -
Page 24: Divert Feature
MANUAL Divert Feature Avoid Allow Road Road DIvert icon Gizmondo Navigator’s Divert Feature allows you to preview an alternate route before deciding whether or not to take it. Perfect for situations in which traffic has suddenly slowed ahead of you, the Divert Feature will generate an alternate route. You can then make an informed decision about whether you’re better off driving through the delay or taking the new route. -
Page 25: Selective Routing
MANUAL Selective Routing Gizmondo Navigator allows you to be selective about the roads you take on your trip. There are two ways to do this: 1) you can customise your Trip Itinerary in Guidance Mode so that Gizmondo Navigator will avoid certain roads;... -
Page 26: Modes Menu - Driving/Walking/Planning
MANUAL Modes Menu Gizmondo Navigator has three modes of operation on the Gizmondo device. Use the D-pad to Menu navigate to the bottom of the menu bar in the left hand side of the screen. Select the Options Play/ Accept. Guidance Mode icon and press Select the... -
Page 27: Customisable Menu Options
MANUAL Customisable Menu Options Your Gizmondo Navigator application can be customised in various ways to suit your needs. Select the Options icon from the Options, menu bar in the left hand side of the screen. Press Play/ Accept. Select and choose one of the option categories. -
Page 28: Guidance
MANUAL Guidance Guidance Speak Turn Warning At In the tab, the settings under determine how often and where Gizmondo Navigator will give you next turn information out loud. All, none, or some Just Ahead: boxes can be checked. A pick list gives the options for by default you will be alerted 5 sec/100 ft... -
Page 29: Favourites
MANUAL Favourites Favorites List of Favourite Addresses. screen displays your To change the assignment of your work or home address, highlight your choice on the list using the D-Pad, then use the rewind fast forward buttons to set as home work. -
Page 30: The Gps Status Menu
MANUAL The GPS Status Menu GPS status menu is a sub-menu of the main screen Menu. Select the Options i con from the main menu bar in the left GPS Status hand side of the screen. Press Play/ Accept. Select and press to access these features. -
Page 31: Reference - Guidance Mode Screens And Toolbars
MANUAL Reference: Guidance Mode Screens & Toolbars on Your Mobile Device The following is a summary guide to the screens and toolbars you will see on your Gizmondo device as you operate Gizmondo Navigator in Guidance Mode. The Welcome screen appears when you first open Gizmondo Navigator. If you don’t want to see it at startup, uncheck Show this screen at startup. -
Page 32: Select Stop Screen
MANUAL Select Stop Screen In this screen you add stops to your trip. There are eight different types of stop entry to choose from: Address Enter a new using a full or partial name of a city or postcode Home Programme or enter your address Programme or enter your... -
Page 33: Determining Current Position
MANUAL Determining Current Position When you see this screen, Gizmondo Navigator is in the process of determining where you are. It can have several minutes to obtain a GPS fix to determine your current position. The scrolling indicator in the bottom right of the screen, will indicate whether you have a GPS fix and help you identify the strength of the signal. -
Page 34: Map Screen
MANUAL Map Screen The Map Screen displays when you are traveling at less than than 10 m.p.h. or within about 7/10 of a mile to the turn, or have selected the 2D map screen. It combines a large map display and concise text instructions. When you’re within 1 kilometer of a turn, Gizmondo Navigator automatically switches to the map. -
Page 35: Night Mode
MANUAL Night Mode Night Mode is available in 2D or 3D. It dims the Gizmondo devices display and a darker map display is used to reduce glare and eye strain while driving with Gizmondo Navigator at night. To set Gizmondo Navigator to automatically switch to Night Mode based on your location and current time, select the Options Options, Map. -
Page 36: Toolbar Icons
MANUAL Toolbar Icons Going To - The Going To icon takes you back to the Going To screen where you can edit your trip as detailed on p. 5 Driver Safety - Shows the default driving mode which only displays a map on-screen as you approach a turn or are travelling below 10mph. -
Page 37: About Gps Technology
MANUAL About GPS Technology The Global Positioning System (GPS), developed by the U.S. Department of Defense, is a constellation of 24 satellites that orbit the Earth twice daily. Each satellite contains an atomic clock that is accurate to the nanosecond, and constantly emitting radio waves toward Earth. -
Page 38: End-User License Agreement (Eula)
MANUAL END-USER LICENSE AGREEMENT (EULA) IMPORTANT-PLEASE READ THIS DOCUMENT CAREFULLY BEFORE INSTALLING AND USING THE APPLICATION. BY SO INSTALLING AND USING THE APPLICATION YOU THE PURCHASER AND/OR ANY USER ARE AGREEING TO BE BOUND BY THE TERMS SET OUT IN THIS DOCUMENT. This End User Licence Agreement (the “Agreement") grants you a personal and non-exclusive licence to use the Application and related documentation for the purposes for which it was intended and as is more particularly specified below. - Page 39 MANUAL 5. LIMITED WARRANTY Gizmondo Europe Limited only provides a limited warranty to the Purchaser that the means by which the software program contained upon this application's storage media is recorded will not be defective in materials nor in the way it was made for a maximum of 120 days from the original purchase date.
Need help?
Do you have a question about the GIZMONDO NAVIGATOR 2006 COPILOT and is the answer not in the manual?
Questions and answers