Table of Contents
Advertisement
Advertisement
Table of Contents

Related Manuals for RCA 25212


Summary of Contents for RCA 25212
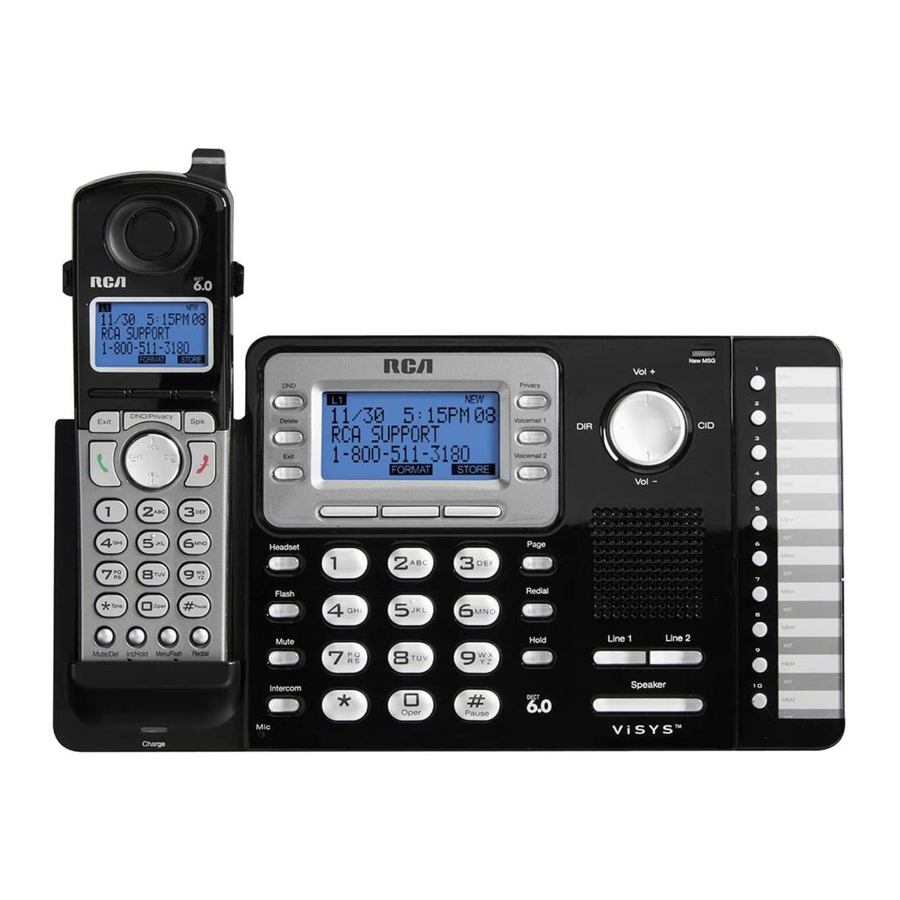
- Page 1 DECT 6.0 2-Line Cordless Intercom Speakerphone User’s Guide...
-
Page 2: Nformation
Important Information Equipment Approval Information Your telephone equipment is approved for connection to the Public Switched Telephone Network and is in compliance with parts 15 and 68, FCC Rules and Regulations and the Technical Requirements for Telephone Terminal Equipment published by ACTA. 1 Notification to the Local Telephone Company On the bottom of this equipment is a label indicating, among other information, the US number and Ringer Equivalence Number (REN) for... -
Page 3: Interference Information
Important Information 2 Rights of the Telephone Company Should your equipment cause trouble on your line which may harm the telephone network, the telephone company shall, where practicable, notify you that temporary discontinuance of service may be required. Where prior notice is not practicable and the circumstances warrant such action, the telephone company may temporarily discontinue service immediately. -
Page 4: L Icensing
Important Information Warning: The changes or modifications not expressly approved by the party responsible for compliance could void the user’s authority to operate the equipment. Licensing Licensed under US Patent 6,427,009. Hearing Aid Compatibility This telephone system meets FCC standards for Hearing Aid Compatibility. FCC RF Radiation Exposure Statement This equipment complies with FCC RF radiation exposure limits set forth for an uncontrolled environment. -
Page 5: Table Of Contents
Table of Contents ..... 2 WITCHING ETWEEN THE PEAKERPHONE QUIPMENT PPROVAL NFORMATION .... 22 ......3 ANDSET EADSET NTERFERENCE NFORMATION ..........4 ..........22 ICENSING ......22 ....... 4 ORDLESS ANDSET EARING OMPATIBILITY ..........23 FCC RF R ..4 ADIATION XPOSURE TATEMENT... -
Page 6: Telephone
Table of Contents TORING ECORD IN OUCH IALING ) ......30 APPLICABLE FOR BASE .... 30 EVIEWING HONE ECORDS ....31 DITING A HONE ECORD ....31 OPYING A HONE ECORD ..... 32 ELETING A HONE ECORD ....32 IALING A HONE ECORD IAL A PHONE BOOK RECORD WHILE IN... -
Page 8: Installation
Connections & Setup Installation Digital Security System Your cordless phone uses a digital security system to protect against false ringing, unauthorized access, and charges to your phone line. INSTALLATION NOTE: Some cordless telephones operate at frequencies that may cause or receive interference with nearby TVs, microwave ovens, and VCRs. -
Page 9: Handset Layout
Connections & Setup Handset Layout Visual Indicator display 3 Soft keys DND/Privacy (button) Exit (button) (Speaker button) Headset Jack VOL +/- (button) (buttons) (button) (button) Talk (button) #Pause (button) * Tone (button) Mute/Del Redial (button) (button) Int/Hold (button) Menu/Flash (button) -
Page 10: Base Layout
Connections & Setup Base Layout New message Indicate... -
Page 11: Installing The Phone
Telefield NA Inc.approved Nickel-metal Hydride (Ni-MH) battery model T-T104 (GP, 2.4V, 500mAh) , which is compatible with this unit. Class (Classe) 2 Power source... - Page 13 Connections & Setup 4. If you want to mount the telephone on the wall, you can plug the 2 lines such as the below drawing; Line 2 Line 1 -OR- Line 2 Line 1 -OR- Line 1 + 2...
-
Page 14: Programming The Phone
Sound Setting, Voice Mail... -
Page 15: Phone Setting
Programming the Telephone Phone Setting 1. Make sure your phone is OFF (not in Talk mode). 2. Press the Menu button on HS or the MENU soft key (left) on BS to go to the main menu. 3. Press VOL (+ or -) button to scroll to Phone Setting. 4. -
Page 16: Auto Answer ( 16 Auto Answer Intercom ( And Handset )
Programming the Telephone Auto Answer (only applicable for handset) This option allows you to pick up the handset from base to answer an incoming call without pressing the Talk/Spk/L1/L2 button. When it is set to off, this function is disabled in this handset. From the Phone Setting Menu: 1. -
Page 17: Remove Handset
Programming the Telephone Registration (only applicable to handset) A cordless handset will not operate until it is registered to the base. During the registration process, keep the handset near the base. Up to 10 cordless handsets can be registered to one base. NOTE: If a handset has not been registered to the base, then the screen displays “PRESS “REG”... -
Page 18: Programming The Telephone
“Saved” and then displays “Press “REG” to initiate registration” in the handset. Add Headset (only applicable for base) NOTE: This wireless headset option is only compatible with the RCA 25065RE1, 25265RE2 and 25270RE3 headsets. From the Phone Setting Menu: 1. Press the vol(- or +) button to scroll to Add Headset;... -
Page 19: Display Setting
Programming the Telephone From the Phone Setting Menu: 1. Press the VOL (+ or -) button to scroll to the Update HS List. 2. Press SELECT soft key. 3. The latest handset name list stored in the base will be sent to all registered handsets. -
Page 20: Ring Volume
Telephone Operation Ring Tone There are 8 tone levels for your selection. They are Melody 1 to 8 for line 1 and line 2 respectively. From the Sound Setting Menu: 1. Press the VOL (+ or -) button to scroll to the Ring Tone. 2. -
Page 21: Making Calls With The C Making Calls In The S ( From The Base )
2. Press SELECT Soft key VOL (- or +) button to toggle between Line 1 and Line 2 and 3. Use the press SELECT soft key to select. 4. Use the dial pad to enter the call-in access number for your voicemail. Press Delete button to backspace and delete numbers, if necessary. -
Page 22: Handset , And Headset Mode Base
Telephone Operation CAUTION: For servicing or replacement, you can purchase a suitable headset through service centre or retailer shop. Pre-dialing 1. With the phone idle, manually enter the telephone number. The screen displays the telephone number. 2. Press the DIAL soft key (on base only), Speaker button, Talk button (handset only), or Line 1 or Line 2 button to take a line, and then the telephone number will be dialed out. -
Page 23: Mute
Telephone Operation Mute To have a private, off-line conversation, use the Mute feature. The party on the other end of the line cannot hear you, but you can still hear them. 1. Press Mute button to activate the mute feature. NOTE: When using the mute feature on the base, the indicator will illuminate when the mute is activated. -
Page 24: Eviewing The Edial Umbers
Telephone Operation Reviewing the Redial Numbers Your phone records up to three previously dialed phone numbers. 1. When the phone is idle, press the Redial button. 2. Use the VOL (+ or -) button to view the last three previously dialed numbers. -
Page 25: Inger O N /Off And Ringer Vpeakerphone , Handset , And Hume
Telephone Operation Ringer On/Off and Ringer Volume 1. Make sure the phone is in idle mode. 2. Press the VOL (+ or -) button to activate the ringer Volume setting. Press Line1 or Line2 softkey to select the direct line which you want to set, then use the VOL (- or +) button to scroll to your selection. -
Page 26: Line 2 + 2 Extension )
Telephone Operation Four-way conference call (Line 1 + Line 2 + 2 extension): 1. Once the base unit or handset has both Line 1 and 2 on hold, press the Intercom button and then select the desired handset or base to intercom. -
Page 27: Uto Standby
Caller ID Auto Standby If you place the handset in the cradle while the handset is off the hook (during a call), the call is automatically disconnected. Caller ID (CID) IMPORTANT: In order to use this unit’s Caller ID features, you must subscribe to either the standard Name/Number Caller ID Service or Call Waiting Caller ID Service. -
Page 28: Memory
Caller ID Saving a CID Record to Phone Book Memory 1. While viewing a CID record, press the STORE soft key. 2. The name displays on the screen. You can edit it. After editing, press the SAVE soft key. 3. The number displays on the screen. You can edit it. After editing, press the SAVE soft key. -
Page 29: Area Code
Memory/Phone Book Number of digits Explanation Example 7-digits: 7-digit telephone number (i.e.555-5555) 10-digits: 3-digit area code +7-digit telephone (i.e.425-555-5555) number 11-digits: long distance code 1 (i.e. 1-425-555-5555) +3-digit area code +7-digit telephone number 4. To dial the displayed number, select a Line or press Talk, Spk, or Headset button. -
Page 30: Book Record
Memory/Phone Book Adding Phone Book Entries 1. Make sure the phone is OFF (not in Talk mode). 2. Press the DIR button. 3. Press the NEW soft key. The screen displays “Enter Name”. Please refer to section “Handset Name” for name editing method. 4. -
Page 31: Editing A Phone Book Record
Memory/Phone Book Editing a Phone Book Record 1. When reviewing the phone book records, use the VOL (+ or -) button or the number keys to scroll to the desired record. 2. Press Menu soft key and then use VOL(- or +) to select Edit Entry. You may now change the name, if desired. -
Page 32: Deleting A Phone Book Record
Memory/Phone Book Deleting a Phone Book Record VOL (+ or -) 1. When reviewing the phone book records list, use the button or the number keys to scroll to the desired record. 2. Press the delete key on the phone to delete the record. 3. -
Page 33: Voice Mail System
Voice Mail System Voice Mail System Provided your phone company offers voice messaging service and you subscribe to it, the NEW MSG indicator on the base and the Visual Indicator on the top of the handset flashes to indicate a message is waiting. The screen displays “L1 MSG Waiting”... -
Page 34: Programming The Voice Mail Numbers
Voice Mail System Programming the Voice mail numbers 1. Make sure your phone is OFF (not in talk mode). 2. Press STORE soft key on base. The screen displays “SELECT BUTTON LOCATION”. 3. Press one of the two Voice mail buttons. 4. -
Page 35: Changing The Battery
only the Telefield NA Inc. approved Nickel-metal Hydride (Ni- MH) battery model T-T104, which is compatible with this... -
Page 36: Display Messages
Display Messages Display Messages The following messages show the status of the phone, provides Caller ID information, or helps you set up and use your phone. DELETE ALL? Prompt asking if you want to erase all records. DELETE? Prompt asking if you want to erase the current record. ENTER NAME Prompt telling you to enter a name. -
Page 37: Troubleshooting Guide
Troubleshooting Guide Troubleshooting Guide Telephone Solutions No dial tone • Check or repeat installation steps: Make sure the base power cord is connected to a working electrical outlet. Make sure the telephone line cord is connected to the base and the wall jack. -
Page 38: Caller Id Solutions
Troubleshooting Guide “Out of Range...” is displayed on the screen • Move the handset closer to the base. • Make sure the base power cord is connected to a working electrical outlet. Date/Time setting is restored to default setting • May be caused by power failure. Set Date/Time again. Caller ID Solutions No Display •... -
Page 39: General Product Care
Troubleshooting Guide General Product Care To keep your unit working and looking good, follow these guidelines: • Avoid dropping the handset, as well as other rough treatment to the phone. • Clean the phone with a soft cloth. • Never use strong cleaning agents, paint thinner, abrasive powder, alcohol, or other chemical products to clean the unit. -
Page 40: Warranty Assistance
’s authority to operate this product. -
Page 41: Limited Warranty
• Contact RCA Customer Care at (800) 511-3180. Our representatives will help you troubleshoot and diagnose the problem. As you may be asked to disconnect your RCA telephone from it's power source, you must call from another telephone. If the issue cannot be resolved by our Customer Care Team, you will be issued an RMA (Return Merchandise Authorization) number and be given instructions on how to submit your proof-of-purchase paperwork and where to send your defective merchandise. - Page 42 TELEFIELD NA INC. TELEFIELD NA INC. OREGON How state law relates to this warranty: • Some states do not allow the exclusion nor limitation of incidental or consequential damages, or limitations on how long an implied warranty lasts so the above limitations or exclusions may not apply to you. •...
-
Page 43: I Nstalling The P Hone
Index FCC RF Radiation Exposure Statement 4 Adding Phone Book Entries Answering a Call Flash 23 Answering an Intercom Call Four-way conference call (Line 1 + Line 2 + 2 extension): Area Code (only applicable for base) 16 Auto Answer (only applicable for handset) General Product Care Auto Answer Intercom (applicable for... - Page 44 Index One-Touch Intercom Telephone Jack Requirements Telephone Operation Telephone Solutions Page 26 Three-way conference call by an Parts Checklist intercom call: Phone Setting Three-way conference call with two Pre-dialing lines: Programming Functions To listen to your voice mail messages Programming the Phone from the base unit in idle mode.
- Page 46 Please do not send any products to the Oregon address listed in this Telefield NA Inc. 4915 SW Griffith DR. #205 Beaverton, OR 97005 RCA is a trademark of RCA Trademark Management S.A., used under license. © 2010. All rights reserved. Model 25212 T0000109 (REV.0 E)
Need help?
Do you have a question about the 25212 and is the answer not in the manual?
Questions and answers