Table of Contents
Advertisement
Advertisement
Table of Contents

Related Manuals for RCA 25214RE1


Summary of Contents for RCA 25214RE1
- Page 1 2-Line Speakerphone V i S Y S ™ V i S Y S User’s Guide 25214...
-
Page 3: Equipment Approval Information
The REN is useful in determining the number of devices you may connect to your telephone line and still have all of these devices ring when your telephone number is called. In most (but not all) areas, the sum of the RENs of all devices connected to one line should not exceed 5. -
Page 4: Interference Information
FCC Rules and Regulations. If these changes are expected to affect the use or performance of your telephone equipment, the telephone company must give you adequate notice, in writing, to allow you to maintain uninterrupted service. -
Page 5: Table Of Contents
Table of Contents Equipment Approval Information Interference Information Licensing Hearing Aid Compatibility Introduction Parts Checklist Telephone Jack Requirements Important Installation Guidelines Phone Layout Installing the Phone Programming the Phone - Standby Screen - Programming Functions - Voice Mail - Call VM... -
Page 6: Introduction
Introduction CAUTION: When using telephone equipment, there are basic safety instructions that should always be followed. Refer to the IMPORTANT SAFETY INSTRUCTIONS provided with this product and save them for future reference. Parts Checklist Make sure your package includes the following items:... -
Page 7: Telephone Jack Requirements
• Avoid areas of excessive dust, moisture and low temperature. • Never install telephone wiring during a lightning storm • Never install telephone jacks in wet locations unless the jack is specifically designed for wet locations. • Never touch non-insulated telephone wires or terminals, unless the telephone line has been disconnected at the network interface. -
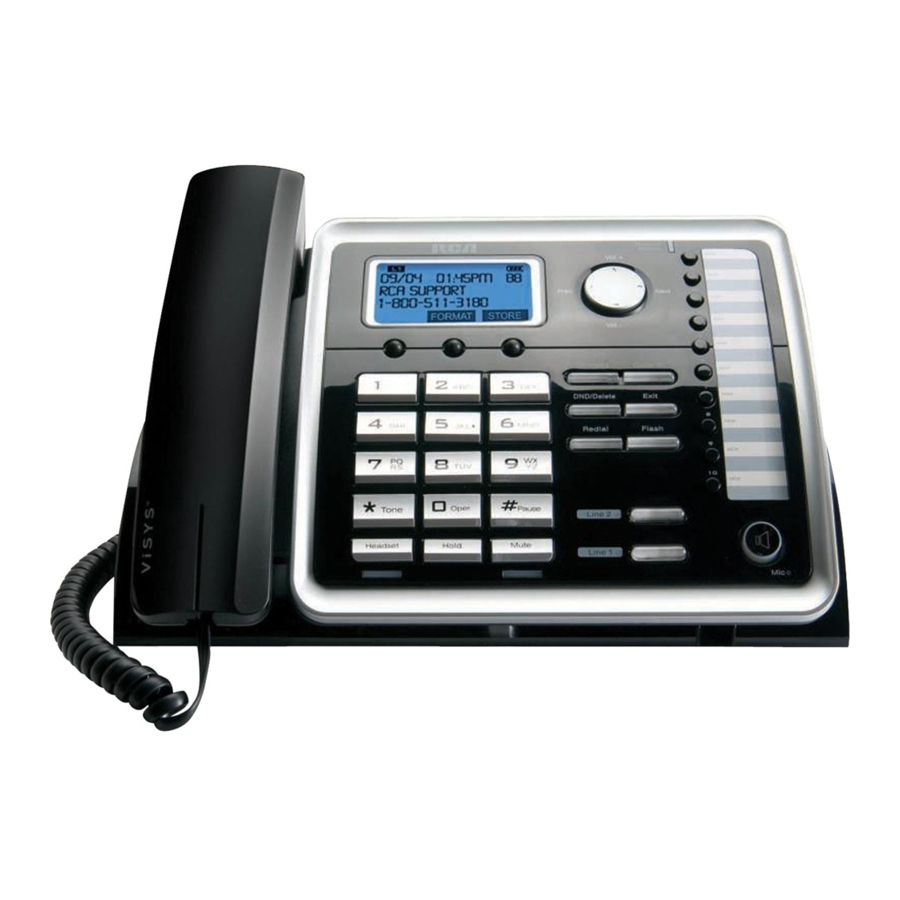
Page 8: Phone Layout
Phone Layout Display 3 Soft Keys Tone Volume +/- Message Waiting Prev Key Headset, Hold, Pause Mute Next Key One-Touch Memory Log Directory, Caller ID DND/Delete, Exit Redial, Flash Line1, Speakerphone Line 2... -
Page 9: Installing The Phone
The phone may be connected by a single two-line cable or two single line cables. 1. Choose an area near an electrical outlet and a telephone wall jack (RJ11C), and place your cordless telephone on a level surface, such as a desktop or tabletop, or you may mount it on the wall. - Page 10 If you have Line 1 and Line 2 wired into one wall jack in your home or office, you can use one of the supplied telephone line cords to connect from the wall jack to the Line 1 + 2 jack on the back of the phone as shown below.
- Page 11 -OR- Line 1 Line 2 -OR- Line 1 & 2 6. Connect the handset cord: Connect one end of the coiled handset cord to the jack on the side of the base and the other end into the jack in the handset, and place the handset in the cradle.
-
Page 12: Programming The Phone
“Phone Setting- Date /Time” to set the clock. If you subscribe to Caller ID services from your telephone service provider, your clock will be set automatically each time you receive a phone call. However, you will need to set the year by going to the Date/Time option in the Phone Settings Menu. -
Page 13: Date/Time
Delete button to backspace and delete numbers, if necessary. 12:00AM 01/01/10) -
Page 14: Set Format
Note: The line 1 default ring tone is melody 1 and the line 2 default is melody 2. -
Page 15: Key Tone
Key Tone From the Sound Settings Menu: 1. Use the VOL (- or +) button to scroll to Key Tone. 2. Press the OK Soft key. 3. Use the VOL (- or +) button to scroll to select either On or Off. 4. -
Page 16: Display Setting
Warning: Pressing OK will return phone to its default state. This will reset date/time and all menu settings to default. -
Page 17: Telephone Operation
NOTE: Headset performance may vary widely depending on the quality of the headset. Pre-Dialing 1. With the phone idle, manually enter the telephone number. 2. Press the Speaker button or line1 or line 2 button to take a line, or pick up the corded handset (on the base cradle) and then the telephone number will be dialed out. -
Page 18: Answering A Call
This feature is set at individual telephones to disable (silence) an incoming ring signal. When there is an incoming call , the status indicators will function, but the phone will not ring. -
Page 19: Flash
Flash If you subscribe to Call Waiting service from your telephone service provider and you receive an incoming call on while a call is currently active on the same line, you will hear an audible tone to indicate another call is waiting. -
Page 20: Ringer On/Off And Ringer Volume
6. You can edit the telephone number by using the Delete button and number keys. -
Page 21: Caller Id (Cid)
IMPORTANT: In order to use this unit’s Caller ID features, you must subscribe to Caller ID services from your telephone service provider. To know who is calling while you are currently on an active call on the same line, you must subscribe to Call Waiting Caller ID Service. -
Page 22: Deleting A Cid Record
11-digits: 4. To dial the displayed number, select a Line or press the Speaker or Headset button or pick up the handset from the base. Explanation 7-digit telephone number 3-digit area code +7-digit telephone number Long distance code 1 +3-digit area code... -
Page 23: Call Waiting Caller Id
NOTE: Press the Delete button will delete the last number or character during editing. -
Page 26: Dialing A One-Touch/Memory Record
while in idle mode: 1. Make sure your phone is in idle mode. (Not in Talk mode) 2. Press the One-Touch/Memory Log button to select the desired record. 3. Press the speaker or line 1/2 or pick up the handset on the base. The number dials automatically. -
Page 27: Backup Battery Operation
No dial tone • Check or repeat installation steps. • Make sure the base power cord is connected to a working electrical outlet. Make sure the telephone line cord is connected to the base and the wall jack. • Connect another phone to the same jack. If it doesn’t work, the problem might be your wiring or your local service. -
Page 28: Warranty Assistance
If trouble is experienced with this equipment, for warranty information, please contact customer service at 1-800-511-3180. If the equipment is causing harm to the telephone network, the telephone company may require that you disconnect the equipment until the problem is resolved. -
Page 29: Product Registration
• Insure your shipment for loss or damage. Telefield NA Inc. accepts no liability in case of damage or loss. • A new unit will be shipped to you freight prepaid. What your warranty does not cover: • Customer instruction. (Your Instruction Book provides information regarding operating instructions and user controls. - Page 30 • This warranty does not apply. Contact your dealer for warranty information. Telefield NA Inc. 4915 SW Griffith Dr., Suite 205 Beaverton, OR 97005 Visit the RCA website: www.rca4business.com RCA is a trademark of RCA Trademark Management S.A., used under license. ©2009. All rights reserved. Model 25214 T0009061 (Rev00) 09-50 Printed in China 25214 Spanish Instruction Book available at www.rca4business.com...
Need help?
Do you have a question about the 25214RE1 and is the answer not in the manual?
Questions and answers