Harman XXV Installation & Operating Manual
Space heating appliance fired by wood pellets
Hide thumbs
Also See for Harman XXV:
- Owner's manual (44 pages) ,
- Owners manual care and operation (35 pages) ,
- Installation & operating manual (32 pages)
Table of Contents
Advertisement
Quick Links
XXV Pellet Stove Owners Manual
PleaSe read thiS entire Manual beFOre YOu inStall and uSe YOur new rOOM heater. Failure
tO FOllOw inStructiOnS MaY reSult in PrOPertY daMage, bOdilY injurY, Or eVen death.
FOr uSe in the u.S. and canada. Suitable FOr inStallatiOn in MObile hOMeS.
iF thiS harMan StOVe iS nOt PrOPerlY inStalled, a hOuSe Fire MaY reSult. FOr YOur SaFetY,
FOllOw inStallatiOn directiOnS.
cOntact lOcal building Or Fire OFFicialS abOut reStrictiOnS and inStallatiOn inSPectiOn
reQuireMentS in YOur area.
cOntact YOur lOcal authOritY (Such aS MuniciPal building dePartMent, Fire dePartMent,
Fire PreVentiOn bureau, etc.) tO deterMine the need FOr a PerMit.
cette guide d'utiliSatiOn eSt diSPOnible en FrancaiS. chez VOtre cOnceSSiOnnaire de
harMan hOMe heating.
installation & Operating Manual
SaFetY nOtice
SaVe theSe inStructiOnS
r11
R1
# 3-90-00684
Advertisement
Table of Contents

Related Manuals for Harman Harman XXV


Summary of Contents for Harman Harman XXV
-
Page 1: Safety Notice
installation & Operating Manual XXV Pellet Stove Owners Manual SaFetY nOtice PleaSe read thiS entire Manual beFOre YOu inStall and uSe YOur new rOOM heater. Failure tO FOllOw inStructiOnS MaY reSult in PrOPertY daMage, bOdilY injurY, Or eVen death. FOr uSe in the u.S. and canada. Suitable FOr inStallatiOn in MObile hOMeS. iF thiS harMan StOVe iS nOt PrOPerlY inStalled, a hOuSe Fire MaY reSult. - Page 3 Fuel Specifications Fuel and Fuel Storage Size Pellet fuel quality can fluctuate from manufacturer to • Pellets are either 1/4 inch or 5/16 inch (6-8mm) in manufacturer, and even from bag to bag. diameter Hearth & Home Technologies recommends using only •...
- Page 4 135-S-14c-6.2 FOR USE WITH PELLETIZED WOOD FUEL OR CORN/PELLET MIXTURE ONLY. CONSULT MANUFACTURER’S INSTRUCTIONS. FLOOR PROTECTION: CANADA Sides (A)* 6” /15cm 8”/20cm Back (B) 0” 0” Front (C)* 6”/15cm 18”/46cm *Measured from window opening. PROTECTION DU PLANCHER: CANADA (A)* 6” /15cm 8”/20cm 0”...
-
Page 5: Table Of Contents
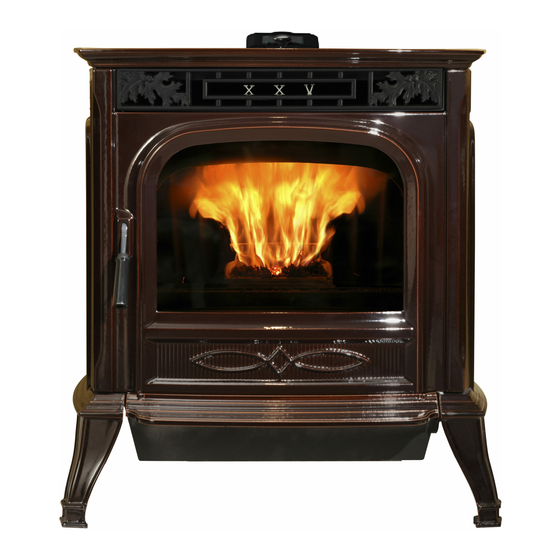
Thank you for purchasing the Harman XXV Pellet Stove. The Harman XXV Pellet Stove is the culmination of elegance, convenience, functionality and dependability The XXV was thoughtfully designed to look captivating in every home. Intricately detailed oak leaves express the magnitude of craftsmanship that goes into making this stove a masterpiece. -
Page 6: Assembly & Installation
iMPOrtant nOteS Fuel should be stored in a cool dry place, well cautiOn away from the room heater. do not store fuel keeP cOMbuStible MaterialS (Such within the installation clearance area or the space required for loading and/or ash removal. aS graSS, leaVeS, etc.) at leaSt 3 Feet awaY FrOM the Flue Outlet dO nOt use makeshift parts or other... -
Page 7: Installation
installation installing Place the stove on a non-combustible floor protector that extends a minimum of 6 inches 6.25" to the front (152mm), 6 inches to the sides 3" (152mm) and flush with the rear of the hopper. Front and side floor protection measurements are made from the firebox or window opening. -
Page 8: Venting
Venting requirements for terminating the Venting I. The clearance to service regulator vent outlet must WARNING: Venting terminals must not be recessed be a minimum of 6 feet. into a wall or siding. J. The clearance to a non-mechanical air supply inlet NOTE: Only the Harman Direct Vent Wall Pass-through to the building or the combustion air inlet to any other (part # 1-00-677077) or PL listed vent pipe wall pass-... - Page 9 Venting Venting iMPOrtant nOtice A combustion blower is used to extract the Approved Pellet Vent Pipe Must Be Used unless combustion gases from the firebox. This causes a installing with the optional top 6" Flue Adapter. negative pressure in the firebox and a positive pres- If using 6"...
-
Page 10: Outside Air
Venting avoiding Smoke and Odors negative Pressure, Shut-down, and Power Failure: Outside air flex pipe To reduce the probability of back-drafting or burn- goes here. back in the pellet burning appliance during power failure or shut-down conditions, the stove must be able to draft naturally without exhaust blower op- eration. - Page 11 Venting nOtice use only components specified by the venting manufacturer or the appliance manufacturer, including the proper wall pass-through and termination cap. the use of mis-matched or makeshift venting components may cause exhaust spillage and/or increase fire risk. #1 Preferred method This method provides excellent venting for nor- mal operation and allows the stove to be installed closest to the wall.
- Page 12 Venting #3 installing into an existing chimney This method provides excellent venting for nor- mal operation. This method also provides natural draft in the event of a power failure. If the chimney condition is questionable* you may want to install a liner as in method #6.
- Page 13 Venting #5 installing into an existing fireplace chimney (uS and canada) This method can be done with or without a flue liner. Without a liner, the damper area must be sealed off with a steel plate. Kaowool, mineral wool or an equivalent non-combustible insulation is recommend- ed on top of the steel plate to minimize condensation.
- Page 14 Venting #7 installing into an existing chimney using 3" pellet vent in combination with 6" or 8" single or double wall stove pipe. This method allows the installer to use 6" or 8" single and double wall stove pipe ( sealed seam not snap lock ) and an existing masonry or class A chimney to vent the stove.
-
Page 15: Vent Configurations
Venting Minimum flue vent configuration 12" min. It is recommended that outside wall to outlet air be installed with this venting configuration to reduce smoke and creosote smell in the room in the event of power failure. Fig. 18 Fig. 19 Vent configurations: To reduce probability of reverse drafting during shut-down conditions, Hearth &... -
Page 16: Esp Control
autOMatic ignitiOn eSP cOntrOl Dealer Diagnostic Port Temp dial For dealer maintenance Allows you to adjust the only. Requires special DDM room temperature in monitor supplied to Harman Room Temp Mode using Dealers exclusively. the outer scale marked D i s t r i b u t i o n B l o w e r in degrees Fahrenheit. -
Page 17: Low Draft Voltage Adjustment
low draft Voltage adjustment Combustion Motor Speed Control Low draft only set point. The small straight screwdriver slot is plastic; therefore, the unit can be adjusted while Draft Meter Draft Meter bolt hole location in operation. is just behind the left front leg, near the top of the ash pan area. -
Page 18: Automatic Operation
autOMatic ignitiOn/OPeratiOn The XXV is a fully automatic stove that features two room temperature Mode operating modes; Stove temperature Mode and room temperature Mode. In Stove Temperature Mode, you select a burn rate and the stove will remain at the same burn rate regardless of the room temperature. - Page 19 autOMatic ignitiOn/OPeratiOn Stove temperature Mode In the Stove Temperature Mode and with the igniter toggle switch in the Auto position, the stove will light automatically and can be adjusted to the desired setting using the same temperature control dial as is used in the Room Temperature Mode.
- Page 20 autOMatic Start uP Starting Fire igniter Switch to "autO" (down position) Make sure the unit is plugged into a 120 VAC, 60 HZ electrical source. The power light should be the only light lit. to avoid unwanted smoke, be sure there is no See Hint #7.
-
Page 21: Manual Operation
Manual ignitiOn/OPeratiOn The XXV Pellet Stove is capable of manual operation. This also allows the opera- tor to manually control operation during an emergency (i.e. igniter failure, or when using certain generators.) The unit can be switched between "AUTO" and "MANUAL" at any time during operation. - Page 22 Manual Start uP Starting Fire igniter Switch to "Manual" (up position) Fig. 27 Make sure the unit is plugged into a 120 VAC, 60 HZ electrical source. The power light should be the only light lit. Fig. 26 to avoid unwanted smoke, be sure there is no See Hint #7.
-
Page 23: Room Sensor
room Sensor installation room Sensor installation Fig. 31 The room sensor is a small temperature sensor on the end of a 60" wire. This sensor is installed much like a standard wall thermostat. Because it is so small, it can be hidden along the trim of a door- way or even up the leg of a coffee table. -
Page 24: Maintenance
Maintenance removing ashes: Fuel quality and moisture content will dictate how often it will be necessary to empty the ash pan. disposal of ashes ashes should be placed in a metal container with a tight fitting lid. the closed container of ashes should be placed on a noncombustible floor or on the ground, well away from all combustible materials, pending final disposal. - Page 25 Maintenance 6. Remove the ash pan and dispose of ashes in an ap- proved manner, according to local codes. 7. Remove the combustion blower by loosening the 3 wing nuts, twisting the combustion blower mount plate counterclockwise to unlock, and pulling the blower out.
-
Page 26: Burn Pot Cleaning And Maintenance
Maintenance - burn Pot burn Pot cleaning and Maintenance 1. Scrape the top holed surface and sides of the burn pot. (Fig 39) It is not necessary to completely remove all loose material from the burn pot. The excess will be pushed out during the next use. - Page 27 Maintenance Pellet fines will accumulate in the feeder body over Two 5/16" socket hex screws on each side. a period of time; therefore, a yearly inspection and cleaning of this must be performed. To clean out fines: 1. Remove right rear cover panel. 2.
-
Page 28: Options
Options XXV top Flue Option Floor Protector The Steel Floor Protector measures 32 inches The Top Flue option attaches to the exhaust on wide by 32 inches deep. This is the minimum size the rear of the stove, and extends it to the top for floor protection (US) permitted with this unit. -
Page 29: Trouble Shooting
trouble-Shooting StOVe dOeS nOt Feed SMOke iS ViSible cOMing Out OF Vent 1. No fuel in hopper. 1. Air-fuel ratio is too rich. 2. Firebox draft may be too low for sensing switch in A. Feed rate too high. B. Draft too low caused by a gasket leak. feeder circuit to operate. -
Page 30: Specifications
Specifications 26 1/2" 28 3/8" 24 1/4" 29" 4" weight 375 lbs. blower 150 cfm Feed rate approx. 1lb. to 5.75 lbs/hr. hopper capacity 65 lbs Fuel wood Pellets or corn/Pellet mixture Flue Size 3 inch or optional 6" top exit Outside air Size 2 3/8"... -
Page 31: Power Failure / Back-Up
addendum Minimizing Smoke during loss of Power using battery back-up harman strongly recommends installing battery back-up to minimize entry of smoke into the room in the event of power loss. Your pellet/biomass burning appliance relies on a combustion blower to remove exhaust. A power failure will cause the combustion blower to stop. -
Page 34: Corn Burning Info
Addendum for Burning Corn and Pellet Fuel Mixture Harman pellet burning, free-standing stoves and inserts have been tested to ASTM E1509 for burning shelled corn in a mixture with wood pellets. The listing approves up to a 50% corn and 50% pellet mixture. Different mixtures of corn will have distinctively different burn characteristics depending upon moisture content and variety. -
Page 35: Service Parts List
XXV Pellet Stove Service Parts beginning Manufacturing date: n/a Pellet Stove ending Manufacturing date: active 1-90-00677-12 (Forest green), 1-90-00677-1 (black), 1-90-00677-4 (Metallic blue), 1-90-00677-14 (Majolica brown), 1-90-00677-2 (charcoal), 1-90-00677-5 (honey glo), 1-90-00677-19 (bronze) 1-90-00677-3 (goldenfi re), 1-90-00677-10 (Mojave red), 1-90-00025-2 (25th anniversary edition) 39 &... - Page 36 XXV Pellet Stove Service Parts beginning Manufacturing date: n/a ending Manufacturing date: active IMPORTANT: THIS IS DATED INFORMATION. When requesting service or replacement Stocked parts for your appliance please provide model number and serial number. All parts listed in this manual may be ordered from an authorized dealer. at depot iteM deScriPtiOn...
- Page 37 XXV Pellet Stove Service Parts beginning Manufacturing date: n/a ending Manufacturing date: active IMPORTANT: THIS IS DATED INFORMATION. When requesting service or replacement Stocked parts for your appliance please provide model number and serial number. All parts listed in this manual may be ordered from an authorized dealer. at depot iteM deScriPtiOn...
- Page 38 XXV Pellet Stove Service Parts beginning Manufacturing date: n/a ending Manufacturing date: active #39 Pre Serial number 12826 Feeder assembly 39.1 39.2 39.13 39.3 39.4 39.12 39.11 39.10 39.9 39.7 39.6 39.5 39.8 IMPORTANT: THIS IS DATED INFORMATION. When requesting service or replacement Stocked parts for your appliance please provide model number and serial number.
- Page 39 XXV Pellet Stove Service Parts beginning Manufacturing date: n/a ending Manufacturing date: active #40 Post Serial number 12826 Feeder assembly 40.1 40.15 40.12 40.16 40.14 40.2 40.13 40.3 40.11 40.10 40.9 40.4 40.5 40.8 40.7 40.6 IMPORTANT: THIS IS DATED INFORMATION. When requesting service or replacement Stocked parts for your appliance please provide model number and serial number.
- Page 40 XXV Pellet Stove Service Parts beginning Manufacturing date: n/a ending Manufacturing date: active IMPORTANT: THIS IS DATED INFORMATION. When requesting service or replacement Stocked parts for your appliance please provide model number and serial number. All parts listed in this manual may be ordered from an authorized dealer. at depot iteM deScriPtiOn...
- Page 41 Service & Maintenance log date Of Service Performed by description Of Service XXV Pellet Stove...
- Page 42 Service & Maintenance log date Of Service Performed by description Of Service XXV Pellet Stove...
- Page 44 Proudly Printed On 100% Recycled Paper...
Need help?
Do you have a question about the Harman XXV and is the answer not in the manual?
Questions and answers