
Related Manuals for American Audio VMS2


Summary of Contents for American Audio VMS2
- Page 1 Professional Digital Producer E A T U R I N G ©American Audio® - www.americanaudio.eu VMS2™ User Manual Page 1...
- Page 2 ©American Audio® - www.americanaudio.eu VMS2™ User Manual Page 2...
- Page 3 Please visit one of the following websites to view and download the VMS2™ MIDI table chart: www.americanaudio.us www.americanaudio.eu Please Note: All specifications and improvements to and in the design of this unit and this manual are subject to change at any time without any prior written or published noticed.
-
Page 4: Table Of Contents
12.1 Player Front ........................20 12.2 Front Panel ........................24 12.3 Rear Panel ........................25 Audio Interface Mode ....................27 13.1 4 Out Mode ........................27 MIDI Latency Modes ..................... 28 ©American Audio® - www.americanaudio.eu VMS2™ User Manual Page 4... - Page 5 EQ Modes ........................29 Firmware Update ......................30 Computer Connection ....................32 17.1 Connecting the VMS2™ to your PC ................32 Setup ..........................33 Cleaning ......................... 34 Crossfader Replacement ....................35 20.1 Replacing the Crossfader ....................35 ROHS – A Contribution to the Conservation of Environment ........36 WEEE –...
-
Page 6: Electrical Safety Precautions
To avoid electric shock, do not open the top cover when the unit is plugged in. If problems occur with the unit, call your local American Audio® dealer. Do not place metal objects or spill liquid inside the unit. Electric shock or malfunction may occur. - Page 7 41˚- 95˚F or 5˚C - 35˚C. WARNING: TO PREVENT FIRE OR SHOCK HAZARD, DO NOT EXPOSE THIS DEVICE TO WATER OR MOISTURE! ©American Audio® - www.americanaudio.eu VMS2™ User Manual Page 7...
-
Page 8: Important Safety Precautions
Power Sources – This product should be operated only from the type of power source indicated on the marking label. If you are not sure of the type of power supply to your home, consult your product dealer or local power company. ©American Audio® - www.americanaudio.eu VMS2™ User Manual Page 8... - Page 9 Power Lines – An outside antenna system should not be located in the vicinity of overhead power lines or other electric light or power circuits, or where it can fall into such power lines ©American Audio® - www.americanaudio.eu VMS2™ User Manual Page 9...
- Page 10 Wall or Ceiling Mounting – The product should not be mounted to a wall or ceiling. Heat – The product should be situated away from heat sources such as radiators, heat registers, stoves, or other products (including amplifiers) that produce heat. ©American Audio® - www.americanaudio.eu VMS2™ User Manual Page 10...
-
Page 11: Further Safety Instructions
Objects have fallen, or liquid has been spilled into the unit. The unit has been exposed to rain or water. The unit does not appear to operate normally or exhibits a marked change in performance. ©American Audio® - www.americanaudio.eu VMS2™ User Manual Page 11... - Page 12 Model No. ____________________________________________________________ Serial No. ____________________________________________________________ Purchase Notes ____________________________________________________________ Date of Purchase ____________________________________________________________ Dealer Name ____________________________________________________________ Dealer Address _____________________________________________________________ ___________________________________________________________________________ ___________________________________________________________________________ Dealer Phone ______________________________________________________________ ©American Audio® - www.americanaudio.eu VMS2™ User Manual Page 12...
-
Page 13: Unpacking
5. U NPACKING Every VMS2™ has been thoroughly tested and has been shipped in perfect operating condition. Carefully check the shipping carton for damage that may have occurred during shipping. If the carton appears to be damaged, carefully inspect your device for any damage and be sure all equipment necessary to operate the device has arrived intact. -
Page 14: Introduction
USTOMER UPPORT American Audio® provides a toll free customer support line to provide set up help and to answer any questions, should you encounter problems during your initial set-up or operation. You may also visit us on the web at www.AmericanAudio.us for any comments or suggestions. -
Page 15: Set-Up Precautions
Keep the unit out of direct sunlight and away from heaters. Operate the device only after becoming familiar with its functions. Do not permit operation by persons not qualified for operating the unit. Most damages are the result of unprofessional operation! ©American Audio® - www.americanaudio.eu VMS2™ User Manual Page 15... -
Page 16: Main Features
Crossfader Assign, Curve, & Reverse Durable Touch Sensitive High-Res Jog Wheel Pitch Lock One Mic Combo Jack Pitch Bend Innofader Compatible 82 MIDI Controls USB/Analog Source Selects on Each MIDILOG ™ Channel ©American Audio® - www.americanaudio.eu VMS2™ User Manual Page 16... -
Page 17: Minimum System Requirements
1024_768 SVGA Video 2 GIG RAM (Vista) 40MB Free on the Hard-Drive (Recommended 2000MB) DirectX 9.0 9.2 M EQUIREMENTS Mac OS X 10.5 PPC/Intel, 10.5.6 Intel, or 10.6 Intel 1.86GHz 2GB RAM ©American Audio® - www.americanaudio.eu VMS2™ User Manual Page 17... -
Page 18: Set-Up
UDIO ONNECTIONS Use RCA or XLR cables to connect the VMS2™ outputs to powered speakers or an amplifier. Never connect this player's output to a mixers Phono inputs. Caution: To avoid severe damage to the unit, be sure the power is off when making connections to the unit. -
Page 19: Software And Asio Driver Installation
The ASIO Driver installation will open during the Virtual DJ installation. PC users, follow the screen prompts for proper installation. Mac install is automatic after clicking on the *.dmg file. ©American Audio® - www.americanaudio.eu VMS2™ User Manual Page 19... -
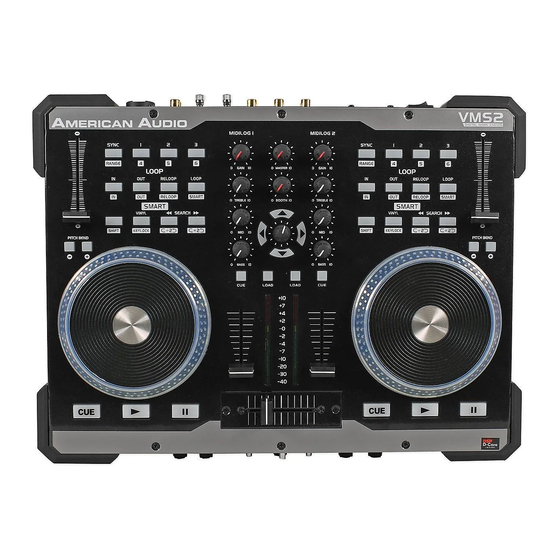
Page 20: General Functions And Controls
(3) Cue Button – These buttons are used to activate a channels‘ Cue mode. The Cue LED will glow when a channels‘ Cue mode is activated. The Cue function sends a channels‘ incoming signal to the headphones. The cue level is adjusted by the Cue Level Knob. ©American Audio® - www.americanaudio.eu VMS2™ User Manual Page 20... - Page 21 ©American Audio® - www.americanaudio.eu VMS2™ User Manual Page 21...
- Page 22 When no Cue sources are selected, these indicate the volume level on the Master Output. When one or more Cue sources are selected, these indicate the volume levels on all of the Cue sources combined. At power-on, these indicate the VMS2™ firmware ©American Audio® - www.americanaudio.eu VMS2™...
- Page 23 (17) Jog Wheel – This wheel has three functions: Attention: Make sure that nothing is touching or resting on the jog wheels when you power on the VMS2™. The wheel works as a pitch bend during playback. Turning the wheel clockwise can increase the pitch percentage up to 100%, and turning the wheel in the counter- clockwise direction can decrease the pitch percentage down to -100%.
-
Page 24: Front Panel
(24-25) IXER ONTROLS The VMS2™ can be used as a MIDI control, a standalone mixer, or in combination giving you maximum control of your music collection whether it be on vinyl, digital CD's or Computer DJ software (Virtual DJ included). -
Page 25: Rear Panel
12.3 R ANEL (30) Power Switch – This switch will turn the VMS2™ on and off. When the unit is powered on, the power indicator LED will glow. Attention: Make sure that nothing is touching or resting on the jog wheels when you power on the VMS2™. - Page 26 (38) USB Port – Connect here to your PC for MIDI interface and USB interface (audio ins and outs). (39) Power Supply – The power supply is not required, but the headphones may be underpowered, and there is an increased chance of audio distortion. ©American Audio® - www.americanaudio.eu VMS2™ User Manual Page 26...
-
Page 27: Audio Interface Mode
13. A UDIO NTERFACE 13.1 4 O The VMS2™ can act like a 4x4 audio interface. Your USB audio is routed through the VMS2™'s MIDILOG Ch. #1 and #2 inputs. If you wish to route the inputs via USB for software play through or Timecode control, set your desired VMS2™... -
Page 28: Midi Latency Modes
10 milliseconds, this is the default mode. Turbo mode has a MIDI latency of 1 millisecond. To set the VMS2™ to Turbo mode, do as follows: Before powering on, press and hold the Cue, Play, and Pause buttons on the left side. -
Page 29: American Audio® - Www.americanaudio.eu Vms2™ User Manual
"0" (See picture). Note: Beware that mapping the MIDI on the EQ knobs in this mode will cause your audio to process the EQ from the software and VMS2™ EQ. Post EQ is for users who prefer using the EQ from their software. -
Page 30: Firmware Update
Firmware update utility. It is necessary to install this. To update your VMS2™: Please check your computer audio settings and ensure that the VMS2™ is not set as a default playback, playback recording, or MIDI device. This will interfere with the update and software applications. - Page 31 You may receive some Error windows like you see below. Select the proper device in device select window. Please check your computer audio setting and ensure that the VMS2™ is not set as a default playback, playback recording, or MIDI device. This will interfere with the update and software applications.
-
Page 32: Computer Connection
Connect the VMS2™ to your PC by using the USB ports located on the rear of the VMS2™ and your PC. Connect the supplied USB cable to the USB port on the rear of the VMS2™, and the other end connects to the USB port on your computer. -
Page 33: Setup
18. S ETUP ©American Audio® - www.americanaudio.eu VMS2™ User Manual Page 33... -
Page 34: Cleaning
Cleaning should be carried out every 30-60 days to prevent heavy built up. Always be sure to dry all parts completely before plugging the device in. Cleaning frequency depends on the environment in which the device operates (i.e. smoke, fog residue, dust, dew). ©American Audio® - www.americanaudio.eu VMS2™ User Manual Page 34... -
Page 35: Crossfader Replacement
(part# Z-FF-8). If you wish to upgrade to an Innofader, please order the Innofader model which comes with the VMS2™ plate cover to protect the Innofader from damage during handling of the VMS2™. If you upgrade to the Innofader,... -
Page 36: Rohs - A Contribution To The Conservation Of Environment
As manufacturers of products of the brands of AMERICAN AUDIO®, AMERICAN DJ®, ELATION Professional and ACCLAIM Lighting, we are obligated to comply with the ROHS directive. -
Page 37: Weee - Waste Of Electrical And Electronic Equipment
(Registration in Germany: DE41027552) That means that products of AMERICAN DJ® and AMERICAN AUDIO® can be left in the collection points free of charge and they will be used in the recycling program. Products of ELATION Professional, which are used only by professionals, shall be handled by us. Please send Elation products directly to us at the end of their lifetime so that we can professionally dispose of them. -
Page 38: Specifications
23. S PECIFICATIONS Model: American Audio® VMS2™ - PC Media Controller Dimensions: 399 (L) x 300 (W) x 40 (H) mm 15.7" (L) x 12 (W) x 1.5" (H) Installation: Place on flat surface or mount in flat case Weight: 10,9 Lbs. - Page 39 Dynamic Range (Max. Output, EQ Flat) 96dB 85dB 1KHz,-60dB Line 94dB 85dB 1KHz,-60dB Mixed Out Frequency Response 10-20KHz +/-0,3dB 10-20KHz +/-1dB Line 10-20KHz +/-0,3dB 10-20KHz +/-1dB Mixed Out Phones 1,8V 1KHz, 0dB, THD=1% Max. Output ©American Audio® - www.americanaudio.eu VMS2™ User Manual Page 39...
- Page 40 NOTES: Specifications and improvements in the design of this unit and this manual are subject to change without any prior written notice. CHECK THE AMERICAN AUDIO WEBSITE FOR DOWNLOADABLE USER SOFTWARE UPDATES. ©American Audio® World Headquarters 6122 S. Eastern Ave.
Need help?
Do you have a question about the VMS2 and is the answer not in the manual?
Questions and answers