Table of Contents
Advertisement
Operation
™
Nova
390 Stand/Nova
Pulvérisateurs électriques Airless Nova
Pulverizadores eléctricos sin a ire Nova
- For portable spray applications of architectural paints and coatings-
- Pour l'application de peintures et revêtements architecturaux avec un appareil mobile -
- Para aplicaciones de pulverización portátiles de pinturas y revestimientos con fines arquitectónicos -
Model Number: 826084, 826098
Maximum Working Pressure / Pression de service maximum / Presión máxima de trabajo: 3300 psi (227 bar, 22,7 MPa)
Important Safety
Instructions
Read all warnings and instruc-
tions in this manual. Save these
instructions.
826084
Graco Inc. P.O. Box 1441 Minneapolis, MN 55440-1441
Copyright 2006, Graco Inc. is registered to I.S. EN ISO 9001
™
™
390 ProStep
Electric Airless Sprayer
™
™
Instructions de sécurité
importantes
Lire toutes les mises en garde
et instructions de ce manuel.
Sauvegarder ces instructions.
ti11608a
™
390 Stand/Nova
™
390 Stand/Nova
Instrucciones importantes
de seguridad
Lea todas las advertencias e
instrucciones de este manual.
Guarde las instrucciones.
826098
™
390 ProStep
™
390 ProStep
312858B
Related Manuals
312859
309639
309250
312860
ti11583a
Advertisement
Table of Contents

Related Manuals for Graco Nova 312858B


Summary of Contents for Graco Nova 312858B
- Page 1 Operation ™ ™ Nova 390 Stand/Nova Pulvérisateurs électriques Airless Nova Pulverizadores eléctricos sin a ire Nova - For portable spray applications of architectural paints and coatings- - Pour l’application de peintures et revêtements architecturaux avec un appareil mobile - - Para aplicaciones de pulverización portátiles de pinturas y revestimientos con fines arquitectónicos - Model Number: 826084, 826098 Maximum Working Pressure / Pression de service maximum / Presión máxima de trabajo: 3300 psi (227 bar, 22,7 MPa) Important Safety...
-
Page 2: Grounding Instructions
Warning The following warnings are for the setup, use, grounding, maintenance and repair of this equipment. The exclamation point symbol alerts you to a general warning and the hazard symbol refers to procedure-specific risks. Refer back to these warnings. Additional, product-specific warnings may be found throughout the body of this manual where appli- cable. -
Page 3: Fire And Explosion Hazard
All parts of the spray system, including the pump, hose assembly, spray gun, and objects in and around the spray area shall be properly grounded to protect against static discharge and sparks. Use Graco conductive or grounded high-pressure airless paint sprayer hoses. - Page 4 EQUIPMENT MISUSE HAZARD Misuse can cause death or serious injury. • Always wear appropriate gloves, eye protection, and a respirator or mask when painting. • Do not operate or spray near children. Keep children away from equipment at all times. •...
-
Page 5: Instructions De Mise À La Terre
Avertissement Les mises en gardes suivantes sont des mises en garde relatives à la sécurité au sujet de la configuration, l’utilisation, la mise à la terre, l’entretien et la réparation de ce matériel. Le point d’exclamation est une mise en garde générale et le symbole de danger fait référence à... - Page 6 DANGERS D’INCENDIE ET D’EXPLOSION Les vapeurs inflammables, vapeurs de solvant et de peinture par exemple, sur le lieu de travail peuvent s’enflammer ou exploser. Pour prévenir un incendie ou une explosion : • Ne pas pulvériser des produits inflammables ou combustibles proche d’une flamme nue ou de sources d’étincelles comme des cigarettes, des moteurs ou des équipements électriques.
- Page 7 DANGER EN CAS DE MAUVAISE UTILISATION DE L’ÉQUIPEMENT Toute mauvaise utilisation du matériel peut provoquer des blessures graves, voire mortelles. • Toujours porter des lunettes et gants de sécurité appropriés, ainsi qu’un appareil respiratoire ou un masque lors de la peinture. •...
-
Page 8: Instrucciones De Conexión A Tierra
Advertencia A continuación se ofrecen advertencias relacionadas con la seguridad de la puesta en marcha, utilización, conexión a tierra, mantenimiento y reparación de este equipo. El símbolo acompañado de una exclamación le indica que se trata de una advertencia y el símbolo de peligro se refiere a un riesgo específico. Consulte estas Advertencias. Siempre que sea pertinente, en este manual encontrará... - Page 9 PELIGRO DE INCENDIOS Y EXPLOSIONES Vapores inflamables, como los vapores de disolvente o de pintura en la zona de trabajo pueden incendiarse o explotar. Para evitar un incendio o explosión: • No pulverice materiales inflamables o combustibles cerca de una llama desnuda o fuentes de ignición, como cigarrillos, motores o equipo eléctrico.
- Page 10 PELIGROS DEBIDOS A LA UTILIZACIÓN INCORRECTA DEL EQUIPO El uso incorrecto puede causar la muerte o heridas graves. • Al pintar, utilice siempre guantes, protección ocular y un respirador o máscara adecuados. • No utilice el equipo ni pulverice cerca de los niños. Mantenga a los niños lejos del equipo en todo momento.
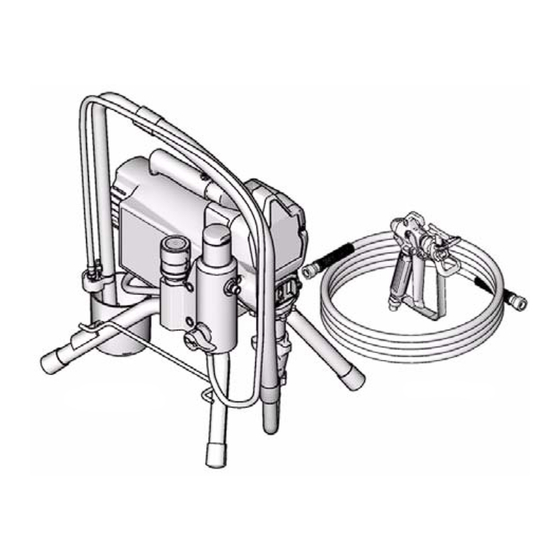
- Page 11 Component Identification/Identification des composants/ dentificación de los componentes English Pressure Control ON/OFF switch Power Cord Fluid Outlet Prime Valve Cord Wrap Pump Suction Hose Drain Hose Fluid Hose Guard Trigger Safety Lock Serial Number ID Label Filter Cover Platform (826098 only) 312858B Component Identification/Identification des composants/ dentificación de los componentes Français...
-
Page 12: Pressure Relief Procedure / Procédure De Décompression / Procedimiento De Descompresión
Pressure Relief Procedure / Procédure de décompression / Procedimiento de descompresión Pressure Relief Procedure / Procédure de décompression / Procedimiento de descompresión English Follow this Pressure Relief Procedure when- ever you stop spraying and before cleaning, checking, servicing, or transporting equip- ment. -
Page 13: Grounding / Mise À La Terre / Conexión A Tierra
Grounding / Mise à la terre / Conexión a tierra English The sprayer must be grounded. Grounding reduces the risk of static and electric shock by providing an escape wire for the electrical cur- rent due to static build up or in the event of a short circuit. - Page 14 ti4297a Power Requirements • Do not modify plug! If it will • 100-120V units require not fit in outlet, have grounded 100-120 VAC, 50/60 Hz, 11A, outlet installed by a qualified 1 phase. electrician. Do not use an adapter. Spécification électrique •...
- Page 15 Pails • Solvent and oil/based flu- • Do not place pail on a noncon- ids: follow local code. Use only ductive surface such as paper conductive metal pails, placed or cardboard which interrupts on a grounded surface such as grounding continuity. concrete.
-
Page 16: Setup / Installation / Configuración
Setup / Installation / Configuración ti5300b Connect Graco airless hose to sprayer. Tighten securely. Brancher un flexible Graco type airless sur le pulvérisa- teur. Bien serrer. Conecte la manguera sin aire Graco al pulverizador. Apriete firmemente. ti2702a Connect other end of hose Tighten securely. - Page 17 ti5301a Check inlet strainer for clogs and debris. Vérifier si la crépine d’entrée est bouchée ou contient des impuretés. Revise el elemento filtrante de entrada en busca de obstrucciones o suciedad. 312858B ti5735b Fill throat packing nut with Turn power OFF. TSL to prevent premature packing wear.
- Page 18 ti8626a Turn prime valve down. Tourner la vanne d’amor- çage vers le bas. Gire la válvula de cebado hacia abajo. Flush ti5856a Place siphon tube set in grounded metal pail partially filled with flushing fluid. See Grounding, page 15. Do steps 1- 6 of Startup, page 19, to flush out storage oil shipped in sprayer. Use water to flush water-based paint or mineral spirits to flush oil-based paint and storage oil.
-
Page 19: Startup / Démarrage / Puesta En Marcha
Startup / Démarrage / Puesta en marcha ti8324a Turn pressure control to lowest pressure. Régler la régulation de pres- sion au niveau le plus bas. Ajuste el dispositivo de con- trol de presión al valor más bajo. 312858B 1/4 turn ti5303a Turn power ON. - Page 20 Flush ti5310c Hold gun against grounded metal flushing pail. Trigger gun and flush 1 minute. Appuyer le pistolet contre un seau de rinçage métallique mis à la terre. Actionner le pistolet et rincer pendant 1 minute. Mantenga la pistola contra un recipiente metálico de lavado conectado a tierra.
- Page 21 ti5313b Move gun to paint pail and trigger for 20 seconds. Set gun safety ON. Déplacer le pistolet vers le seau de peinture et presser la gâchette pendant 20 secondes. VER- ROUILLER le pistolet. Mueva la pistola al bidón de pintura y dispárela durante 20 segundos.
- Page 22 Spray Test Pattern / Faire un essai de pulvérisation / Pulverice la plantilla de prueba Heavy Edges Spray test pattern. Adjust pressure to eliminate heavy edges. Faire un essai de pulvérisa- tion. Ajuster la pression pour supprimer les bords trop chargés.
- Page 23 Clearing Clogs / Débouchage / Eliminación de las obstrucciones Release trigger, put safety ON. Rotate Spray Tip. Take safety OFF. Trigger gun to clear clog. Relâcher la gâchette, la VERROUILLER. Faire pivoter la buse. DEVERROUILLER la gâchette. Actionner le pistolet pour déboucher la buse.
-
Page 24: Cleanup / Nettoyage / Limpieza
Cleanup / Nettoyage / Limpieza ti2758a Relieve Pressure, page Décompression, page 12. Libere la presión, página 12. ti7860a Remove guard and Spray Remove siphon tube set Tip. For additional informa- from paint. Wipe excess tion, see gun manual paint off outside of tubes. 309639. - Page 25 ti5313a ti8327a Turn prime valve horizontal. Mettre la vanne d’amorçage en position horizontale. Coloque la válvula de cebado en posición horizontal. 312858B 1/4 Turn Waste ti8325a Hold gun against paint pail. Stop triggering gun. Move Take trigger safety OFF. gun to waste pail, hold gun Trigger gun and increase against pail, trigger gun to pressure until the pump...
- Page 26 ti5848a Raise siphon tube above flushing fluid. Relever le tuyau d’aspira- tion au-dessus du niveau de produit de rinçage. Suba el tubo de aspiración por encima del líquido de lavado. ti8327a Flush ti5316a ti2599c Close drain valve. Trigger gun Turn pressure control knob into flushing pail to purge fluid all the way down and power from hose.
- Page 27 Remove filter from gun if installed. Clean and inspect. Install filter. See gun manual 309639. Démonter le filtre du pisto- let, si existant. Le nettoyer et l’examiner. Voir le manuel du psitolet 309639. Si estuvieran instalados, retire los filtros de la pistola. Limpie e inspeccione.
- Page 28 Platform Access Position (826098) / Position d’accès de la plate-forme (826098) / Posición de l’acceso de la plataforma (826098) Platform Access Position (826098) / Position d’accès de la plate-forme (826098) / Posición de l’acceso de la plataforma (826098) To avoid falling, make sure To avoid electrocution, do not sprayer is on a firm, level, allow sprayer frame to come in...
- Page 29 Platform Access Position (826098) / Position d’accès de la plate-forme (826098) / Posición de l’acceso de la plataforma (826098) ti11587a The sprayer platform is revers- ible, and can be installed facing either direction. To install the platform, perform the following steps: La plate-forme du pulvérisateur est réversible et peut être placée sur chacune de ses faces.
- Page 30 Platform Transport Position (826098) / Position de transport de la plate-forme (826098) / Posición de transporte de la plataforma Platform Transport Position (826098) / Position de transport de la plate-forme (826098) / Posición de transporte de la plataforma (826098) ti11584a Attach the platform to the side of the sprayer frame to access the handle and transport the sprayer.
- Page 31 Platform Transport Position (826098) / Position de transport de la plate-forme (826098) / Posición de transporte de la plataforma ti11584a ti11604a Align clips on opposite side NOTE: Platform is reversible and of platform with sprayer can be attached to either side of frame and push until it the sprayer frame.
-
Page 32: Technical Data
Technical Data Power requirements ........100/120V AC, 50/60 hz, 11A, 1 phase Generator required . -
Page 33: Características Técnicas
Características técnicas Requisitos eléctricos ....... . . 100/120V CA, 50/60 hz, 11A, monofásico Generador necesario . - Page 34 Notes Notes 312858B...
-
Page 35: Warranty
Warranty Warranty Graco warrants all equipment referenced in this document which is manufactured by Graco and bearing its name to be free from defects in material and workmanship on the date of sale to the original purchaser for use. With the exception of any special, extended, or limited warranty published by Graco, Graco will, for a period of twelve months from the date of sale, repair or replace any part of the equipment determined by Graco to be defective. - Page 36 Warranty TO PLACE AN ORDER, contact your Graco distributor, or call 1-800-690-2894 to identify the nearest distributor. All written and visual data contained in this document reflects the latest product information available at the time of publication. Graco reserves the right to make changes at any time without notice. mm 312858 This manual contains English, French, Spanish Graco Headquarters: Minneapolis,...
Need help?
Do you have a question about the Nova 312858B and is the answer not in the manual?
Questions and answers