Table of Contents
Advertisement
Repair
Electric Airless Sprayers
- For the application of architectural paints and coatings -
Important Safety Instructions. Read all warnings and instructions
in this manual. Save these instructions. See page 2 for model
information.
3300 psi (227 bar, 22.7 MPa) Maximum Working Pressure
Korean patent: 10-0579681
TM
Ultra
395/495/595
Ultimate Nova
Super Nova
TM
ST Max
Graco Inc. P.O. Box 1441 Minneapolis, MN 55440-1441
Copyright 2002, Graco Inc. is registered to I.S. EN ISO 9001
ti2399
TM
395
TM
495/595
395/495/595
TM
UltraMax II
490/495/595
TM
Ultimate MX II
490/495/595
TM
ST Max II
490/495/595
309674M
Advertisement
Table of Contents

Related Manuals for Graco 309674M


Summary of Contents for Graco 309674M
- Page 1 395/495/595 Ultimate Nova Super Nova 495/595 ST Max 395/495/595 Graco Inc. P.O. Box 1441 Minneapolis, MN 55440-1441 Copyright 2002, Graco Inc. is registered to I.S. EN ISO 9001 309674M UltraMax II 490/495/595 Ultimate MX II 490/495/595 ST Max II 490/495/595...
- Page 2 825029 825036 249916 249917 825038 825039 249918 249919 825046 825045 258662 233970 233971 248661 244437 253012 253013 253014 249978 253015 249930 233975 244436 249979 249931 233975 244436 249980 249937 234181 234182 248660 244439 253104 253105 253107 249934 233974 253106 309674M...
- Page 3 Do not stop or deflect leaks with your hand, body, glove, or rag. • Engage trigger lock when not spraying. • Follow Pressure Relief Procedure in this manual, when you stop spraying and before cleaning, checking, or servicing equipment. 309674M WARNING Warnings...
- Page 4 This equipment includes, but is not limited to: • Protective eye wear • Clothing and respirator as recommended by the fluid and solvent manufacturer • Gloves • Hearing protection Warnings 309674M...
-
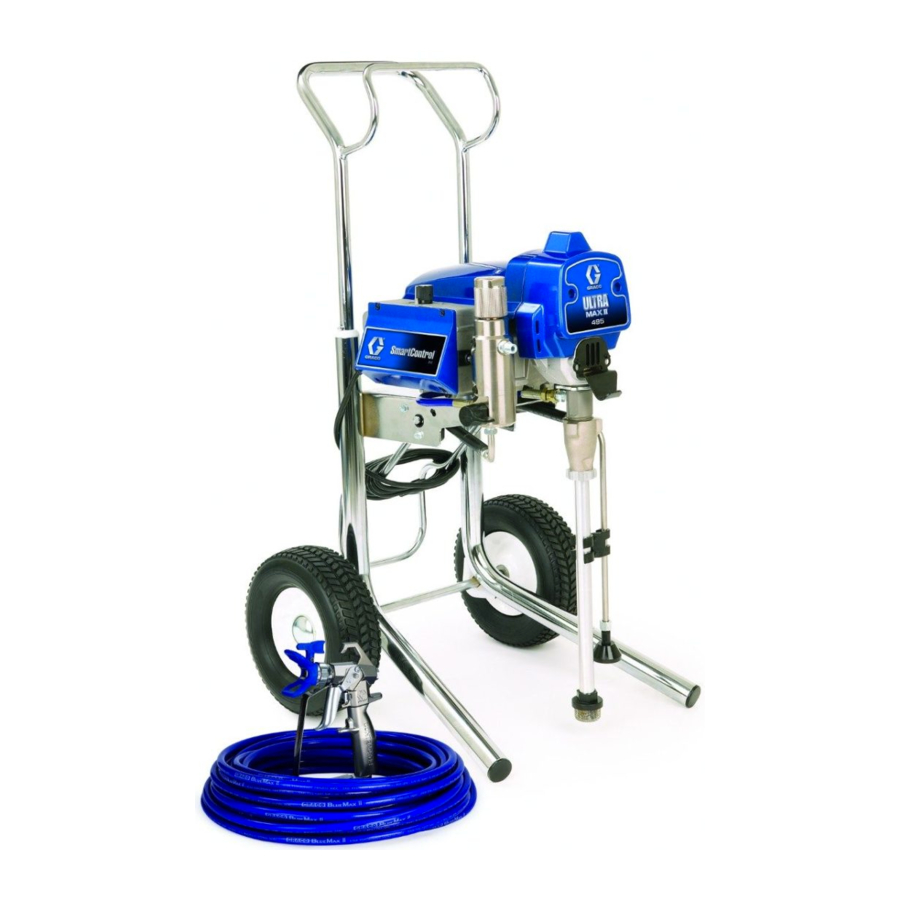
Page 5: Component Identification
Component Identification Model 233960 shown 309674M Component ON/OFF switch Prime tube Siphon tube Pressure control Filter Trigger lock Pump Fluid outlet Prime/Spray valve Service Tag (below sprayer frame) Component Identification... -
Page 6: Installation
Maintain grounding continuity when flushing or relieving pressure: hold metal part of the spray gun firmly to the side of a grounded metal pail, then trigger the gun. Installation 309674M... -
Page 7: Pressure Relief Procedure
Read warnings, page 3. 1. Turn power switch OFF and unplug power cord. ti2707a 309674M 2. Turn pressure to lowest setting. Hold gun to side of grounded metal flushing bucket. Trigger gun to relieve pressure, turn prime valve down. -
Page 8: General Repair Information
Prevent pump corrosion and damage from freezing. Never leave water or water-base paint in sprayer when its not in use in cold weather. Freezing fluids can seriously damage sprayer. Store sprayer with Pump Armor to protect sprayer during storage. 309674M... -
Page 9: Troubleshooting
Troubleshooting Type of Problem Basic fluid pressure problems Basic Mechanical Problems 309674M What to Check (if check is OK, go to next) Pressure control knob setting. Motor will not run if at minimum setting (fully counter-clockwise). Spray tip or fluid filter may be clogged. - Page 10 Clean brush holders. Remove carbon with small cleaning brush. Align brush leads with slot in brush holder to assure free vertical brush move- ment. Remove motor and have motor shop resurface commutator if possible. See page 29. 309674M...
- Page 11 Note: for the following electric prob- lems, refer to wiring diagram, page 22, 23, and 24 to identify Test Points (TP). Low Output 309674M What to Check (if check is OK, go to next) Power supply cord. Connect volt meter between TP1 (neutral) and TP2.
- Page 12 Strain paint before using to remove particles that could clog pump. See pump manual. Replace packings. Also check piston valve seat for hardened paint or nicks and replace if necessary. Tighten packing nut/wet-cup. See pump manual. Replace pump, page 15. 309674M...
- Page 13 Ultimate MX II and ST Max II 490/495/595 model sprayers. Building circuit breaker opens as soon as sprayer is plugged into outlet and sprayer is NOT turned on. 309674M What to Check (if check is OK, go to next) missing. Connecting rod assembly damaged.
- Page 14 Replace ON/OFF switch. See page Replace damaged parts. See page Perform necessary procedures. If voltage is too high, do not operate sprayer until corrected. Loosen packing nut. Check for leaking around throat. Replace pump packings, if necessary. See pump manual. 309674M...
-
Page 15: Displacement Pump Replacement
(Style B) Loosen screws (12). Push cover (70) up and pull off sprayer. Style B Style A 3. Remove suction tube (60) and hose (45). 309674M Displacement Pump Replacement 4. Cycle motor until pump pin (32)is in position to be removed. 5. Disconnect power cord from outlet. - Page 16 9. Fill packing nut with Graco TSL until fluid flows onto top of seal. 10. (Style A) Rotate cover (70). Tighten screws (12). (Style B) Replace cover (70) over screws. Push cover down into place. Tighten screws (12). Displacement Pump Replacement 309674M...
-
Page 17: Drive Housing Replacement
3. Install washers (1, 9) on back of gear (44). Install in motor endbell. 4. Install thrust washer (25) on gear (44). 309674M Drive Housing Replacement 3. Remove screws (12) and pump rod cover (70). 4. Remove pump (41), Displacement Pump Replace- ment, page 15 5. -
Page 18: Motor Diagnostics
3. If there is an uneven resistance or no resistance, check for broken brush springs*, brush leads*; loose brush terminal screws*, worn brushes*, or motor lead terminals. Repair as needed, page 20. 4. If still uneven, or no resistance, replace motor using Motor Kit, page 29. Motor Diagnostics 309674M... -
Page 19: Fan Replacement
1. Relieve pressure, page 7. Disconnect power cord from outlet. 2. Remove four screws (12) and shroud (23). 3. Loosen tensioning screw (126) on fan (125). 309674M 4. Pull off fan (77). Installation 1. Slide new fan (125) in place on back of motor. Be sure blades of fan face motor as shown. -
Page 20: Motor Brush Replacement
Minimum 0.5 in. (12.5 mm) Included in Brush Repair Kit Style B 6. Inspect commutator for excessive pitting, burning, or gouging. A black color on commutator is normal. Have commutator resurfaced by a motor repair shop if brushes wear too fast. 309674M... -
Page 21: Motor Brush Installation
15. b. With sprayer OFF, turn pressure control knob fully counter-clockwise to minimum pressure. Plug in sprayer. 309674M Style A c. Turn sprayer ON. Slowly increase pressure until motor is at full speed. Do not run sprayer dry for more than 30 seconds while checking brushes to avoid damaging displace- ment pump packings. -
Page 22: On/Off Switch Replacement
4. Remove toggle boot (30) and locking ring. Remove ON/OFF switch (58). Installation 1. Install new ON/OFF switch (58). Install locking ring and toggle boot (30). 2. Connect two wires (A) to ON/OFF switch (58). 3. Install pressure control cover (50) with four screws (12). TP1/L1 309674M... - Page 23 2. Remove four screws (12) and pressure control cover (50). 3. Remove display connector (B) from plug (C). 4. Disconnect four wires (A) from ON/OFF switch (58). 309674M On/Off Switch Replacement 5. Remove toggle boot (30) and locking ring. Remove ON/OFF switch (58).
-
Page 24: On/Off Switch/Power Cord Board Kit
6. Reattach black and white power cord leads to con- trol and switch boards. 7. Reattach ground choke coil to ground screw (19). Replace and tighten green ground screw. 8. Install pressure control cover (50) with four screws (12). On/Off Switch Replacement 309674M... -
Page 25: Wiring Diagram
On/Off Switch Replacement Wiring Diagram Potentiometer Ref 37 ON/OFF Switch Ref 30 Black Pressure Transducer Ref 38 Ground Power Plug Ref 56 Black Green White Black 309674M... -
Page 26: Pressure Control Repair
4. Connect potentiometer and transducer leads to con- trol board. 5. Connect motor and thermistor leads (210, 211). 6. Do steps 1-8 of ON/OFF Switch/Power Cord Board Kit installation instructions, page 24. 7. Replace shroud (23) with four screws (12). Pressure Control Repair 309674M... - Page 27 * Ultra, Ultimate Nova, Super Nova and ST Max 395/495/595. ** Ultra Max II, Ultimate MX II and ST Max II 490/495/595. 309674M CAUTION Do not allow sprayer to develop fluid pressure without transducer installed. Leave drain valve open if test transducer is used.
-
Page 28: Pressure Control Transducer
Sprayer model number displays (U395/U495) for a few seconds and then data point 1 is displayed. 5. Push display button and next data point displays. Turn sprayer OFF and then ON to exit stored data mode. Pressure Control Repair 309674M... -
Page 29: Motor Replacement
4. Remove screws (12) from cover (50). 5. Disconnect all leads from board (49). Remove screws (6) and board. 309674M 6. Remove screws (47) and control box (48). 7. Remove screws (47) and manifold (15). 8. Remove screws (47) and motor (54) from frame (59). - Page 30 5. Install drive housing (42); Drive Housing Replace- ment, page 17. 6. Install pump (41); Displacement Pump Replace- ment, page 15. 7. Replace front cover (22) and screws (12). Tighten screws securely. 8. Replace shroud (23) and screws (12). Tighten screws securely. Motor Replacement 309674M...
-
Page 31: Technical Data
Stand 43 (20) 34 (19) 43 (20) Lo-Boy 63 (29) 54 (25) 63 (29) Hi-Boy 66 (30) 57 (26) 66 (30) 309674M Generator Motor HP Minimum W 3000 3/4 (560) 3500 7/10 (510) 3750 3/4 (560) 4000 9/10 (671) Weight lb (kg) -
Page 32: Graco Standard Warranty
Graco reserves the right to make changes at any time without notice. This manual contains English. MM 309674 Graco Headquarters: Minneapolis International Offices: Belgium, Korea, China, Japan GRACO INC. P.O. BOX 1441 MINNEAPOLIS, MN 55440-1441 http://www.graco.com 12/2002, Rev 9/2007 309674M...
Need help?
Do you have a question about the 309674M and is the answer not in the manual?
Questions and answers