Table of Contents
Advertisement
Quick Links
Advertisement
Table of Contents

Subscribe to Our Youtube Channel
Related Manuals for ATEN IP8000


Summary of Contents for ATEN IP8000
- Page 1 Remote Management PCI Card IP8000 User Manual www.aten.com...
-
Page 2: Fcc Information
IP8000 User Manual FCC Information This is an FCC Class A product. In a domestic environment this product may cause radio interference in which case the user may be required to take adequate measures. This equipment has been tested and found to comply with the limits for a Class A digital device, pursuant to Part 15 of the FCC Rules. -
Page 3: User Information
IP8000 User Manual User Information Online Registration Be sure to register your product at our online support center: International http://support.aten.com North America ATEN TECH http://www.aten-usa.com/product_registration ATEN NJ http://support.aten.com Telephone Support For telephone support, call this number: International 886-2-8692-6959 North America... -
Page 4: Package Contents
Manual Part No. PAPE-0279-100G Printing Date: 12/2007 P/N: IP8000 ATFW Series ATEN and the ATEN logo are registered trademarks of ATEN International Co., Ltd. All rights reserved. All other brand names and trademarks are the registered property of their respective owners. -
Page 5: Table Of Contents
IP8000 Layout Diagram ........ - Page 6 IP8000 User Manual Security........... 21 Overview .
- Page 7 IP8000 User Manual 8. The Log Server Introduction ..........57 Installation .
- Page 8 IP8000 User Manual IP Address Determination........83 Resetting Your Computer Address .
-
Page 9: About This Manual
IP8000 User Manual About this Manual This User Manual is provided to help you get the most from your IP8000. It covers all aspects of installation, configuration and operation. An overview of the information found in the manual is provided below. -
Page 10: Conventions
For information about all ATEN products and how they can help you connect without limits, visit ATEN on the Web or contact an ATEN Authorized Reseller. Visit ATEN on the Web for a list of locations and telephone numbers: International http://www.aten.com... -
Page 11: Introduction
Introduction Overview The IP8000 is a PCI card implementation of a control unit that provides “over- IP” access and control of the server it is installed in. In addition to local console operation, the IP8000 allows multi-platform access and control of the server from remote locations using a standard Internet browser or with a stand-alone Windows-based application. -
Page 12: Features
IP8000 User Manual Features Standard PCI-sized card provides over-IP access and control of a remote server from anywhere in the world Virtual media via USB 2.0 data transmission Remote power control and reset support Up to 64 user accounts – Up to 32 concurrent user logins for single-bus... -
Page 13: System Requirements
General For best results we recommend that the computers used to access the IP8000 control unit have at least a P III 1 GHz processor, and that the screen resolution is set to 1024 x 768. Browsers must support 128-bit SSL data encryption. -
Page 14: Cables
Cables Two cable sets are provided with this package: a KVM cable set to link the IP8000 to a server; and a feature cable to link the IP8000 to the mainboard power control header. Note: Only cable sets specifically designed to work with the IP8000 may be used for the above purposes. -
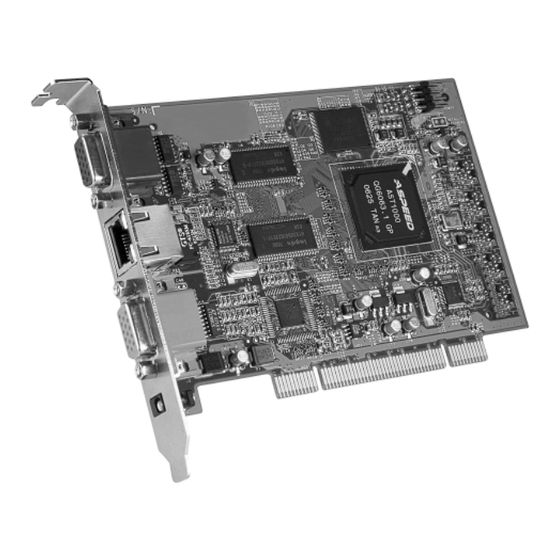
Page 15: Ip8000 Layout Diagram
1. Introduction IP8000 Layout Diagram Component Description Monitor Port The video cable from your monitor plugs in here LAN Port The cable that connects to the WAN, LAN, Intranet, or Internet plugs in here. KVM Port The Custom KVM cable that links the card to your server’s Video and USB ports plugs in here. - Page 16 IP8000 User Manual This Page Intentionally Left Blank...
-
Page 17: Hardware Setup
Basic Installation After installing the IP8000 into any available PCI slot on the server’s mainboard, refer to the installation diagram below (the diagram numbers correspond to the step numbers), and do the following: 1. - Page 18 KVM port to the server’s video port and USB port. 4. Plug the LAN or WAN cable into the IP8000's LAN port. 5. Plug the power adapter cable into the IP8000's power jack, then plug the power adapter into an AC power source.
-
Page 19: Feature Cable Installation
2. Hardware Setup Feature Cable Installation The feature cable provides the ability to perform remote power on/off and reset operations. The cable plugs into a header block located at the upper right of the card. The block contains two rows of pins. The upper row comprises pins 1, 3, 5, and 7;... - Page 20 6. Plug the leads from computer case’s Reset switch into pins 1–3 (on the upper row) of the IP8000’s feature cable pin header. 7. Plug the leads from the computer case’s Power switch into pins 5–7 (on the upper row) of the IP8000’s feature cable pin header. From Case Reset Switch...
-
Page 21: Browser Login
Logging In To operate the IP8000 from an Internet browser, begin by logging in: 1. Open your browser and specify the IP address of the IP8000 you want to access in the browser's URL location bar. Note: 1. For security purposes, a login string may have been set by the administrator. - Page 22 IP8000 User Manual (Continued from previous page.) 2. A Security Alert dialog box appears. Accept the certificate – it can be trusted. (See Trusted Certificates, page 91, for details.) If a second certificate appears, accept it as well.
- Page 23 Chapter 3. Browser Login The IP8000 login page appears: 3. Provide a valid Username and Password (set by the IP8000 administrator), then Click Login to continue. Note: 1. If you are the administrator, and are logging in for the first time, use the default Username: administrator;...
-
Page 24: Screen Elements
IP8000 User Manual After you have successfully logged in, the IP8000 Main Screen appears: Screen Elements The Main Screen consists of Utility icons arranged vertically down the left side; Administration icons arranged across the top; and a Remote Console Preview with icons to launch the Java Applet and Windows Client displayed in the center. -
Page 25: Utility Icons
Power On, Power Off, or Reset the remote server. Log: All the events that take place on the IP8000 are recorded in a log file. If you have the proper permission (see User Management, page 27), clicking this icon displays the contents of the log file. -
Page 26: Remote Console Preview
2. If a user doesn’t have permission to open the Windows Client, the icon to launch the client does not appear. IP8000 operation using the Java applet is discussed in Chapter 6; IP8000 operation using the Windows client is discussed in Chapter 5. -
Page 27: Administration
Administration Introduction The administration utilities, represented by the icons located across the top of the IP8000 web page, are used to configure the IP8000’s operating environment. This chapter discusses each of them in turn. Note: 1. As you make your configuration changes in each dialog box, click Apply to save them. -
Page 28: General
Device Name: To make it easier to manage installations that have more than one IP8000, each one can be given a name. To assign a name for the IP8000, key in one of your choosing here (16 characters max.). MAC Address: The IP8000's MAC Address displays here. -
Page 29: Network
Users must specify the port number as part of the IP address If an invalid port number (or no port number) is specified, the IP8000 will not be found. An explanation of the fields is given in the table below:... -
Page 30: Ip Address
For dynamic IP address assignment, select the Obtain an IP address automatically, radio button. Note: If the IP8000 is on a network that uses DHCP to assign network addresses, and you need to ascertain its IP address, see IP Address Determination, page 83, for information. -
Page 31: Security
The Security page controls access to the IP8000. Overview IP and MAC Filters control access to the IP8000 based on the IP and/or MAC addresses of the computers attempting to access the system. If any filters have been configured, they appear in the IP Filter and/or MAC Filter list boxes. -
Page 32: Filtering
IP8000 User Manual Filtering To enable IP and/or MAC filtering, Click to put a check mark in the IP Filter Enable and/or MAC Filter Enable checkbox. There are a maximum of 100 filters allowed for each. If the include button is checked, all the addresses within the filter range are allowed access;... -
Page 33: Mac Filtering
Chapter 4. Administration To delete a filter, select it and Click Remove. To modify a filter, select it and Click Edit. The Edit dialog box is similar to the Add dialog box. When it comes up, simply delete the old address and replace it with the new one. -
Page 34: Anms
2. Fill in the IP addresses and Service Ports for the Primary and Alternate RADIUS servers. 3. In the Timeout field, set the time in seconds that the IP8000 waits for a RADIUS server reply before it times out. 4. In the Retries field, set the number of allowed RADIUS retries. -
Page 35: Radius Examples
Allows the user to access the system via the Windows Client program. Allows the user to access the system via Java. Allows the user to Power On/Off, Reset the computer that the IP8000 is connected to. Allows the user to access log information via the user's browser. -
Page 36: Cc Management Settings
IP8000 User Manual CC Management Settings To allow authorization for the IP8000 through a CC (Control Center) server, check Enable CC Management and fill in the CC Server’s IP address and the port that it listens on in the appropriate fields. -
Page 37: User Management
Chapter 4. Administration User Management The User Management dialog box is used to create and manage user profiles. Up to 64 user profiles can be established. To add a user profile, fill in the information asked for in the User Info panel and click Add. - Page 38 40 for details). Java Applet: Checking Java Applet allows a user to access the IP8000 via the Java Applet software. Configure: Checking Configure gives a user Administrator privileges, and allows the user to set up and modify the IP8000's operating environment.
-
Page 39: Customization
An explanation of the Customization parameters is given in the table below: Parameter Explanation Timeout If the IP8000 doesn't receive any input from a computer that is accessing it with the Windows Client or Java Applet for the amount of time specified here, it ends the connection. - Page 40 (Continued from previous page.) Item Explanation Working Enable If ICMP is enabled, the IP8000 can be pinged. If it is not Mode ICMP enabled, the device cannot be pinged. Enable If this item is enabled, the device will show up in the list of device list local IP8000 units (see Starting Up, page 66).
-
Page 41: Firmware
1. Download the new firmware file to a computer that is not the one that your IP8000 is installed on. 2. From that computer, open your browser; log in to the IP8000; and click the Firmware icon to bring up the Firmware File dialog box: 3. - Page 42 IP8000 User Manual This Page Intentionally Left Blank...
-
Page 43: The Windows Client
Chapter 5 The Windows Client Starting Up After you log in (see Logging In, page 11), Click the Open Windows Client link on the Remote Console Preview screen. Note: 1. The first time you run the Windows client, you are prompted to install a plugin (ip8000plugin.exe) that is required for its operation: Click the link;... -
Page 44: Navigation
IP8000 User Manual (Continued from previous page.) A second or two after you click the Open Windows Client link, the remote server’s display appears as a window on your desktop: Navigation You can work on the remote system via the screen display on your monitor just as if it were your local system. -
Page 45: The Windows Client Control Panel
Chapter 5. The Windows Client The Windows Client Control Panel The Windows Client control panel – located at the bottom right of the screen – provides utilities to help you control remote KVM operations. The panel consists of an icon bar with a text bar below it. The text bars displays the remote server’s video resolution. - Page 46 IP8000 User Manual (Continued from previous page.) The functions that the icons perform is described in the table below: Icon Function Click to bring up the Hotkey setup dialog box (see Hotkey Setup, page 37 for details). Click to bring up the Video settings dialog box.
-
Page 47: Hotkey Setup
Substitute Alt Key Although all other keyboard input is captured and sent to the IP8000, [Alt + Tab] and [Ctrl + Alt + Del] work on your local computer. In order to implement their effects on the remote system, a function key is substituted for the Alt key. If you substitute the F12 key, for example, you would use [F12 + Tab] and [Ctrl + F12 + Del]. -
Page 48: Configuring The Hotkeys
IP8000 User Manual Configuring the Hotkeys If you find the default Hotkey combinations inconvenient, you can configure them by following these steps: 1. Highlight the Action, then Click Start 2. Key in the new combination. The key names appear in the Key field as you press them. -
Page 49: Video Settings
Chapter 5. The Windows Client Video Settings The Video settings dialog box allows you to adjust the placement and picture quality of the remote screen (as displayed on your monitor). The meanings of the adjustment options are given in the table below: Option Usage Screen Position... -
Page 50: Virtual Media
IP8000 User Manual Virtual Media The IP8000’s virtual media feature allows a USB 2.0 device (Floppy drive, CDROM, Flash Drive, etc.), or an image file, on a user’s system, to appear, and act, as if it were installed on the remote server. - Page 51 Chapter 5. The Windows Client 3. After you have made your media source selection, click Start. The device (or image file) that you have selected is then redirected to the remote server, where it shows up as a drive on the remote server’s file system. Note: You can dismiss the Virtual media dialog box at this point –...
-
Page 52: Message Board
IP8000 User Manual Message Board The IP8000 supports multiple user logins, which can possibly give rise to access conflicts. To alleviate this problem, a message board, similar to an internet chat program, allows users to communicate with each other: (Continues on next page.) -
Page 53: The Button Bar
Chapter 5. The Windows Client (Continued from previous page.) The Button Bar The buttons on the Button Bar are toggles. Their actions are described in the table below: Button Action Enable/Disable Chat. When disabled, messages posted to the board are not displayed. The icon displays next to the user's name in the User List panel when he has disabled Chat. -
Page 54: User List Panel
IP8000 User Manual User List Panel The names of all the logged in users appear in the User List panel. Select the names of the users that you wish to send the message to before sending your message. If a user has disabled Chat, its icon displays before the user's name to indicate so. -
Page 55: The Java Applet
The Java Applet Introduction The Java Applet makes the IP8000 accessible to all platforms that have JRE 6 Update 3 or higher installed. Java is available for free download from Sun's Java web site (http://www.java.com or http://java.sun.com). To access the... -
Page 56: Navigation
IP8000 User Manual Navigation You can work on the remote system via the screen display on your monitor just as if it were your local system. You can maximize the window, drag the borders to resize the window; or use the scrollbars to move around the screen. - Page 57 Chapter 6. The Java Applet (Continued from previous page.) The functions that the icons perform is described in the table below: Icon Function Click to bring up the Hotkey setup dialog box (see Hotkey Setup, page 48 for details). Click to bring up the Video settings dialog box. Click to bring up the Message board (see page 51).
-
Page 58: Hotkey Setup
Substitute Alt Key Although all other keyboard input is captured and sent to the IP8000, [Alt + Tab] and [Ctrl + Alt + Del] work on your local computer. In order to implement their effects on the remote system, a function key is substituted for the Alt key. If you substitute the F12 key, for example, you would use [F12 + Tab] and [Ctrl + F12 + Del]. -
Page 59: Configuring The Hotkeys
Chapter 6. The Java Applet Configuring the Hotkeys If you find the default Hotkey combinations inconvenient, you can reconfigure them by following these steps: 1. Highlight the Action, then click Start. 2. Key in the new combination. The key names appear in the Key field as you press them. -
Page 60: Video Settings
IP8000 User Manual Video Settings The Video settings dialog box allows you to adjust the placement and picture quality of the remote screen (as displayed on your monitor). The meanings of the adjustment options are given in the table below:... -
Page 61: Message Board
Chapter 6. The Java Applet Message Board The IP8000 supports multiple user logins, which can possibly give rise to access conflicts. To alleviate this problem, a message board feature, similar to an internet chat program, allows users to communicate with each other: The buttons on the Button Bar are toggles. - Page 62 IP8000 User Manual The names of all the logged in users appear in the User List panel. Select the users that you want to post to before sending your message. Users that aren’t selected won’t see the message. To Hide/Unhide the User List panel, click on the arrows in the panel separator.
-
Page 63: Ctrl+Alt+Del
Chapter 6. The Java Applet Ctrl+Alt+Del Clicking this button sends a Ctrl+Alt+Del signal to the remote system. Exit Click this button to exit the Java Applet and return to local operation. Lock LEDs The Lock Key LEDs show the Num Lock, Caps Lock, and Scroll Lock status of the remote computer. - Page 64 IP8000 User Manual This Page Intentionally Left Blank...
-
Page 65: The Log File
The Log File The Log File Screen The IP8000 logs all the events that take place on it. To view the contents of the log file in the browser, click the Log icon at the left of the web page. A screen similar to the one below appears: A maximum of 512 events are kept in the log file. - Page 66 IP8000 User Manual This Page Intentionally Left Blank...
-
Page 67: The Log Server
Introduction The Windows-based Log Server is an administrative utility that records all the events that take place on selected IP8000 units and writes them to a searchable database. The installer for the Log Server program – LogSetup.exe – can be found on the IP8000 software CD. -
Page 68: Starting Up
The screen is divided into three components: A Menu Bar at the top A panel that will contain a list of IP8000 units in the middle (see The Log Server Main Screen, page 63, for details). A panel that will contain an Events List at the bottom... -
Page 69: The Menu Bar
IP8000 units from the list. To add a IP8000 to the IP8000 List, click Add. To edit or delete a listed IP8000, first select the one you want in the IP8000 List window, then open this menu and click Edit or Delete. -
Page 70: Events
Explanation Address This can either be the IP address of the IP8000 or its DNS name (if the network administrator has assigned it a DNS name). Key in the value specified for the IP8000 in the ANMS settings (see ANMS, page 24). -
Page 71: Maintenance
Server List IP8000 units are listed according to their IP address. Select the unit that you want to perform the search on from this list. You can select more than one unit for the search. If no units are selected, the search is performed on all of them. -
Page 72: Options
IP8000 User Manual Options Network Retry allows you to set the number of seconds that the Log Server should wait before attempting to connect if the previous attempt to connect failed. When you click this item, a dialog box, similar to the one below appears: Key in the number of seconds, then click OK to finish. -
Page 73: The Log Server Main Screen
Overview The Log Server Main Screen is divided into two main panels. The upper (List) panel lists the IP8000 units that have been selected for the Log Server to track (see Configure, page 59). The lower (Event) panel displays the log events for the currently selected IP8000 (the highlighted one - if there are more than one). -
Page 74: The List Panel
Recording Determines whether the Log Server records log events for this IP8000 or not. If the Recording check box is checked, the field displays Recording, and log events are recorded. If the Recording check box is not checked, the field displays Paused, and log events are not recorded. -
Page 75: Ap Operation
In addition to the browser based client utilities, the IP8000 also provides stand-alone Windows and Java applications that can be used without a browser. Both applications can be found on the IP8000 software CD. The installer for the Windows Client program is called ip8000winclient.exe; the Java Client program is called iClientJ.jar. -
Page 76: Starting Up
(Continued from previous page.) Starting Up To connect to the IP8000, either click its icon on the desktop or click its entry on the Start menu. If this is the first time that you are running the utility, a dialog box appears requesting you to input your serial number. -
Page 77: The Windows Client Connection Screen
Click Logout to end the connection. Server This area is used when you want to connect to a IP8000 at a remote location. You can drop down the IP list box and select an address from the list. If the address you want isn't listed, you can key in the IP address you want. -
Page 78: Logging In
IP8000 User Manual Logging In Once the IP8000 to the unit you specified, a login window appears: connects Provide a valid Username and Password, then Click OK to continue. Note: The default Username is administrator; the default Password is password. For security, we strongly recommend that you change these to something unique (see User Management, page 74, for details). - Page 79 Remote View In some cases, administrator’s do not wish to have users connect to the IP8000 with a browser. Remote View solves this problem. It opens a window on the user’s desktop containing the remote server’s display that is the same as the one that appears with the browser-based Windows client.
-
Page 80: The Administrator Utility
General The Settings notebook opens with the General page displayed: The General page provides information about the IP8000's status, as explained in the table, below: Item Description... -
Page 81: Network
See Network, page 19, for details. Note: Be sure to enable Reset on exit on the Customization page (see page 75) before exiting the Administrator Utility. This allows network changes to take effect without having to power the IP8000 off and on. -
Page 82: Security
IP8000 User Manual Security The Security page is used to control access to the IP8000. The settings on this page are essentially the same as that of the browser-based version. See Security, page 21, for details. -
Page 83: Anms
Chapter 9. AP Operation ANMS The Advanced Network Management Settings dialog box allows you to set up login authorization management from a external sources. The settings on this page are essentially the same as that of the browser-based version. See ANMS, page 24, for details. -
Page 84: User Management
IP8000 User Manual User Management This page is used to set up and manage user profiles. It defines the access rights of each user. Up to 64 user profiles can be established The settings on this page are essentially the same as that of the browser-based... -
Page 85: Customization
See Customization, page 29, for details on setting Timeout, Login failure, Working mode, and Mouse Sync Mode parameters. The Firmware Upgrade section is used when upgrading the IP8000’s firmware. Upgrading the firmware is discussed in the next section. -
Page 86: Upgrading The Firmware
IP8000 User Manual Upgrading the Firmware New versions of the Mainboard firmware files can be downloaded from our website as they become available. After downloading the new firmware file, to upgrade the firmware, do the following: 1. On the Customization page of the Administration Utility’s configuration notebook (see page 75) click the Browse button. -
Page 87: The Ap Java Client
2. If this is the first time that you are running the program a dialog box appears requesting you to input your serial number. The serial number can be found on the IP8000's CD case. Key in the serial number - 5 characters per box - then click OK to bring up the IP8000 Connection Screen. -
Page 88: The Java Client Connection Screen
IP8000 User Manual The Java Client Connection Screen To connect to the IP8000 1. Key in its IP address in the Server field. 2. If the port number shown isn’t correct, key in the correct number. 3. Click Connect. Logging In... -
Page 89: Appendix
Appendix Safety Instructions General Read all of these instructions. Save them for future reference. Follow all warnings and instructions marked on the device. Do not place the device on any unstable surface (cart, stand, table, etc.). If the device falls, serious damage will result. Do not use the device near water. - Page 90 IP8000 User Manual When connecting or disconnecting power to hot-pluggable power supplies, observe the following guidelines: Install the power supply before connecting the power cable to the power supply. Unplug the power cable before removing the power supply. If the system has multiple sources of power, disconnect power from the system by unplugging all power cables from the power supplies.
-
Page 91: Technical Support
Online Technical Support http://support.aten.com Support Troubleshooting http://www.aten.com Documentation Software Updates Telephone Support 886-2-8692-6959 North America Email Support ATEN TECH support@aten-usa.com ATEN NJ sales@aten.com Online Technical Support ATEN TECH http://www.aten-usa.com/support Support ATEN NJ http://support.aten.com Troubleshooting ATEN TECH http://www.aten-usa.com Documentation ATEN NJ http://www.aten.com... -
Page 92: Specifications
IP8000 User Manual Specifications Function Specification Connectors Console Ports Video 1 x HDB-15 Female KVM Link 1 x SPHD-15 Female 1 x RJ-45 Receptacle Power 1 x DC Jack 5V LEDs Link 1 (Green) 10/100 Mbps 1 (Orange/Green) Emulation Keyboard/Mouse USB;... -
Page 93: Ip Address Determination
If you are an administrator logging in for the first time, you need to access the IP8000 in order to give it an IP address that users can connect to. There are two methods to choose from: 1) Resetting Your Computer Address; and 2) running the Windows Client program. -
Page 94: The Windows Client
Windows stand-alone application program. When you run the Windows stand-alone application (see page 65), it searches the network segment for IP8000 devices, and displays what it finds in a dialog box similar to the one below: You can now use this network address if it is suitable to do so. You can change it to a more suitable one if you wish, by clicking Login, logging in, clicking Admin Utility, and clicking the Network tab. -
Page 95: Administrator Login Failure
1. Power off the IP8000 by unplugging its power adapter cable. 2. Power off the server that the IP8000 is installed in and remove its housing. 3. Short the jumper on the IP8000 labeled J2 Default Password. 4. Power on the IP8000 by plugging its power adapter cable back in. Wait a few seconds, then unplug it again. -
Page 96: Troubleshooting
IP8000 User Manual Troubleshooting Overview Operation problems can be due to a variety of causes. The first step in solving them is to make sure that all cables are securely attached and seated completely in their sockets. In addition, updating the product’s firmware may solve problems that have been discovered and resolved since the prior version was released. -
Page 97: The Java Client
Symptom Action Java Client won't connect 1. JRE 6 Update 3 or higher must be installed on your to the IP8000 computer. 2. Close the Java Client, reopen it, and try again. Java Client performance Exit the program and start again. -
Page 98: Sun Systems
IP8000 User Manual Sun Systems Problem Resolution Video display problems with The display resolution should be set to 1024 x 768: HDB15 interface systems (e.g., Under Text Mode: Sun Blade 1000 servers). 1. Go to OK mode and issue the following... -
Page 99: Additional Mouse Synchronization Procedures
Appendix Additional Mouse Synchronization Procedures If the mouse synchronization procedures mentioned in the manual fail to resolve mouse pointer problems for particular computers, try the following: Windows: Note: In order for the local and remote mice to synchronize, you must use the generic mouse driver supplied with the MS operating system. -
Page 100: Sun / Linux
IP8000 User Manual 2. Windows XP / Windows Server 2003: → a) Open the Mouse Properties dialog box (Control Panel Mouse) b) Click the Pointer Options tab c) Set the mouse speed to the middle position (6 units in from the left) d) Disable Enhance Pointer Precision 3. -
Page 101: Trusted Certificates
Appendix Trusted Certificates Overview When you try to log in to the device from your browser, a Security Alert message appears to inform you that the device’s certificate is not trusted, and asks if you want to proceed. The certificate can be trusted, but the alert is triggered because the certificate’s name is not found on Microsoft’s list of Trusted Authorities. -
Page 102: Installing The Certificate
IP8000 User Manual Installing the Certificate To install the certificate, do the following: 1. In the Security Alert dialog box, click View Certificate. The Certificate Information dialog box appears: Note: There is a red and white X logo over the certificate to indicate that it is not trusted. -
Page 103: Certificate Trusted
Appendix Certificate Trusted The certificate is now trusted: When you click View Certificate, you can see that the red and white X logo is no longer present – further indication that the certificate is trusted:... -
Page 104: About Sphd Connectors
IP8000 User Manual About SPHD Connectors This product uses SPHD connectors for its KVM and/or Console ports. We have specifically modified the shape of these connectors so that only KVM cables that we have designed to work with this product can be connected. - Page 105 Index MAC, 23 Firmware Access Ports, 19 Upgrading, 75 Administration, 17 upgrading, 76 ANMS, 24 Firmware upgrading, 31 Customization, 29 Forgotten Password, 85 Firmware upgrading, 31 General, 18 Network, 19 General, 18 Security, 21 settings, 70 Administrator Login Failure, 85 Administrator Utility, 70 ANMS, 24 Hardware Setup...
- Page 106 IP8000 User Manual Layout Diagram, 5 Network, 19 Lock Key LEDs, 47, 53 settings, 71 Log File, 55 Network environment, 71 Main Screen, 55 Log file, 55 Log Server, 1 Online Configure, 59 Registration, iii Events, 60 Overview, 1 Installation, 57...
- Page 107 Index Time out control, 29 User Station filtering Troubleshooting MAC, 23 Java Client, 87 Log Server, 87 Windows Client, 86 Video Settings Trusted Certificates, 91 Java Applet, 50 Windows Client, 39 Virtual Media, 40 Upgrading firmware, 75 Upgrading the Firmware, 76 User Management, 74 Windows Client, 1, 33 Administration...
Need help?
Do you have a question about the IP8000 and is the answer not in the manual?
Questions and answers