Table of Contents
Advertisement
Advertisement
Table of Contents

Related Manuals for Alpine CDA-W550E


Summary of Contents for Alpine CDA-W550E
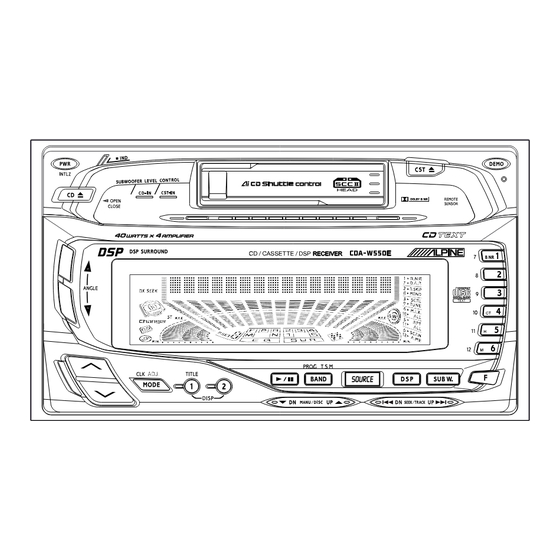
- Page 1 CDA-W550E CD/Cassette/DSP Receiver • OWNER'S MANUAL (page 2- page 68) Please read this manual to maximize your enjoyment of the outstanding performance and feature capabilities of the equipment, then retain the manual for future reference. RECEIVER 40W x 4...
- Page 2 English...
- Page 3 English Precautions The exclamation point within an equilateral triangle and "WARNING" Warning are intended to alert the user to the presence of important operating instructions. Failure to heed the instructions will result in severe injury or death. DO NOT DISASSEMBLE OR ALTER. Doing so may lead to accident, fire or electric shock.
-
Page 4: Table Of Contents
English Contents Page 6 ................... Precautions Basic Operation 9 ..............Initial System Start-Up 9 ............. Turning Power On and Off 10 ..............Subwoofer On and Off 10 ................Demonstration 11 ..............Sound Guide Function 12 ..............CD Text Scroll Setting 13 ............ - Page 5 English Contents Page Cassette Player Operation 44 ..................Playback 45 ............. Dolby B NR (Noise Reduction) 45 .................. Repeat Play 46 ............Fast Forward and Rewind 46 ..............Blank Skip (B.SKIP) 47 ................Manual Reverse 47 ..............Scanning Programs 48 ..............Program Sensor (P.S.) Surround Operation 49 ..............
-
Page 6: Precautions
Playing a bad disc could severely damage the playback mechanism. Maintenance If you have problems, do not attempt to repair the unit yourself. Return it to your Alpine dealer or the nearest Alpine Service Station for servicing. Irregular Shaped Discs Make sure the discs you use in this unit do not have any irregularities. -
Page 7: Fuse Replacement
If the fuse blows more than once, carefully check all electrical connections for shorted circuitry. Also have your vehicle’s voltage regulator checked. Installation Location Make sure the CDA-W550E player/receiver will not be exposed to: • Direct sun and heat •... - Page 8 English Precautions Tape Slack Check and make sure any slack in the tape is taken up before inserting the tape into the unit. A loose tape can get caught in the mechanism and cause damage to the unit and the tape itself.
-
Page 9: Basic Operation
English Basic Operation Initial System Start-Up Immediately after installing or applying power to the unit, it should be initialized. At the upper- right corner of the front panel is a small button. Using a pencil or other pointed object, press this reset button to complete the initialization procedure. -
Page 10: Subwoofer On And Off
English Basic Operation Subwoofer On and Off This unit is not equipped with a low pass filter. Turn on the Subwoofer Output when an amplifier having the built-in filter is connected to drive your subwoofer. Press the SUB W. button to display Subwoofer Subwoofer ON Each press will toggle the subwoofer on and off. -
Page 11: Sound Guide Function
English Basic Operation Sound Guide Function This function will give audible feedback with varying tones depending upon the button pressed. Press and hold the INTLZ button for more than 3 seconds. Press the Preset button and the display BEEP ON shows "BEEP ON."... -
Page 12: Cd Text Scroll Setting
English Basic Operation CD Text Scroll Setting With the built-in CD player of this device, the disc or track name recorded on the disc will scroll if longer than 16 characters. This scrolling feature is available only with text compatible CDs pre-recorded with text. -
Page 13: Turning Mute Mode On/Off
English Basic Operation Turning Mute Mode On/Off If a device having the interrupt feature is connected, audio will be automatically muted whenever the interrupt signal is received from the device. This function can be turned ON or OFF from the head unit by following procedure below. -
Page 14: Adjusting Volume/Balance/Fader
English Basic Operation Adjusting Volume/Bal- ance/Fader Press and release the MODE button repeatedly to choose the desired mode. Notes: • If the button is not pressed in 5 seconds after selecting the BALANCE and FADER modes, the unit automatically returns to the VOLUME mode. Sub-W •... -
Page 15: Level Indicateur Display Pattern Switching
English Basic Operation Level Indicator Level Indicator Display Pattern Switching Press and hold the DISP2 button for at least 2 seconds. Each press of the button changes the display pattern. Indicator 1 The indicators will flash outward from the center following the audio levels. -
Page 16: Display Angle Adjustment
English Basic Operation Display Angle Adjustment It is possible to adjust the angle (5 steps) of the movable display according to the user prefer- ence. Press the ANGLE button. Movable display Notes: • The display will close a half minute after the ignition key is turned to the OFF position. -
Page 17: Using The Function Button
English Basic Operation Using the Function Button The chart below describes the function of each preset button. The function will change depending upon the source selected and the condition of the FUNCTION switch, ON or OFF. Note: This function is not available for the built- in CD/cassette of this device. -
Page 18: Clock Operation
English Clock Operation Displaying Time Press the DISP1 button. 12:00 The mode will change every time the button is pressed. Select the time display mode. Notes: • When the power is off, the time will not be displayed regardless of whether the DISP1 button is pressed. -
Page 19: Setting Time
English Clock Operation Setting Time Make sure you are in the Clock mode by pressing the Clock button (see page 18). Then, 12:30 press and hold the CLK ADJ. button for at least 2 seconds. The time indication will begin to blink. -
Page 20: Radio Operation
English Radio Operation Manual Tuning Press the SOURCE button to select the radio mode. (* Only with the CD shuttle connected.) TUNER TAPE CD CHANGER Press the BAND button repeatedly until the desired radio band is displayed. Press the DN or UP button to move downward or upward one step respectively until the desired station frequency is displayed. -
Page 21: Automatic Seek Tuning
Réception Operación de la English Radio Operation radio radio Automatic Seek Tuning Press the SOURCE button to select the mode. (* Only with the CD shuttle connected.) TUNER TAPE CD CHANGER Press the BAND button repeatedly until the desired radio band is displayed. When the Function mode is ON*, press the (TUNE) button to illuminate the DX indicator in DX SEEK... -
Page 22: Manual Storing Of Station Presets
English Radio Operation Manual Storing of Station Presets 1. Tune in the desired radio station you wish to store in the preset memory. 2. Press and hold any one of the preset buttons ( through ) for at least 2 seconds. -
Page 23: Mono/Stereo Switching
Réception Operación de la English Radio Operation radio radio Mono/Stereo Switching "ST" indicator appears when a stereo station is tuned in. When the Function mode is ON*, press the (MONO) button to switch from stereo to monaural FM reception. This will help in reducing the noise of weak FM Stereo broad- casts. -
Page 24: Automatic Memory Of Station Presets
English Radio Operation Automatic Memory of Station Presets Press the BAND button repeatedly until the desired radio band is displayed. When the Function mode is ON*, press the (A. ME) button. The frequency on the display continues to change while the automatic memory is in progress. -
Page 25: Storing Into Direct Access Preset (D.a.p.) Band
Réception Operación de la English Radio Operation radio radio Storing into Direct Access Preset (D.A.P.) Band A combination of radio stations from any band, AM and FM (up to 6 stations) can be manually preset onto the D.A.P. band. When the Function mode is ON*, press the (D.A.P.) button to activate the D.A.P. -
Page 26: Tuning To Preset Stations
English Radio Operation Tuning to Preset Stations Press the BAND button repeatedly until the desired band is displayed. Press the (D.A.P.) button when the station desired was stored using the D.A.P. function. Press the station preset button ( through FM1 P2 90.1 ) that has your desired radio station in memory. -
Page 27: Displaying The Title
Réception Operación de la English Radio Operation radio radio Displaying the Title The titles for certain stations can be displayed if they were previously input. For details on inputting titles, see Titling Stations (page 28). Press the TITLE button while in the TUNER mode. -
Page 28: Titling Stations
English Radio Operation Titling Stations It is possible to title your favorite radio broad- casting stations. Tune in a station to be titled. Press the TITLE button and select the title display mode. For details, see Displaying the Title (page 27). Press and hold the TITLE button for at least 2 seconds. - Page 29 Réception Operación de la English Radio Operation radio radio Titling Stations (Continued) Repeat steps to input up to 16 digits. To store the inputted title in memory, press the TITLE button after confirming the last character. To cancel the title display mode, press the TITLE button and switch to the display mode.
-
Page 30: Cd Operation
English CD Operation Opening and Closing the Movable display Press the CD button. The movable display will open. Movable display To close the movable display, press the CD button again. The movable display will close. Notes: • Do not apply shock to the movable display when it is open as it may result in malfunc- tion of the unit. -
Page 31: Playback
English CD Operation Playback Press the CD button. The movable display will open. Insert a disc with the label side facing up. The disc will be pulled into the unit automati- cally. The movable display will close and playback will begin. When a disc is already inserted, press the SOURCE button to switch to the CD mode. - Page 32 English CD Operation Playback (Continued) Notes: • Do not attach adapters to CD singles (8cm) as it may cause malfunction of the unit. • When the disc is being pulled into the unit, do not grab the disc or turn the power on or off.
-
Page 33: Fast Forward And Backward
English CD Operation Fast Forward and Back- ward Press and hold the DN or UP button to quickly move backward or forward until you reach the desired section of the track. Repeat Play Press the (RPT) button to play back repeatedly the track being played. -
Page 34: Music Sensor (Skip)
English CD Operation Music Sensor (Skip) Momentarily press the DN button once to return to the beginning of the current track. If you wish to access a track further back, repeatedly press until you reach the desired track. Press the UP button once to advance to the beginning of the next track. -
Page 35: Random Play)
English CD Operation M.I.X. (Random Play) Press the (M.I.X.) button in the play or pause mode. The unit enters the M.I.X. mode and the tracks on the disc will be played back in a random sequence. After all the tracks on the disc have been played back once, the player will load the next disc and begin a new random sequence until the M.I.X. -
Page 36: Scanning Programs
English CD Operation Scanning Programs Press the (SCAN) button to activate the Scan mode. The first 10 seconds of each track will be played back in succession. (OFF) To stop the Scan, press the (SCAN) button to deactivate the Scan mode. -
Page 37: Displaying The Title/Text
English CD Operation Displaying the Title/Text It is possible to display the CD title if the title has been previously inputted. For details, see Titling Disc (page 38). In addition, it is possible to display text such as the disc name and the track name during music CD playback for text compatible CDs. -
Page 38: Titling Disc
English CD Operation Titling Disc It is possible to title your favorite CDs. Play the CD you want to title. Press the TITLE button and select the title display mode. For details, see Displaying the Title/Text (page 37). Press and hold the TITLE button for at least 2 seconds. - Page 39 English CD Operation Titling Disc (Continued) Repeat step to input up to 16 digits. (8 digits for CD shuttle) To store the inputted title in memory, press the TITLE button after confirming the last character. To cancel the title display mode, press the TITLE button and switch to the display mode.
-
Page 40: Cd Shuttle Operation
CD Shuttle Operation Operation of CD Shuttle (Option) If an Ai-NET applicable CD Shuttle made by ALPINE is connected, this unit can operate the CD Shuttle. Press the SOURCE button to switch to the CD changer mode. The mode changes every time the button is pressed. - Page 41 English CD Shuttle Operation Deleting a Stored Title It is possible to delete stored titles with the CD shuttle. Press the TITLE button when in the CD Shuttle mode and select the title display mode. For details, see Displaying the Title/Text (page 37).
- Page 42 English CD Shuttle Operation Searching Titled Discs (Title Search Menu) It is possible to search the disc you want to listen to within the CD Shuttle from the stored titles. Press the TITLE button when in the CD Shuttle mode and select the title display mode. For details, see Displaying the Title/Text (page 37).
- Page 43 English CD Shuttle Operation Multi-Changer Selection Alpine's Ai-NET system will support up to 6 CD Shuttles. When operating two or more changers, the KCA-400C (Multi-Changer Switching Device) must be used. If you use 1 Switching device, you can connect up to 4 CD Shuttles.
-
Page 44: Cassette Player Operation
English Cassette Player Operation Playback When a tape cassette is inserted, the playback starts. When a cassette is already inserted, press the SOURCE button to select the TAPE mode. The mode will change each time the button is pressed. (*Only with a CD Shuttle connected.) TUNER TAPE CD CHANGER... -
Page 45: Dolby B Nr (Noise Reduction)
English Cassette Player Operation Dolby B NR (Noise Reduc- tion) • Dolby noise reduction manufactured under license from Dolby Laboratories Licensing Corporation. "DOLBY" and the double-D symbol are trademarks of Dolby Laborato- ries Licensing Corporation. After inserting a Dolby B NR encoded tape, press the button. -
Page 46: Fast Forward And Rewind
English Cassette Player Operation Fast Forward and Rewind Press the REW or FF ( DN or UP ) button button during tape play to fast rewind or forward the tape respectively. When the end of the tape is reached in the rewind mode, the player stops automatically and begins playing from the beginning of the same side. -
Page 47: Manual Reverse
English Cassette Player Operation Manual Reverse Press the PROG button during tape play to change the direction of play. Scanning Programs Press the (SCAN) button to play the first 10 seconds of each program on the tape. Press the (SCAN) button to cancel the scanning when the desired program is found. -
Page 48: Program Sensor
English Cassette Player Operation Program Sensor (P.S.) Press the P.S. DN button once to return to the P.S -1 beginning of the current selection being played. If you wish to return to a selection further back, press repeatedly until the number of selections you would like to skip is shown in the display. -
Page 49: Surround Operation
English Surround Operation DSP Surround Presets The CDA-W550E employs DSP (Digital Signal Processing) to duplicate mathematically various listening environments. Six typical surround settings are provided for a variety of musical source material as follows. Press the DSP button and select the SUR mode. -
Page 50: Adjusting The Surround Settings
English Surround Operation Adjusting the Surround Settings You can adjust the Surround settings for your preference. Select the surround mode (other than normal) to adjust. See DSP Surround Presets (page 49). Press and hold the DSP button for at least 2 seconds within 10 seconds of Step Press either the DN button or the UP... -
Page 51: Equalizer Operation
English Equalizer Operation Equalizer Presets Six typical equalizer settings are preset at the factory for a variety of musical source material. Press the DSP button and select the EQ mode. The mode will change every time the button is pressed. Press either the DN button or the UP button within 10 seconds of Step... -
Page 52: Adjusting The Equalizer Settings
English Equalizer Operation Adjusting the Equalizer Settings You can modify the Equalizer settings to create a response curve more appealing to your personal taste. Select the equalizer characteristic to adjust. See Equalizer Presets (page 51). Press and hold the DSP button for at least 2 seconds within 10 seconds of Step Press either the DN button or the UP... -
Page 53: Memorizing The Equalizer Settings
English Equalizer Operation Memorizing the Equalizer Settings Recalls the manufacturer's settings of the surround and equalizer. In addition, allows you to store your own sound preferences for later recall. (Refer to page 49 – 52.) Within 10 seconds after operating step , press and hold any one of the Preset buttons ( –... -
Page 54: Recalling The Memorized Equalizer/Surround Settings
English Equalizer Operation Recalling the Memorized Equalizer/Surround Settings Press the DSP button and select either the equalizer or surround mode. To recall your preset, pressing one of the preset switches ( – ) within 10 seconds after the operation in Section . -
Page 55: Switching Graphic Screens
English Equalizer Operation Switching Graphic Screens Press the DISP2 button. Select the desired pattern from the graphic design pattern. The graphic screen will change every time the button is pressed. Screen Display Contents SCREEN 1 Normal display SCREEN 2 Peak hold display SCREEN 3 Peak rise display SCREEN 4... -
Page 56: Choosing The Listening Position Selector (L
English L.P.S. Operation Choosing the Listening Position Selector (L.P.S.) This feature gives the user the ability to adjust the time delay of the 4 main speakers to provide the ideal sound stage for each listener in the car. The staging can be optimized for the front passenger, driver, front passenger and driver, or front and rear passengers and driver. -
Page 57: Remote Control
English Remote Control Controls 1 Mute Button Press the button to lower the volume by 20 dB instantly. Press the button again to cancel. 2 Power Switch Press the switch to turn the power on/off. k k k k k Button Press the button to switch between the Play and Pause modes for the cassette... - Page 58 English Remote Control Button Radio mode: SEEK (DN) Button Tape mode: REW Button CD/CD Shuttle mode: Press the button to go back to the beginning of the current track. Button Radio mode: SEEK (UP) Button Tape mode: FF Button CD/CD Shuttle mode: Press the button to advance to the beginning of the next track.
-
Page 59: Battery Replacement
English Remote Control Battery Replacement Applicable battery: Use two "AAA" sized dry batteries or equivalent. Opening the battery cover Slide out the battery cover while firmly pressing outward. Replacing the battery Put the batteries in the case as illustrated. Closing the cover Push the cover as illustrated until a click is heard. -
Page 60: Disc Care
Using such accessories Transparent Sheet can cause the disc to be out of standard specifications and may create operational problems. We recommend not using these accessories on discs played in Alpine CD players. Disc Stabilizer... -
Page 61: In Case Of Difficulty
This guide will help you isolate the problem if the unit is at fault. Otherwise, make sure the rest of your system is properly connected or consult your authorized Alpine dealer. Initial Turn-on After Installation Symptom Cause and Solution No function or display. -
Page 62: Radio Mode
English In Case of Difficulty Radio Mode Symptom Cause and Solution Unable to receive stations. • No antenna or open connection in cable. – Make sure the antenna is properly connected; replace the antenna or cable if necessary. Unable to tune stations in the seek mode. •... -
Page 63: Tape Mode
English In Case of Difficulty CD Mode Symptom Cause and Solution CD not functioning. • Out of operating temperature range +50°C (+120°F) for CD. – Allow the car's interior (or trunk) tempera- ture to cool. CD playback sound is wavering. •... -
Page 64: In Case Of Difficulty
Mechanism error. ERROR 1. Press the CD button and eject the CD. If not ejecting, consult your Alpine dealer. 2. When the error indication remains after ejecting, press the CD button again. If the error indication still does not turn off... - Page 65 • Malfunction in the CD Shuttle. – Consult your Alpine dealer. Press the magazine eject button and pull out the magazine. Check the indication. Insert the magazine again. If the magazine cannot be pulled out, consult your Alpine dealer.
-
Page 66: Specifications
English Specifications FM TUNER SECTION Tuning Range ...................... 87.5 – 108.0 MHz Mono Usable Sensitivity ................9.3 dBf (0.8µV/75 ohms) 50 dB Quieting Sensitivity ..............13.5 dBf (1.3µV/75 ohms) Alternate Channel Selectivity ....................80 dB Signal-to-Noise Ratio ......................70 dB Stereo Separation ........................ - Page 67 Wow & Flutter ........................0.06% Tape Signal-to-Noise Ratio With Dolby B NR On ....................68/60 dB Frequency Response With Alpine Test Tape ................. 30 – 20,000 Hz (±3 dB) EQUALIZER SECTION Number of Bands ..........................7 Equalizer Centre Frequency Range ..........63/160/400 Hz/1/2.5/6.3/16 kHz, ±10 dB for each range...
- Page 68 English Specifications GENERAL Power Requirement ..............14.4V DC (11 – 16V (allowable)) Maximum Power Output* ....................40W x 4 Output Voltage ....................500 mV/10k ohms Maximum Pre-Output Voltage ..................2V/10k ohms Weight ......................2.6 kg (5 lbs. 12 oz) CHASSIS SIZE Width ..........................
Need help?
Do you have a question about the CDA-W550E and is the answer not in the manual?
Questions and answers