Esoteric SA-60 Owner's Manual
Universal audio player
Hide thumbs
Also See for SA-60:
- Product comparisons (1 page) ,
- Brochure & specs (12 pages) ,
- Upgrade information (3 pages)

Related Manuals for Esoteric SA-60


Summary of Contents for Esoteric SA-60
- Page 1 D00918300B Universal Audio Player OWNER’S MANUAL ....MANUEL DU PROPRIÉTAIRE . . .
-
Page 2: Important Safety Instructions
IMPORTANT SAFETY INSTRUCTIONS 1) Read these instructions. 2) Keep these instructions. 3) Heed all warnings. CAUTION: TO REDUCE THE RISK OF ELECTRIC SHOCK, 4) Follow all instructions. DO NOT REMOVE COVER (OR BACK). NO USER- 5) Do not use this apparatus near water. SERVICEABLE PARTS INSIDE. - Page 3 This product has been designed and manufactured according to WARNING: TO PREVENT FIRE OR SHOCK FDA regulations “title 21, CFR, chapter 1, subchapter J, based on HAZARD, DO NOT EXPOSE THIS APPLIANCE the Radiation Control for Health and Safety Act of 1968“, and is TO RAIN OR MOISTURE.
-
Page 4: Table Of Contents
Contents Before Use Thank you for choosing Esoteric. Read this manual What’s in the box carefully to get the best performance from this unit. Please confirm that the following accessories are in the box when you open it. Remote control unit x 1 Contents. -
Page 5: Restoring Factory Settings
Read this before operation Restoring factory settings < Be careful to avoid injury when moving the unit, on account If you have made a lot of changes to the setup, and want to of its weight. Get someone to help you if necessary. restart from a known set of options, restore the unit to the factory settings as follows: <... -
Page 6: Discs
If you attempt to play back such discs, there is a risk that sudden loud noise can blast over the speakers at full volume and cause *: As the SA-60 has no video output terminals, you cannot see damage to the speakers and your hearing. - Page 7 < Always place the disc on the disc tray with the label side up. < Do not use irregular shape doscss (octagonal, heart shaped, (Compact discs can be played or recorded only on one side.) business card size, etc.). Discs of this sort can damage the unit: <...
-
Page 8: Connections
Connections CAUTION: < Switch off the power to all equipment before making connections. < Read the instructions of each component you intend to use with this unit. < Be sure to insert each plug securely. To prevent hum and noise, avoid bundling the signal interconnection cables together with the AC power cord or speaker cables. - Page 9 2 channel analog audio output terminals Word sync connector Connect either the XLR or RCA (pin) terminals to analog This allows the use of an externally-generated word clock audio inputs of a stereo amplifier using commercially connection, using a commercially available BNC coaxial available XLR or RCA audio cables.
-
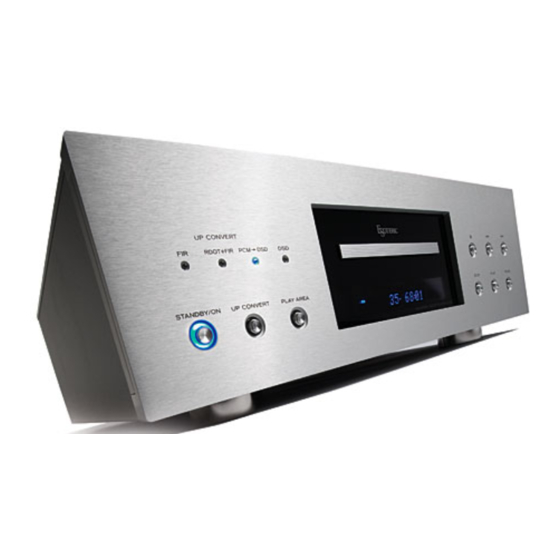
Page 10: Front Panel Features
Front panel features STANDBY/ON Use this button to turn the unit on and standby. The ring surrounding the button is red in the standby mode. It turns blue when the unit is turned on. The equipment draws nominal non-operating power from the AC outlet with its STANDBY/ON in the standby position. -
Page 11: Front Panel Display
Front panel display Disc type indicator Shows the type of disc currently loaded. REPEAT indicator Lights when repeat play is selected SETUP indicator Lights to show that the GUI is being displayed through the video outputs. Message area Alphanumeric display to show times, titles, status messages, etc. DOWN MIX indicator Lights to show that a multi-channel source has been down mixed to 2 channels. -
Page 12: Understanding The Remote Control Unit
Understanding the remote control unit ON/STANDBY Use the ON button to turn the unit on. Use the STANDBY button to turn it standby. When you press the ON button, white buttons on the remote control unit light for several seconds. Number buttons Use these for selecting tracks by number, etc. - Page 13 OPEN/CLOSE How to insert the batteries Use this button to open and close the disc tray. Remove the cover of the remote control unit with a screwdriver. After checking the polarity (+/_) of two AA batteries, insert the batteries, replace the cover and replace CLEAR the screws.
-
Page 14: Playback
“unloaded” and the tray opens. As the SA-60 has no video output terminals, you cannot see an on-screen menu of a DVD video disc. Playback of some DVD video discs may be difficult depending... -
Page 15: Selecting Groups And Titles
Selecting groups and titles Skipping playback Use the remote control unit’s GROUP buttons ( ) to Press the SKIP button (. or /) repeatedly until the change titles and groups on DVD media. desired chapter or track is found. The selected chapter or If pressed during playback, these buttons start playback at the track will be played from the beginning. -
Page 16: Fast Scanning
Fast scanning Repeat mode Use the REPEAT button to select the repeat mode for When playing back, use the SCAN button (m or ,) to playback. Repeated presses of the REPEAT button cycle move backwards and forwards (sound is muted for DVD video between the following options: discs). -
Page 17: Selecting Audio
Selecting audio Display dimming Many DVD discs include audio in different languages, as well The display on the main unit can be dimmed to suit the as stereo and multi-channel surround versions of the environment in which you listen to music or watch video. soundtrack. -
Page 18: Word Sync
PCM q DSD The SA-60 can convert PCM signals to the DSD signals (1 bit, 64 fs) that are used on a Super Audio CD. < The conversion has effect on signals output from the... -
Page 19: Changing The Display Mode
Changing the display mode During playback, it is possible to change the display as shown Super Audio CD/CD playback here. The display on both the main unit, and the on-screen display (when the video output is on) changes. When playback stops, the display mode reverts to the first type Currently playing track Elapsed time of current track of display. -
Page 20: Setting Digital Filter, Etc
Setting Digital Filter, etc. Available menu item and options WORD Turns on or off the word sync function. PLAY AREA < The WORD button of the remote control unit provides the same function (see page 18). When playback is stopped, press and hold the PLAY DF (digital filter) AREA button for more than 2 seconds. -
Page 21: Settings (Introduction)
Settings (introduction) Turn on the main unit. When an option marked with “>” is displayed, use the up or down cursor buttons to change the setting, and press the ENTER button to confirm the entry. Press the SETUP button to enter the setup menu. <... -
Page 22: Setup Menu Chart
Settings (Setup Menu Chart) AudioSetup GeneralSet Analog Out options SP Setup SP Size L/R Size options DigitalOut options DigitalOut options C Size options CD Direct options SR/SL Size options SW ON/OFF DR Control options options Distance L/R *.*m options Group Play options C *.*m options... -
Page 23: Analog Output Settings (Analog Out)
Settings Analog output settings (Analog Out) CD Digital Direct (CD Direct) When an option marked with “>” is displayed, use the up or When an option marked with “>” is displayed, use the up or down cursor buttons to change the setting, and press the down cursor buttons to change the setting, and press the ENTER button to confirm the entry. -
Page 24: Group Playback Mode Of Dvd Audio Discs (Group Play)
Settings Settings (Speaker Setup) Group playback mode of DVD audio discs Use these speaker setup menus only when the 5.1-channel AUDIO OUT terminals are connected to a surround sound (Group Play) amplifier. When an option marked with “>” is displayed, use the up or down cursor buttons to change the setting, and press the There is no need for this setup when not using the 5.1-channel ENTER button to confirm the entry. -
Page 25: Speaker Size (Sp Size)
Speaker Size (SP Size) Speaker distance (Distance) Select the size (Large or Small) independently for the L/R Ideally, the speakers should be placed so that they are all the (front pair of speakers), the C (center speaker) and the SR/SL same distance from the listening position. -
Page 26: Speaker Levels (Sp Level)
Settings (Speaker Setup) Settings Speaker levels (SP Level) DVD digital output formats (DigitalOut) Use this to set the relative levels of the speakers. You can set This setting has an effect on the digital signal output from the the L/R pair together, and the center, and surround rear pair DIGITAL OUT terminals. -
Page 27: Specifications
Input level......TTL level/75 Ω The SA-60 can accept and synchronize to the following frequencies received from external devices (rectangular wave): 44.1kHz, 48kHz, 88.2kHz, 96kHz,... -
Page 28: Troubleshooting
Troubleshooting In case you experience any problem with this unit, please take Sound skips. the time to look through this chart and see if you can solve the e Place the unit on a stable place to avoid vibration and shock. problem yourself before you call your dealer. -
Page 29: Beware Of Condensation
Cannot output 96kHz or 88.2kHz digital audio. For European customers e Check that the DVD Digital Out setting is set to “Down Disposal of your old appliance Sample OFF” (see page 26). e Some copy protected discs do not output high sampling rate 1. -
Page 30: Avant Utilisation
Sommaire Avant utilisation Nous vous remercions pour l’achat d’un appareil Esoteric. Contenu de l’emballage Lire ce manuel avec attention pour obtenir les meilleures Veuillez vérifier que les accessoires suivants se trouvent dans performances possibles de cet appareil. l’emballage après l’avoir ouvert. - Page 31 NE DEPLACEZ PAS L’APPAREIL DURANT LA LECTURE Restauration des réglages d’usine Durant la lecture, le disque tourne à haute vitesse. Ne Si vous avez apporté beaucoup de changements à la soulevez et ne déplacez PAS l’appareil durant la lecture. Cela configuration, et si vous désirez revenir à...
-
Page 32: Disques
Les titres peuvent ensuite être divisés en chapitres. *: Comme le SA-60 n'a pas de prises de sortie vidéo, vous ne pouvez pas voir de menu à l'écran pour un DVD vidéo. La lecture de certains DVD vidéo peut être difficile selon le... - Page 33 être correctement reproduits par ce lecteur. Si vous utilisez de sources de chaleur comme des radiateurs ou des appareils tels disques dans cet appareil, TEAC ESOTERIC COMPANY ne électriques producteurs de chaleur. pourra être tenu pour responsable d’aucune conséquence et ne garantit pas la qualité...
-
Page 34: Connexions
Connexions ATTENTION < Eteignez tous vos équipements avant de faire des connexions. < Lisez les instructions accompagnant chaque élément que vous désirez utilisez avec cet appareil. < Veillez à bien insérer chaque fiche. Pour éviter le bruit et les ronflements, ne regroupez pas les câbles de signaux et les câbles d’alimentation électrique ou les câbles d’enceintes. - Page 35 Prises de sortie audio analogique 2 Connecteur de synchronisation Word canaux Clock Reliez les prises XLR ou cinch (RCA) aux entrées audio Il permet l’emploi d’une connexion à une référence word analogiques d’un amplificateur stéréo à l’aide de câbles clock externe, au moyen d’un câble coaxial BNC du audio XLR ou cinch (RCA) du commerce.
-
Page 36: Caractéristiques De La Face Avant
Caractéristiques de la face avant STANDBY/ON Utilisez cette touche pour allumer l’appareil et le mettre en veille. L’anneau entourant la touche est rouge en mode de veille et bleu quand l’appareil est allumé. L’équipement tire un courant nominal de veille de la prise secteur quand STANDBY/ON est en position de veille. -
Page 37: Afficheur De La Face Avant
Afficheur de la face avant Indicateur de type de disque Affiche le type de disque actuellement chargé. Indicateur de lecture en boucle (REPEAT) S’allume quand la lecture en boucle est sélectionnée. Indicateur de configuration (SETUP) S’allume pour signaler que l’interface graphique utilisateur est affichée par les sorties vidéo. -
Page 38: Comprendre La Télécommande
Comprendre la télécommande ON/STANDBY Utilisez la touche ON pour allumer l’appareil. Utilisez la touche STANDBY pour le mettre en veille. Quand vous appuyez sur la touche ON, les touches blanches de la télécommande s’allume pendant plusieurs secondes. Touches numériques Utilisez-les pour sélectionner les plages par numéro, etc. PLAY AREA Utilisez cette touche avec des DVD audio et Super Audio CD pour sélectionner la zone de lecture. - Page 39 WORD Comment insérer les piles Utilisez cette touche pour activer/désactiver la synchronisation Retirez le capuchon de la télécommande avec un tournevis. word clock. Après avoir vérifié la polarité (+/_) des deux piles AA, Quand elle est activée, l’appareil se synchronise sur une insérez-les, replacez le capuchon et ses vis.
-
Page 40: Lecture
Si le tiroir est ouvert durant la lecture, il peut falloir quelques secondes avant que Comme le SA-60 n'a pas de prises de sortie vidéo, vous ne le disque ne soit “libéré” et que le tiroir s’ouvre. -
Page 41: Sélection Des Groupes Et Des Titres
Sélection des groupes et des titres Saut de lecture Utilisez les touches GROUP ( ) de la télécommande Appuyez répétitivement sur une touche de saut (. ou pour changer de titre et de groupe sur un DVD. /) jusqu’à obtention du chapitre ou plage désiré. Le Si vous appuyez sur ces touches durant la lecture, elles chapitre ou plage sélectionné... -
Page 42: Recherche Accélérée
Recherche accélérée Lecture en boucle (Repeat) Utilisez la touche REPEAT pour sélectionner le mode de Lors de la lecture, utilisez les touches SCAN (m ou ,) lecture en boucle. Appuyer répétitivement sur la touche pour reculer ou avancer (le son est coupé pour les DVD REPEAT permet de passer en revue les options suivantes : vidéo). -
Page 43: Sélection Du Son
Sélection du son Atténuation de l’afficheur De nombreux DVD comprennent des pistes audio en La luminosité de l’afficheur du lecteur peut être atténuée en différentes langues, ainsi que des versions stéréo et surround fonction de l’environnement dans lequel vous écoutez de la multicanal de la bande son. -
Page 44: Synchronisation Word Clock
PCM q DSD Le SA-60 peut convertir les signaux PCM en signaux DSD (1 bit, 64 fs) utilisés par un Super Audio CD. < La conversion agit sur les signaux produits par les prises suivantes : XLR (symétrique) L et R... -
Page 45: Changement Du Mode D'affichage
Changement du mode d’affichage Durant la lecture, il est possible de changer l’affichage comme Lecture de Super Audio CD/CD indiqué ici. L’affichage sur l’appareil et celui à l’écran (quand la sortie vidéo est activée) changent tous les deux. Quand la lecture stoppe, le mode d’affichage revient au premier type d’affichage. -
Page 46: Réglage Du Filtre Numérique, Etc
Réglage du filtre numérique, etc. Paramètres de menu et options disponibles WORD Active/désactive la fonction de synchronisation word clock. < La touche WORD de la télécommande offre la même PLAY AREA fonction (voir page 44). DF (digital filter) Quand la lecture est arrêtée, appuyez sur la touche Sélectionne les caractéristiques du filtre numérique RIF. -
Page 47: Réglages (Introduction)
Réglages (introduction) Allumez l'unité principale. Quand une option marquée d'un “>” est affichée, utilisez les touches curseur haut et bas pour changer le réglage, et appuyez sur la touche ENTER pour confirmer le choix. Appuyez sur la touche SETUP pour accéder au menu de configuration. -
Page 48: Tableau Du Menu De Configuration
Réglages (Tableau du menu de configuration) AudioSetup GeneralSet Analog Out options SP Setup SP Size L/R Size options DigitalOut options DigitalOut options C Size options CD Direct options SR/SL Size options DR Control options SW ON/OFF options Distance L/R *.*m options Group Play options... -
Page 49: Réglages De Sortie Analogique (Analog Out)
Réglages Réglages de sortie analogique (Analog Out) Sortie numérique directe du CD (CD Direct) Quand une option marquée d'un “>” est affichée, utilisez les Quand une option marquée d'un “>” est affichée, utilisez les touches curseur haut et bas pour changer le réglage, et touches curseur haut et bas pour changer le réglage, et appuyez sur la touche ENTER pour confirmer le choix. -
Page 50: Mode De Lecture Groupée (Dvd Audio) (Group Play)
Réglages Réglages (configuration d’enceintes) Mode de lecture groupée (DVD audio) N'utilisez ces menus de configuration d'enceintes que lorsque les prises de sortie audio (AUDIO OUT) 5.1 sont (Group Play) reliées à un amplificateur de son surround. Quand une option marquée d'un “>” est affichée, utilisez les touches curseur haut et bas pour changer le réglage, et Cette configuration n’est pas nécessaire si vous n’utilisez pas les appuyez sur la touche ENTER pour confirmer le choix. -
Page 51: Taille Des Enceintes (Sp Size)
Taille des enceintes (SP Size) Distance des enceintes (Distance) Sélectionnez la taille (Large (grande) ou Small (petite)) Idéalement, les enceintes doivent être placées de façon à être indépendamment pour L/R (paire d’enceintes avant), C toutes à la même distance de la position d’écoute. Si cela (enceinte centrale) et SR/SL (paire d’enceintes surround). -
Page 52: Niveau Des Enceintes (Sp Level)
Réglages (configuration d’enceintes) Réglages Niveau des enceintes (SP Level) Formats de sortie numérique de DVD (DigitalOut) Utilisez ce paramètre pour régler le niveau relatif des enceintes. Vous pouvez régler ensemble les enceintes de la Ce réglage agit sur la sortie du signal numérique par les prises paire L/R, et indépendamment l’enceinte centrale, la paire de sortie numérique (DIGITAL OUT). -
Page 53: Caractéristiques
Caractéristiques Généralités Accessoires fournis Système ....DVD audio, Super Audio CD, CD, Cordon d’alimentation x 1 et DVD vidéo (lecture audio seulement) Télécommande x 1 Alimentation Piles (AA, R6, SUM-3) x 2 Modèle Europe . -
Page 54: Guide De Dépannage
Guide de dépannage Si vous avez des problèmes avec cet appareil, veuillez lire ce qui La recherche s’arrête. suit et voyez si vous pouvez résoudre le problème vous-même e La recherche ne fonctionne pas dans les menus. avant d’appeler votre revendeur. Le son saute. - Page 55 L’enregistrement audio numérique n’est pas possible sur Faites attention à la condensation un autre appareil. Quand l’appareil (ou un disque) est déplacé d’un endroit froid e Vérifiez que la sortie audio numérique est réglée sur “ON”. à un endroit chaud, ou s’il est employé après une hausse Et que le format de sortie numérique est bien réglé...
- Page 56 TEAC ESOTERIC COMPANY 3-7-3, Nakacho, Musashino-shi, Tokyo 180-8550, Japan Phone: (0422) 52-5132 e-mail: eso-os@tec.teac.co.jp TEAC AMERICA, INC. 7733 Telegraph Road, Montebello, California 90640 Phone: (323) 726-0303 TEAC CANADA LTD. 5939 Wallace Street, Mississauga, Ontario L4Z 1Z8, Canada Phone: (905) 890-8008 TEAC MEXICO, S.A.
Need help?
Do you have a question about the SA-60 and is the answer not in the manual?
Questions and answers