Table of Contents
Advertisement
Quick Links
Advertisement
Table of Contents

Related Manuals for AEG 11000 M

Summary of Contents for AEG 11000 M
- Page 1 11000 M / 31000 M Indbygnings-komfur Integrerbara hällar Innbyggings-toppflater Built-In Hobs Brugsanvisning/Installationsvejledning Bruksanvisning/Installationsanvisning Bruksanvisning/Installasjonsveiledning Operating/Installation Instructions...
-
Page 2: Dear Customer
Dear Customer! Please read through this user information carefully. Above all, please take note of the “Safety Instructions” section. Please keep this user information for later reference and pass it on to any subsequent owner. The warning triangle and/or the specific words (Caution!, Important!) are used to highlight instructions that are important for your safety or for the function of the appliance. -
Page 3: Table Of Contents
Contents CONTENTS Operating Instructions ........64 Safety . -
Page 4: Operating Instructions
Operating Instructions OPERATING INSTRUCTIONS Safety The safety aspects of this appliance comply with the accepted technical standards and the German Appliance Safety Law. However, we also con- sider it our obligation as a manufacturer to make you aware of the fol- lowing safety information. -
Page 5: Safety When Cleaning
Operating Instructions Safety When Cleaning Cleaning the appliance with a steam or high pressure cleaner is forbid- den for safety reasons. In this way you avoid damaging your appliance • Do not use the cooking surface as a work surface or for storage. •... -
Page 6: Disposal
Operating Instructions Disposal Disposing of Packaging Material • All packaging material can be recycled, sheeting and hard foam parts are appropriately marked. Please dispose of the packaging material and any old appliance properly. • Please observe national and regional regulations, and the markings on the materials (material separation, waste collection, recycling depots). -
Page 7: Appliance Description
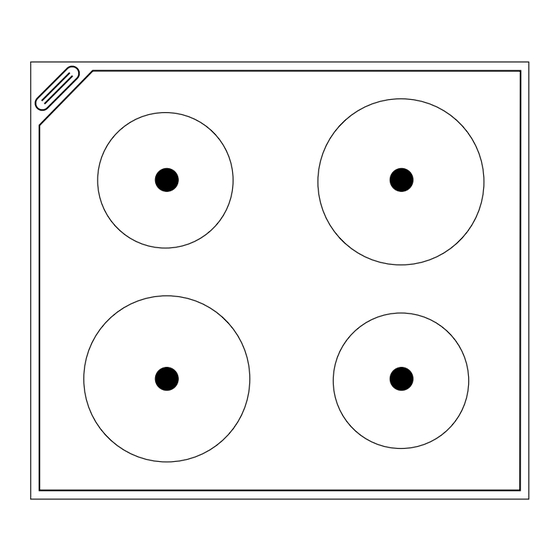
Operating Instructions Appliance Description Cooking Surface Features Oven Steam Outlet Hotplates ø 18.0 cm Hotplates ø 14.5 cm... -
Page 8: Usage, Tips
Operating Instructions Usage, Tips Pans The better the pan, the better the results. • You can recognise good pans by their bases. The base should be as thick and flat as possible. • Do not use cast iron pans or pans with damaged bases that are rough or burred. -
Page 9: Cleaning And Care
Operating Instructions Cleaning and Care Clean the hob after each use, when it is still warm to the touch or cold. By this means you will avoid spills becoming burnt on. 1. Remove heavy soiling with fine scouring sand or a scouring pad. 2. -
Page 10: What To Do, If
Operating Instructions What to do, if ..the cooking zones do not work? Check whether • the corresponding cooking zone is switched on. • the heat setting is correct. • the mains fuse (fuse box) has blown. If this information does not provide you with the necessary assis- tance, please seek specialist advice. -
Page 11: Installation Instructions
Installation Instructions INSTALLATION INSTRUCTIONS Safety Instructions for the Installer • The appliance is only to be connected to the mains by a qualified electrician. • A device is to be included in the electrical installation that makes it possible to isolate the appliance from the mains supply with a mini- mum contact separation of 3 mm. -
Page 12: Installation In The Kitchen Work Surface
Installation Instructions Installation in the Kitchen Work Surface Make a note of the serial number on the appliance rating plate prior to installation. This number will be required in the case of requests for ser- vice and is no longer accessible after installation as it is on the original rating plate on the underside of the appliance. - Page 13 Installation Instructions • The six retaining brackets are inserted in the outer lip on the hob frame, A, in the positions marked (two on the left and right sides, one at the front and one at the back). The plastic clip on the bracket must engage firmly in the rectangular cut-out provided.
- Page 14 Installation Instructions...
- Page 15 Installation Instructions...
- Page 16 Installation Instructions...
-
Page 17: Electrical Connection
Installation Instructions Electrical Connection • Connect the cable harness with the 12 pole compact connector to the mating connector from the built-cooker or switch box. Please ensure that the cooking surface connector is inserted vertically from above in accordance with the numbers 1 – 2 – 3 – 4 and that it engages securely. -
Page 18: Technical Data
Installation Instructions Technical Data Appliance Dimensions Width 579 mm Depth 509 mm Height 43 mm Cut-Out Dimensions Width 560 mm Depth 490 mm Corner Radius Power Consumption Rear left and front right hotplates 1500 W Front left and rear right hotplates 2000 W Heater Element Voltage 230 V ~... -
Page 19: Regulations, Standards, Directives
Installation Instructions Regulations, Standards, Directives This appliance meets the following standards: • EN 60 335-1 and EN 60 335-2-6 in respect of the safety of electrical appliances for household use and similar purposes and • DIN 44546 / 44547 / 44548 in respect of properties of electrical cookers for the household. -
Page 20: Service
Service SERVICE The chapter “What to do if ...?” contains a list of some faults which you can remedy yourself. Look there first if a fault occurs. Is it a technical malfunction? If so, please contact your customer service centre. (You will find addresses and telephone numbers in the “Customer Service Centres”... - Page 21 Hier Typschild aufkleben! (nur für Werk) AEG Hausgeräte GmbH Postfach 1036 D-90327 Nürnberg http://www.aeg.hausgeraete.de © Copyright by AEG ANC 822 947 226 - 03 - 0701...
Need help?
Do you have a question about the 11000 M and is the answer not in the manual?
Questions and answers