
Subscribe to Our Youtube Channel
Related Manuals for GMC HG2000K


Summary of Contents for GMC HG2000K
-
Page 1: Instruction Manual
INSTRUCTION MANUAL 2000W Heat Gun Paint/ Stripper Kit • Melbourne • Perth • Auckland • Hong Kong • Shanghai • Taipei • New York • Verona • London • Paris HG2000K 030825 MA ED1... -
Page 2: Table Of Contents
Contents Warranty Introduction Environmental protection Description of symbols Specifications General safety instructions Safety rules for heat guns Know your product Accessories Features Variable Temperature Control Temperature Indicator Safety Cut Out Assembling the Wire Stand Unpacking Full 2 Years Home Use Warranty Whilst every effort is made to ensure your complete satisfaction with this tool, occasionally, due to the mass manufacturing techniques, a tool may not live up to our... -
Page 3: Introduction
Dear Customer If you require any help with your product, whether it is a Warranty claim, spare part or user information, please phone our Help Line for an immediate response. Phone 1300 880 001 in Australia or 0800 445 721 in New Zealand. -
Page 4: General Safety Instructions
General safety instructions To use this tool properly, you must observe the safety regulations, the assembly instructions and the operating instructions to be found in this Manual. All persons who use and service the machine have to be acquainted with this Manual and must be informed about its potential hazards. -
Page 5: Safety Rules For Heat Guns
17. Stay alert. Watch what you are doing. Use common sense. Do not operate a power tool when you are tired. 18. Check for damaged parts. Before using a tool, check that there are no damaged parts. If a part is slightly damaged, carefully determine if it will operate properly and perform its intended function. -
Page 6: Know Your Product
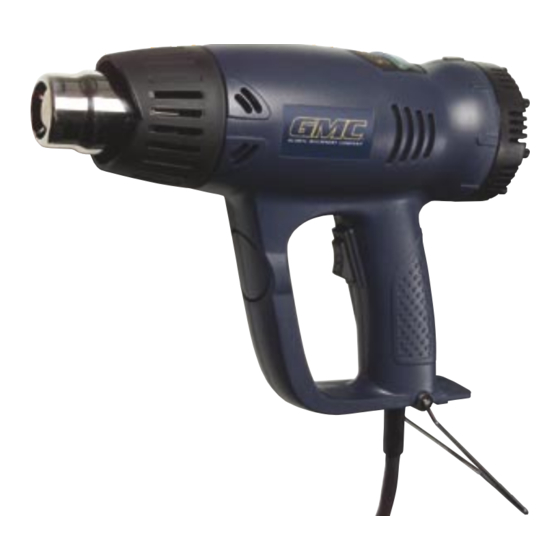
Know your product 1. Heat Nozzle 2. Guard Sleeve 3. Body 4. LED Temperature Indicator 5. Variable Temperature Control Dial 6. Two speed rocker switch 7. Wire Stand 8. Power Cord Accessories 9. Heat Spreader 10. Heat Reflector 11. Heat Concentrator 12. -
Page 7: Features
Features: Two Speed Rocker Switch: The rocker switch can be adjusted to 3 positions and these are: Position 0: Stop/Off Position 1: 50° - 550°C Position 2: 50° - 650°C Variable Temperature Control The variable temperature control enables the temperature to be set and adjusted between 50°C and 650°C, depending upon the type of material and the... -
Page 8: Unpacking
necessary. A Phillips #1 screwdriver (not supplied) is needed during the assembly. Place the wire stand to the bottom of the handle, ensuring that the ends of the stand align themselves with the holes on the handle. Insert the Phillips screw on one side between the end of the stand and the hole of the handle. - Page 9 Carefully read the entire Instruction Manual Before returning this product for a Warranty Claim or any other reason Please Call 1300 880 001 (Australia) or 0800 445 721 (New Zealand) When you make your call, please have the following information at hand: •...
Need help?
Do you have a question about the HG2000K and is the answer not in the manual?
Questions and answers