Honeywell MX7 Tecton User Manual
Hand-held computer
Hide thumbs
Also See for MX7 Tecton:
- Reference manual (366 pages) ,
- User manual (354 pages) ,
- Quick start manual (13 pages)

Related Manuals for Honeywell MX7 Tecton


Summary of Contents for Honeywell MX7 Tecton
- Page 1 MX7 Tecton™ Hand-Held Computer Microsoft® Windows® Embedded CE 6 Operating System User's Guide...
-
Page 2: Limited Warranty
Disclaimer Honeywell International Inc. (“HII”) reserves the right to make changes in specifications and other information contained in this document without prior notice, and the reader should in all cases consult HII to determine whether any such changes have been made. The information in this publication does not represent a commitment on the part of HII. -
Page 3: Table Of Contents
Handle Handstrap Keypads 55 Key Delete Primary ANSI Keypad 55 Key Backspace Primary ANSI Keypad 32 Key Numeric-Alpha Keypad Chapter 2: Set Up A New MX7 Tecton Hardware Setup Software Setup Battery Connect or Remove the Battery Pack Insert/Replace Battery... - Page 4 2-22 Startup Help 2-23 Continuous Scan Mode 2-23 Chapter 3: Connecting Cables to the MX7 Tecton Connecting the USB Client and Power Cable Connecting the Serial and Power Cable Connecting an External Power Supply Connecting Vehicle Power DC to DC Power Supply Installation...
- Page 5 Cradle Power Connector Port 3-10 Chapter 4: Product Agency Compliance - MX7 Tecton Laser Light Safety Statement Vehicle Power Supply Connection Safety Statement Chapter 5: Technical Assistance...
-
Page 7: Chapter 1: Introduction
This user's guide has been developed for a MX7 Tecton with a Microsoft® Windows® Embedded CE 6 operating system. End User License Agreement (EULA) When a new MX7 Tecton starts up a EULA is displayed on the touch screen. It remains on the screen until the Accept or Decline button is tapped with a stylus. -
Page 8: Laser Warnings And Labels
Do not stare directly into the laser beam. Do not remove the laser caution labels from the MX7 Tecton. Do not connect the laser bar code aperture to any other device. The laser bar code aperture is certified for use with the MX7 Tecton only. -
Page 9: Components
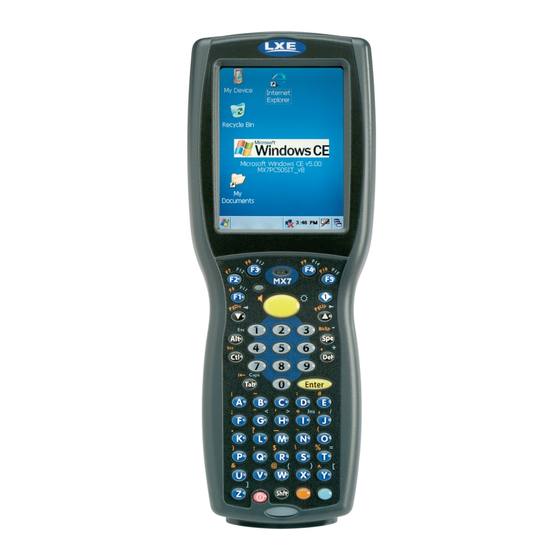
Components Front 1. Scanner/Imager Aperture 6. Blue Key (Sticky Key) 2. Speaker 7. Scan Status LED 3. System Status LED 8. Cable Port 4. Scan Button 9. On / Off Button 5. Orange Key (Sticky Key) 10. Alpha Lock LED (32-Key only) Diamond Keys... -
Page 10: Back
Back 1. Scanner/Imager Aperture 2. Stylus and Stylus Pocket 3. Trigger Handle Attach Points 4. Main Battery 5. Battery Fastener 6. Cable Port... -
Page 11: I/O Port And Cables
I/O Port and Cables Cable: Multipurpose RS232 and Power MX7055CABLE Cable: Multipurpose USB and Power MX7052CABLE Adapter/Cable: Audio MX7060CABLE Adapter: RS232 PC port to D9 male MX7058CABLE... -
Page 12: Scanner / Imager Aperture
Scanner / Imager Aperture 1. Scanner / Imager Aperture 2. MX7 Tecton Front Caution: Never stare directly into the beam aperture. If Continuous Scan Mode has been enabled (default is disabled), the laser is always on and decoding. Caution: Laser beam is emitted continuously. -
Page 13: Keypads
Keypads 55 Key Delete Primary ANSI Keypad 1. System Status LED 2. Volume Control Icon 3. Display Brightness Icon 4. Diamond Key 5. Scan Button 6. Enter Key 7. Orange Key (Sticky Key) 8. Blue Key (Sticky Key) 9. On Off Button 10. -
Page 14: 32 Key Numeric-Alpha Keypad
32 Key Numeric-Alpha Keypad 1. System Status LED 2. Alpha Status LED 3. Diamond Keys 4. Scan Button 5. Enter Key 6. Alph Key 7. Orange Key (Sticky Key) 8. Blue Key (Sticky Key) 9. On Off Button 10. Scan Status LED... -
Page 15: Chapter 2: Set Up A New Mx7 Tecton
Chapter 2: Set Up A New MX7 Tecton This page lists a quick outline of the steps you might take when setting up a new MX7 Tecton. More instruction for each step is listed later in this guide. Please refer to the MX7 Tecton Reference Guide for additional information and instruction. -
Page 16: Battery
An MX7 Tecton will retain data, while the main battery is removed and replaced with a fully charged main battery, for 5 minutes. Important: When the internal battery power is Low or Very Low connect the AC adapter to the MX7 Tecton before replacing the main battery. -
Page 17: Remove Battery
Place the discharged battery pack in a powered battery charger. Hotswap the Main Battery Place the MX7 Tecton in Suspend Mode. Honeywell recommends any work in progress be saved prior to replacing the battery pack. Simply replace the discharged battery with a fully-charged battery. An MX7 Tecton, with a fully charged internal battery, will... -
Page 18: Charge Or Recharge The Main Battery
The MX7 Tecton Battery Charger is designed for an indoor, protected environment. New batteries must be fully charged prior to use. The main battery can be recharged in an AC powered Battery Charger after the battery has been removed from the MX7 Tecton or its packing material when new. -
Page 19: Backlights And Indicators
Backlights and Indicators Status LEDs The MX7 Tecton System Status LED is located at the top left of the keypad, below the F3 key. The Alpha Mode LED is located below the F4 key on the 32-key keypad. LEDs (Light Emitting Diodes) are located on the front of the MX7 Tecton. They are: 1. -
Page 20: Toggle Vibrate Indicator
Start > Settings > Control Panel > Data Collection> Notification tab The MX7 Tecton vibration motor is activated when a scan is completed successfully (good scan vibration) or with a failure (scan key released before good scan, timeout, or rejected because of Data Options configuration). -
Page 21: Tapping The Touch Screen With A Stylus
Tapping the Touch Screen with a Stylus Note: Always use the point of the stylus for tapping or making strokes on the touch screen. Never use an actual pen, pencil, or sharp/abrasive object to write on the touch screen. Hold the stylus as if it were a pen or pencil. Touch an element on the screen with the tip of the stylus then remove the stylus from the screen. -
Page 22: Touch Screen
Adjusting the Display Backlight Timer Start > Settings > Control Panel > Display > Backlight The backlight settings use the Honeywell set of default timeouts and are synchronized to the User Idle setting in the Schemes tab in the Power control panel. -
Page 23: Set Date And Time Zone
Tap Start > Settings > Control Panel > Date/Time icon or tap the Date/Time in the taskbar. Set Date, Time, Time Zone, and assign a Daylight Savings location on the MX7 Tecton. There is very little functional change from standard desktop PC Date/Time Properties options. Adjust the settings and tap the OK button or the Apply button to save changes to the registry. -
Page 24: Set Power Scheme Timers
System Idle timer has expired. When the User Idle timer is set to “Never”, the power scheme timers never place the MX7 Tecton in User Idle, System Idle or Suspend modes (even when the MX7 Tecton is idle). -
Page 25: Set Speaker Volume
You can also select / deselect sounds for key clicks and screen taps and whether each is loud or soft. As the volume scrollbar is moved between Loud and Soft, the MX7 Tecton emits a tone each time the volume increases or decreases. -
Page 26: Setup Terminal Emulation Parameters
Setup Terminal Emulation Parameters Before you make a host connection, you will, at a minimum, need to know: the alias name or IP address (Host Address) and the port number (Telnet Port) of the host system to properly set up your host session. 1. -
Page 27: Using The Applock Switchpad
Click the switchpad icon in the taskbar. A checkmark on the switchpad menu indicates applications currently active or available for Launching by the MX7 Tecton user. When Keyboard, on the Switchpad Menu, is selected, the default input method (Input Panel, Transcriber, or custom input method) is activated. -
Page 28: Using The Input Panel / Virtual Keyboard
Using the Input Panel / Virtual Keyboard The virtual keyboard is always available when needed e.g., text entry. Place the cursor in the text entry field and, using the stylus: Tap the Shift key to type one capital letter. Tap the CAPS key to type all capital letters. Tap the áü... -
Page 29: Connecting Bluetooth Devices
The system administrator has also assigned a Computer Friendly Name using LXEZ Pairing Control Panel for the MX7 Tecton. To connect Bluetooth devices, the MX7 Tecton should be as close as possible and in direct line of sight (distances up to 32.8 feet or 10 meters) with the targeted Bluetooth device during the discovery and pairing process. -
Page 30: Reboot Sequences
Quickly tapping the Power key places the MX7 Tecton in Suspend mode. Quickly tapping the Power key again, pressing any key, pressing the trigger (on the trigger handle, if installed), or tapping the touch screen, returns the MX7 Tecton from Suspend. -
Page 31: Attaching The Handstrap
Note: Either the trigger handle is attached to the MX7 Tecton or the handstrap is attached, not both. In the absence of a trigger handle, the handstrap should be used at all times. The handstrap is pre-installed on a MX7 Tecton that is purchased without a trigger handle. -
Page 32: Attaching The Trigger Handle
Periodically check the trigger handle for wear and the connection for tightness. If the handle gets worn or damaged, it must be replaced. If the trigger handle connection loosens, it must be tightened or replaced before the MX7 Tecton is placed in service. -
Page 33: Assemble The Carry Case
The voice case does not require the clear plastic protector. 5. Slide the MX7 Tecton into the case, making sure the touch screen and keypad (including the Scan LED) are visible and accessible through the front openings of the case. -
Page 34: Connecting The Headset Cable
3. Connects to voice cable end of voice cable MX7 Tecton Voice Cable Connect the MX7 Tecton voice cable I/O connector to the I/O port on the MX7 Tecton. The MX7 Tecton internal microphone and speaker are automatically disabled. Slide the voice cable ends together until they click shut. Do not twist or bend the connectors. -
Page 35: Adjust Headset / Microphone And Secure Cable
The headset consists of an earpiece, a microphone, a clothing clip and a cable. The headset attaches to the audio cable end of the voice cable which attaches to the MX7 Tecton. Align the audio connector and the headset quick connect cable end. Firmly push the cable ends together until they click and lock in place. -
Page 36: Cleaning The Touch Screen And Scanner Aperture
Cleaning the Touch Screen and Scanner Aperture Note: These instructions are for components made of glass. If there is a removable protective film sheet on the display, remove the film sheet before cleaning the screen. Keep fingers and rough or sharp objects away from the bar code reader scanning aperture and the mobile device touch screen. If the glass becomes soiled or smudged, clean only with a standard household cleaner such as Windex®... -
Page 37: Startup Help
Technical Assistance if you need more help. Can’t change the date/time or AppLock is installed and may be running in User Mode on the MX7 Tecton. AppLock user adjust the volume. mode restricts access to the control panels. See Also: "Calibrating the Touch Screen" when the touch screen needs recalibration,... - Page 38 2-24...
-
Page 39: Chapter 3: Connecting Cables To The Mx7 Tecton
1. Holding the cable I/O connector, pinch the catch release buttons in until the catches are open. Connect the cable to the MX7 Tecton I/O port by matching the shape of the I/O connector on the cable with the shape of the I/O connector at the base of the MX7 Tecton. -
Page 40: Connecting The Serial And Power Cable
1. Holding the cable I/O connector, squeeze the catch release buttons in until the catches are open. Connect the cable to the MX7 Tecton I/O port by matching the shape of the I/O connector on the cable with the shape of the I/O connector at the base of the MX7 Tecton. -
Page 41: Connecting An External Power Supply
LED on the power adapter illuminates green. 3. Squeeze the catches of the I/O connector and push the cable connector into the MX7 Tecton I/O port until it clicks. The click means the connector is seated firmly. -
Page 42: Connecting Vehicle Power
9000302PWRSPLY – Power Supply, 60-110VDC with cable Connecting Electrical Cables to Power Sources The DC to DC power supply is used to provide vehicle power to the MX7 Tecton when placed in a DC powered vehicle dock. Specifications for Electrical Supply... -
Page 43: Wiring Schematic
Connect Vehicle Electrical Connection 1. The vehicle cradle must be empty. 2. Begin by connecting the power cable to the MX7 Tecton's vehicle cradle. Work from this connection with the last connection being to the vehicle’s power source. 3. Route the cable from the cradle to the DC to DC converter. - Page 44 10. Wire colors depend on the type of device attached. Please refer to this illustration for wire colors. 11. Use the looms and wire ties to secure all wiring as shown above, then reattach the cover with the screws. 12. Connect the DC to DC converter to the vehicle’s electrical system. 13.
-
Page 45: Vehicle 12V Bare Wire Adapter
Vehicle 12V Bare Wire Adapter Part Number: 9000A079CBL12ML3 Caution For proper and safe installation, the input power cable must be connected to a fused circuit on the vehicle. This fused circuit requires a Amp maximum time delay (slow blow) high interrupting rating fuse. If the supply connection is made directly to the battery, the fuse should be installed in the positive lead within 5 inches of the battery positive (+) terminal. -
Page 46: Connecting The Power Cable To The Vehicle
Connecting the Power Cable to the Vehicle 1. Vehicle Electrical System 2. 10 Amp Slow Blow Fuse 3. DC + 4. DC - 5. Vehicle Chassis 6. Brown 7. Blue 8. Green Note: Correct electrical polarity is required for safe and proper installation. The cradle will not power on or function if the cable is connected with the polarity reversed. -
Page 47: Connect Vehicle 12Vdc Connection
4. Provide mechanical support for the cable by securing it to the vehicle structure at approximately one foot intervals, taking care not to over tighten and pinch conductors or penetrate outer cable jacket. 5. Refer to the following sections to complete the power connection to the MX7 Tecton vehicle cradle. -
Page 48: Connect Power Supply To Vehicle Cradle
Secure the cable to the cradle with the pre-installed strain relief cable clamp (see section titled Vehicle Cradle Strain Relief Cable Clamp). The power LED on the MX7 Tecton illuminates when it is receiving external power and an MX7 Tecton is docked. Cradle Power Connector Port... -
Page 49: Chapter 4: Product Agency Compliance - Mx7 Tecton
Canada. Li-Ion Battery When disposing of the MX7 Tecton main battery, the following precautions should be observed: The battery should be disposed of properly. The battery should not be disassembled or crushed. The battery should not be heated above 212°F... - Page 50 RF Safety Notice Caution: This device was tested for typical body-worn operation. Use only Honeywell tested and approved accessories to ensure FCC Compliance. The use of third-party accessories may not comply with FCC RF exposure compliance requirements, and should be avoided. To comply with FCC RF exposure requirements, this device must be oper- ated in the hand with a minimum separation distance of 2.5 cm (0.9842 inch) or more from a person's body.
-
Page 51: Laser Light Safety Statement
Laser Light Safety Statement Warning: This product uses laser light. One of the following labels is provided on the scanner. Please read the Cau- tion statement. (US) Mise én garde: Ce produit utilise un rayon laser. L’une des étiquettes suivantes est apposée sur le scanneur. Veuillez lire l’avertissement qu’elle contient. -
Page 53: Vehicle Power Supply Connection Safety Statement
Vehicle Power Supply Connection Safety Statement Vehicle Power Supply Connection: If the supply connection is made directly to the battery, a A slow-blow fuse should be installed in the positive lead within 5 inches (12.7 cm.) of the battery positive (+) terminal. (US) Raccordement de l’alimentation du véhicule Si l’alimentation est raccordée directement à... -
Page 55: Chapter 5: Technical Assistance
Limited Warranty Honeywell International Inc. ("HII") warrants its products to be free from defects in materials and workmanship and to conform to HII’s published specifications applicable to the products purchased at the time of shipment. This warranty does not cover any HII product which is (i) improperly installed or used;... - Page 56 The duration of the limited warranty for the MX7 Tecton Battery Charger is 1 year. The duration of the limited warranty for the MX7 Tecton 2200mAh Li-Ion and 1250mAh Li-Ion Battery is 6 months. The duration of the limited warranty for the MX7 Tecton AC power supply and cables is 1 year.
- Page 58 Honeywell Scanning & Mobility 9680 Old Bailes Road Fort Mill, SC 29707 www.honeywellaidc.com E-EQ-MX7CEOGWW Rev F 10/12...
Need help?
Do you have a question about the MX7 Tecton and is the answer not in the manual?
Questions and answers