Table of Contents
Advertisement
Quick Links
Advertisement
Table of Contents

Related Manuals for Gaggenau VI 421


Summary of Contents for Gaggenau VI 421
- Page 1 Operating and assembly instructions VI 421 Induction cooktop...
-
Page 2: Table Of Contents
VI 421 1. Important Notes Page 3-4 For your safety Page 3 Operating for the first time Page 4 About use Page 4 The advantages of cooking by induction Page 4 2. Features Page 5 Features Page 5 Special accessories Page 5 3. - Page 3 Congratulations on buying your new “Vario” appliance. Before switching your appliance on for the first time, we would like you to familiarize yourself with your new appliance. In this manual you will find important notes on safety and operation. These will serve to ensure your personal safety and the lasting value of your appliance.
-
Page 4: Important Notes
1. Important Notes For your safety Do not store any substances that are sensitive to high temperatures, or which pose a fire hazard Do not operate the appliance if it is damaged. (e.g. cleaning agents or spray cans), in drawers or cupboards under the appliance. -
Page 5: Operating For The First Time
The appliance must be installed and connected by please inform your specialist dealer or your nearest an authorised specialist before operation. Before Gaggenau customer service. operating the appliance for the first time, make sure that the mains connection is in proper working order. -
Page 6: Features
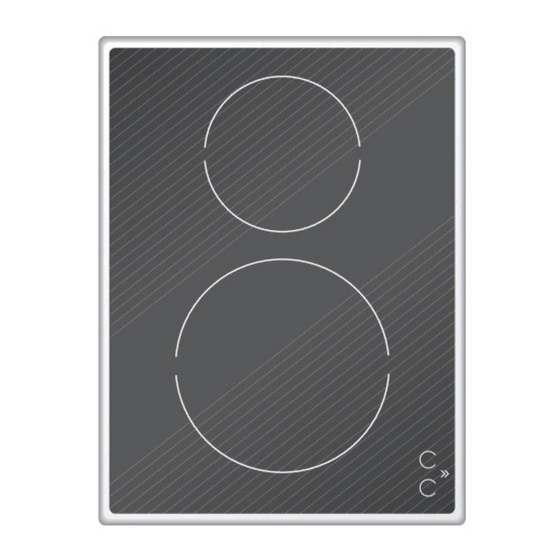
2. Features Features 1 Induction cooking zone Ø 15 cm (1400 W , with booster 1800 W) 2 Induction cooking zone Ø 21 cm (2200 W , with booster 3300 W) 3 Display panel 4 Control knob for front cooking zone 5 Control knob for rear cooking zone Special accessories You can order the following special accessory:... -
Page 7: Operation
3. Operation Switching on Switching on Press down the control knob and turn it left or right to the required position (1 -12). The luminous disc behind the control knob and the indicator light on the display panel light up, as long as the cooking zone is switched on. -
Page 8: Booster Function
Booster function Both cooking zones feature a booster function which will boost the power of the cooking zone for a short time. This allows you to heat up food even Activating faster. If one cooking zone is operated with the booster function and the other cooking zone is being operated, the booster function will be de-activated and the cooking zone will operate at... -
Page 9: Visual Signals
Visual signals luminous disc behind indicator light operating mode the control knob on the cooker appliance is OFF appliance is ON, pot recognized, normal use appliance is ON, no pot recognized appliance is OFF , residual heat display overheating protection*, power cut* holiday safeguard*, faulty installation (Connecting cable between the appliance and the control panel is not plugged in) -
Page 10: Settings Table
4. Settings table Quantity Heat Ongoing cooking Ongoing setting 12 heat setting cooking time Melting Chocolate, chocolate coating, butter, honey 100 g – 1–2 – Gelatine 1 packet – 1–2 – Heating Canned vegetables 400 g–800 g 1–3 mins. 2–4 3–6 mins. -
Page 11: Suitable Cooking Receptacles And How To Use Them
5. Suitable cooking receptacles and how to use them Energy saving tips We recommend that you use high quality pots and pans with thick flat bases. Uneven pan bases lengthen the cooking time unnecessarily. Choose the correct sized pot or pan for the amount of food to be prepared. -
Page 12: Cleaning And Care
Clean the hob with a damp, soft cloth or kitchen paper and the Gaggenau glass ceramic cleaner or similar cleaner suitable for glass ceramic cooktops. Polish with a soft, dry cloth. -
Page 13: Maintenance
If the power supply is functioning correctly, but your appliance still does not work, please contact your dealer or your local Gaggenau customer service agency. Specify the appliance type. The serial number and type of the appliance can be found on the quality control slip which is included with these instructions. -
Page 14: Installation
Technical Data Total connected load: 3 600 W / 220-240 V Important notes on installation This appliance can be combined with all Gaggenau There must be a gap of at least 20 mm at the side Vario 400 Series appliances. -
Page 15: Preparing The Cabinet
Preparing the cabinet • Cut out the recess for the hob in your worktop. Proceed as indicated on the installation sketch. The installation sketch contains the measurements of the space required for the trim between the appliances. Several appliances can also be installed in individual recesses, as long as a minimum clearance of 50 mm is kept to between the appliances. -
Page 16: Installing The Control Panel
Installing the control panel Note: only install control panel with appliance of the corresponding type. Before connecting the appliance, make sure the electricity is switched off at fuse point! • Before installation, remove all styrofoam packaging from the control knobs and peel off the protective film behind the luminous discs. -
Page 17: Installing The Cooktop
Installing the cooktop Please note when installing the appliance cover VD 400-000 (special accessory): T wo brackets are supplied with the cooktop. Screw the brackets on the rear of the cookop before installation (see installation instructions VD 400-000). • Firmly plug the connecting cable in the cooktop and in the control panel (the plugs must lock into place). - Page 18 GAGGENAU HAUSGERÄTE GMBH CARL-WERY-STR. 34 · D - 81739 MÜNCHEN Y (0 89) 45 90 - 03 FAX (0 89) 45 90 - 23 47 www.gaggenau.com...
Need help?
Do you have a question about the VI 421 and is the answer not in the manual?
Questions and answers