Table of Contents
Advertisement
Quick Links
Advertisement
Table of Contents

Related Manuals for Gaggenau VI414105


Summary of Contents for Gaggenau VI414105
- Page 1 Gaggenau en User manual and installation instructions VI414105 Induction hob...
- Page 2 21 2200 W 3700 W 26 2600 W 3700 W 32 3300 W 3700 W IEC 60335-2-6...
-
Page 3: Table Of Contents
Safety en Table of contents ¡ Do not connect the appliance if it has been damaged in transit. INFORMATION FOR USE 1.2 Intended use Safety .............. 3 Only a licensed professional may connect ap- pliances without plugs. Damage caused by in- Avoiding material damage........ -
Page 4: Safety
en Safety Metal objects on the hob quickly become very Children must not perform cleaning or user hot. maintenance unless they are at least 15 years ▶ Never place metal objects (such as knives, old and are being supervised. Keep children under the age of 8 years away forks, spoons and lids) on the hob. -
Page 5: Avoiding Material Damage
Avoiding material damage en An appliance with a cracked or broken sur- WARNING ‒ Risk of suffocation! face can cause cuts. Children may put packaging material over ▶ Do not use the appliance if it has a cracked their heads or wrap themselves up in it and or broken surface. -
Page 6: Environmental Protection And Saving En- Ergy
en Environmental protection and saving energy 3 Environmental protection and saving energy 3.1 Disposing of packaging Lift lids as infrequently as possible. ¡ When you lift the lid, a lot of energy escapes. The packaging materials are environmentally compat- ible and can be recycled. Use a glass lid. -
Page 7: Disposal
Disposal en ¡ Do not heat up empty cookware and do not use Notes ¡ Do not use adapter plates between the hob and the cookware with a thin base, as this may become very cookware. hot. 5 Disposal 5.1 Disposing of old appliance Valuable raw materials can be reused by recycling. -
Page 8: Familiarising Yourself With Your Appliance
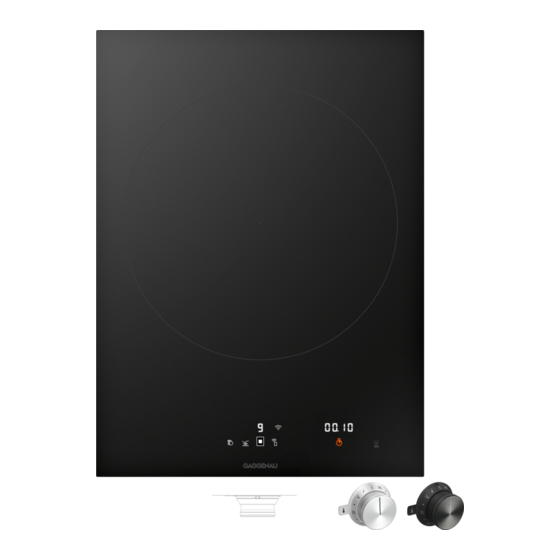
en Familiarising yourself with your appliance 6 Familiarising yourself with your appliance frying, energy savings as well as greater ease of clean- 6.1 Cooking with induction ing and care. It also offers improved heat control as the In comparison to conventional hobs, induction techno- heat is generated directly in the cookware. - Page 9 Familiarising yourself with your appliance en Activating the PowerBoost function Indicator Name Activating the wok function Appliance OFF Lights up: Orange Appliance ON Indicators on the illuminated rings Flashing: Orange Appliance OFF Each control knob is encircled by an illuminated ring Residual heat indicator with various display functions.
-
Page 10: Accessories
It also offers improved heat control as the heat is generated directly in the cookware. 8.3 Cookware You can find a list of recommended cookware on the official website www.gaggenau.com. Further information on suitable cookware. → Page 6 9 Basic operation Ensure that the base of the cookware sits within 9.1 Switching on the hob... - Page 11 Basic operation en Push in the control knob and turn it to the re- Notes quired power level . ¡ In order to protect the appliance's electronic parts from overheating or surge currents, the hob may temporarily reduce the power level. ¡...
- Page 12 en Wok function Power level Cooking methods Examples Defrosting Frozen products Soaking Rice, pulses, vegetables Thickening Egg dishes, e.g. omelette Heating or keeping warm Soup, vegetables in sauce Heating or keeping warm Stew Melting Butter, chocolate a The illuminated ring on the control knob lights up 9.4 Changing the colour of the illuminated yellow.
- Page 13 Wok function en Activating the wok function WARNING ‒ Risk of burns! Push in the control knob and turn it to . The wok and wok accessories become very hot during a After a few seconds, a signal sounds and lights cooking.
- Page 14 en Timer function 11 Timer function Your appliance comes with various functions for setting and to set the time to . the cooking time. Press . a The time is deleted. 11.1 Kitchen timer Switching off the kitchen timer You can use the kitchen timer to set a time of up to...
- Page 15 Booster for pots en 12 Booster for pots You can use the Booster for pots function to heat up 12.2 Switching off Booster for pots large volumes of water more quickly than with power Push in the control knob and turn it to the required ▶...
- Page 16 en Frying sensor function Optional accessories Frying pan, 28 cm dia- Recommended accessory Fried eggs meter for the frying sensor. Re- Scrambled eggs commended for the 28 Kaiserschmarrn (Austrian pan- 10-15 cm cooking zone, the cake) three-ring cooking zone French toast and the FlexPlus cooking zone only.
- Page 17 Locking the control panel for cleaning en Press . lights up orange. Dried instant meals to which 5-10 and the selected temperature level light up. water is added, e.g. pasta a The function is activated. dishes a ...
-
Page 18: Automatic Switch-Off
en Automatic switch-off 15 Automatic switch-off If you operate a cooking zone for an extended period Power level Time and do not change any settings, the automatic safety - 5 hours shut-off is activated. Depending on which performance ... -
Page 19: Home Connect
Home Connect en Push the control knob in. While the control knob is Press again. pushed in, carry out the following steps without in- a The basic settings menu is opened. terruption: and light up. Turn the control knob one notch anti-clockwise to ‒... - Page 20 en Home Connect 17.2 Setting up 17.3 Opening or closing the Home Connect settings menu To configure settings via Home Connect, install the Home Connect app on your mobile device and set it In the Home Connect settings menu, you can connect your appliance to Home Connect and implement the Connect your appliance to the home network (i.e.
- Page 21 Home Connect en Display Meaning Display Meaning Light up: Green The appliance has estab- Light up: Red The appliance was unable lished a connection to the to establish a connection home network. to the home network. 17.4 Overview of the Home Connect settings In the Home Connect settings, you can adjust settings and network settings for Home Connect.
- Page 22 en Home Connect Check that the password has been entered cor- rectly. Connection to the mobile device unsuccessful If a connection could not be established, turn the control knob to another position and then back to . a The illuminated ring on the control knob lights up blue.
- Page 23 Home Connect en Launch the Home Connect app on your mobile 17.8 Exiting the Home Connect settings device and follow the instructions for automatic net- menu work login. Carry out the following operating steps without inter- a Once the illuminated ring around the control knob ruption.
-
Page 24: Cooktop-Based Hood Control
en Cooktop-based Hood Control a The Home Connect settings have been reset. The 17.12 Remote diagnostics appliance is no longer displayed in the Home Con- Customer Service can use Remote Diagnostics to ac- nect app. cess your appliance if you contact them, have your ap- Close the Home Connect settings menu. -
Page 25: Cookware Test
Cookware test en Establishing a connection via the home network Establishing a direct connection Open the Home Connect settings menu. Requirement: Make sure that the extractor hood is → "Opening or closing the Home Connect settings switched on and is in search mode. Search mode menu", Page 20 means that the connection process on the extractor hood has been started. - Page 26 en Cleaning and servicing If necessary, repeat the test using or . 19.1 Checking the cookware At room temperature, place the cookware with ap- 19.2 Checking the result prox. 200 ml water in the centre of the cooking zone. Check the quality result and the speed of the cook- ▶...
- Page 27 FAQs en Clean the wok support with warm soapy water and 20.5 Cleaning the wok support a soft cloth. Note: Do not clean the wok support in the dishwasher. Dry with a soft cloth. 21 FAQs This is where you can find an overview of the frequently asked questions regarding use, noises, cookware and clean- ing.
-
Page 28: Cleaning And Servicing
en Troubleshooting 21.3 Cleaning Question Answer How can I clean the hob? ¡ You can achieve the best results by using special glass-ceramic cleaning products. Do not use harsh or abrasive cleaning products, dishwater deter- gent (concentrated) or scouring pads. You can find more information about this under → "Cleaning and servicing", Page 26. -
Page 29: Customer Service
Troubleshooting en Fault Cause and troubleshooting Demo mode is activated. lights up. The appliance does not Deactivate the demo mode. → Page 29 ▶ heat up. The electronics have overheated and have switched off the corresponding cooking zone. ... -
Page 30: Declaration Of Conformity
BSH Hausgeräte GmbH hereby declares that the appli- A detailed Declaration of Conformity can be found on- ance with Home Connect functionality conforms to the line at www.gaggenau.com/gb among the additional basic requirements and other relevant provisions of Dir- documents on the product page for your appliance. -
Page 31: Installation Instructions
Installation instructions en ¡ Only a licensed expert may connect the ap- pliance. ¡ Switch off the power supply before carrying out any work. ¡ Never use this appliance in boats or in vehicles. ¡ Follow the worktop manufacturer's recom- 25.1 Scope of delivery mendations. - Page 32 en Installation instructions ¡ Do not install refrigerators, dishwashers, non-ventil- 25.7 Information about flush installation ated ovens or washing machines underneath the With the flush installation, the appliance and worktop appliance. are on one level. There is no unattractive stepping ¡ The clearance between the extractor hood and the between the appliance and the worktop.
- Page 33 Installation instructions en Mark the unit cut-out in accordance with the installa- 25.10 Preparing the unit tion diagram. ATTENTION! A fan is located on the underside of this hob. If a drawer is located on the underside of the hob, ▶ do not store any small or pointed objects, paper or tea towels in it.
- Page 34 en Installation instructions Observe the clearance between the intermediate If there is no minimum clearance at the rear of the floor and the worktop. unit, make a unit cut-out in the bottom of the unit. Ensure that the base of the unit is sufficiently ventil- Attaching the sealing strip ated.
- Page 35 Installation instructions en Remove the protective film from the rear of the illu- 25.12 Connecting the control knob to the minated ring. connection cables Connect the control knob to the enclosed connec- tion cable. Push the control knob into the hole. Always position the side marking on the control ‒...
- Page 36 en Installation instructions Keeping the appliance level, insert it into the unit Use the enclosed spacers to adjust the circumferen- cut-out. tial gap between the appliance and the worktop to a uniform distance of 1.5 mm. If the oven is a built-under type, route the mains connection cable along the rear corners of the oven to the mains socket.
- Page 37 Installation instructions en Seal all around the gap using suitable, heat-resistant silicone, e.g. Novasil® S70 or Ottoseal® S70. Unsuitable silicone adhesive causes permanent dis- coloration to natural stone worktops. Use the smoothing agent recommended by the manufacturer to smooth the joint. Observe the usage instructions for the silicone ad- hesive.
- Page 40 BSH Hausgeräte GmbH Carl-Wery-Straße 34 81739 München, GERMANY www.gaggenau.com Valid within Great Britain: Imported to Great Britain by BSH Home Appliances Ltd. Grand Union House Old Wolverton Road Wolverton, Milton Keynes MK12 5PT United Kingdom...
Need help?
Do you have a question about the VI414105 and is the answer not in the manual?
Questions and answers