Table of Contents
Advertisement
Quick Links
Advertisement
Table of Contents

Subscribe to Our Youtube Channel
Related Manuals for Gaggenau EE 214/215


Summary of Contents for Gaggenau EE 214/215
- Page 1 Operating and Installation Instructions EE 214/215 Built-in cooker...
-
Page 2: Table Of Contents
1.2 Operating for the first time Page 3 1.3 About use Page 4 2. Structure and operating principle Page 5-10 2.1 Structure of the EE 214/215, CK 216/CK 236 Page 5-6 2.2 Accessories/special accessories Page 7 2.3 Operating principle of the operating modes Page 8-10 3. -
Page 3: Preface
Preface Baking and cooking with your new cooker will be even more fun than before. The appliance offers you the following advantages: – Very rapid heating up in the hot air and bottom heat modes. – The appliance features CleanEmail and a catalytic cleaning function for air cleaning. -
Page 4: Important Notes
1. Important notes 1.1 For your safety No warranty claims can be lodged for any damage resulting from failure to observe these You must not operate the appliance if it is instructions. damaged. Do not store any substances that are sensitive The appliance must only be connected by an to high temperatures, or which pose a fire hazard authorised specialist, paying attention to the... -
Page 5: About Use
– Do not store any combustible objects in your authorised Gaggenau service centre. oven and, when operating the oven, never leave – All heating elements and the fan are switched any items inside the oven compartment other off when you open the door. -
Page 6: Structure And Operating Principle
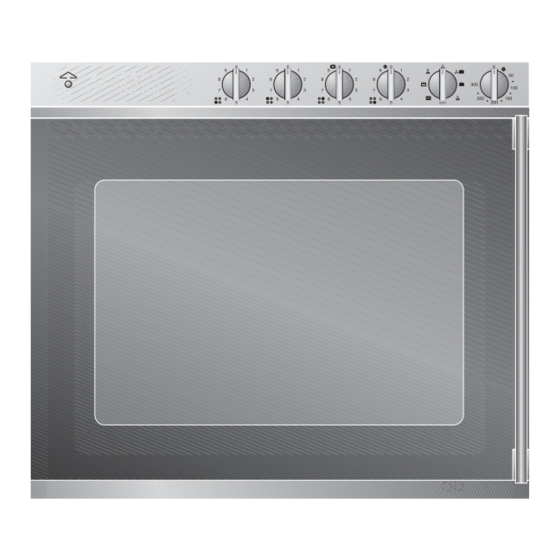
11 Control knob for rear right cooking zone 12 Control knob for front right cooking zone 13 “Mode" control knob 14 “Temperature" control knob Fig. 3 The EE 214/215 built-in cooker can be combined with the CK 216/236/172 glass-ceramic hobs. -
Page 7: Structure Of The Ee 214/215, Ck 216/Ck 236
Structure of the CK 216 / CK 236 1 SuperQuick cooking zone Ø 140 mm (1200 W) 2 SuperQuick cooking zone Ø 180 mm (1800 W) 3 SuperQuick cooking zone Ø 170 mm (1500 W) with connection to the roasting zone Ø... -
Page 8: Accessories/Special Accessories
2.2 Accessories / special accessories As standard, your appliance comes with the following accessories: – GR 200-046: Fig. 5 Grid iron for cake tins, roasts, grilled pieces and crockery (Fig. 5) – KB 200-046: Baking tray for cakes, biscuits and crisp-up items Fig. -
Page 9: Operating Principle Of The Operating Modes
2.3 Operating principle of the operating modes Hot air circulation In the hot air circulation mode, all prepared meals are cooked at the same temperature. Diverse or similar meals can be prepared on several levels without any transfer of taste. You can bake, roast and sterilise with hot air. - Page 10 Grilling When grilling, food is cooked/roasted at a tempera- ture of 150-300 °C from above. A distinction can be made between the following kinds: Temperature-controlled grilling During temperature-controlled grilling, the heating element emits a greater or lesser amount of infra- red radiation depending on the setting of the tem- perature selector switch.
- Page 11 Using the ECO mode is an energy saving way to prepare cakes, small pastries and gratins with hot air circulation. The catalytic converter heating is switched off in this mode. (Fig. 17) Fig. 17 Baking stone operation (with special accessories PS 026 and HZ 026 only) Be it crispy pizza or fresh bread –...
-
Page 12: Operation
3. Operation 3.1 Switching on / Switching off “Temperature" knob: The temperature can be set within the range from 50-300°C. Inserting the baking tray – Insert the baking tray at the same height on both “Mode" knob: sides. You can choose from 8 programs: –... -
Page 13: Hot Air Circulation
3.2 Hot air circulation Switching on Turn the “Mode" control knob to the (Hot air) Switching on symbol and set the “Temperature" control knob to the required temperature. (Fig. 21) You can bake, roast, and sterilise with hot air circulation. When roasting on the grid iron, insert the grilling tray / glass tray one level lower than the food you are cooking to collect dripping fat. -
Page 14: Top And Bottom Heat / Top Heat
3.4 Top and bottom heat / Top heat This unit allows you to select the top heat element separately. In this mode of operation you can deliberately choose to bake or roast food from the top. Switching on Switching on: Turn the “Mode"... -
Page 15: Grilling
3.6 Grilling Note: grilling is possible only when the oven is closed. Switching on Temperature-controlled grilling Switching on: Turn the “Mode" control knob to the (Grilling) symbol. Turn the “Temperature" control knob to the temperature you require. (Fig. 26) Switching off: Turn the “Temperature"... -
Page 16: Operating Ck 216/236/172
3.7 Operating CK 216/236/172 Switching on Turn the corresponding control knob to the required cooking level (1-9) on the right. (Fig. 28) Note on CK 216/236/172: a few seconds after switching on, the individual residual heat display (red dot) for the selected cooking zone appears on the residual heat display panel. - Page 17 Setting table Cooking levels Keeping warm Melting, soaking Thawing, warming up Cooking, warming Steaming Braising, stewing Baking and gentle roasting Roasting Frying, quick boiling Only ever switch to the highest cooking level for quick boiling and browning. Then always switch back to a lower cooking level.
-
Page 18: Baking And Roasting Table
4. Baking table Cakes and biscuits Hot air Hot air and Top and Level Baking circulation bottom heat bottom heat time Temp. °C Temp. °C Temp. °C Temp. °C from below Min. Swiss roll Flan base 170-175 30-35 Fruit flan on yeast dough 165-175 40-45 Fruit flan on short-crust pastry... -
Page 19: Roasting Table
Roasting table Dish Level Hot air Grill and Top and Cooking Core hot air bottom heat time temperature from below Temp. °C Temp. °C Temp. °C minutes sensor Beef Roast beef (casserole*) 60-90 1,5 kg Roast beef rare 230/180 230/180 45-50 45-50 °C 1,5 kg... - Page 20 Roasting table Dish Level Hot air Grill and Top and Cooking Core hot air bottom heat time temperature from below Temp. °C Temp. °C Temp. °C minutes sensor Venison Roast boar (casserole*) 170-180 60-90 Leg of venison (casserole*) 170-180 60-80 75-80 °C Saddle of venison 165-175...
-
Page 21: Grilling Table
Grilling table Dish Level* Pre- Temp. Grill Grill and hot air Total heat °C cooking minutes minutes time [min] 1. side 2. side 1. side 2. side Sliced pork belly 180-200 Kebab Fried sausage Merguez (grilled sausage) Roast chicken** Leg of chicken Spare ribs 180-200 Leg of pork***... -
Page 22: Tips And Tricks
5. Tips and tricks Baking What to do if ... ? The solution ! ... a cake baked in a tray is too light at the bottom? Push the cake in deeper and remove all objects from the oven that you do not need.. - Page 23 Tips for baking: Tips for roasting and grilling: – You can use any heat-resistant dishes. – Before serving, allow the roast to rest for Place dishes in the middle of the grid iron. 10 minutes with the oven switched off and closed. You can also use the grilling tray for large roasts.
-
Page 24: Cleaning And Care
6. Cleaning and care 6.1 Manual cleaning Fruit juices from moist cakes dripping onto the oven interior can damage the enamel. Remove such soiling as soon as the oven has cooled down sufficiently. Do not use commercially available oven sprays to clean the oven. -
Page 25: Self-Cleaning
6.2 Self-cleaning In this mode, soiling on the catalytic interior plates (accessories) combusts at temperatures around 300 °C. In the event of extreme soiling, coarse greasy residues must be removed from the oven before cleaning. The non-catalytic parts such as the muffle base, the door inside and the glass pane are not cleaned. -
Page 26: Cleaning The Grease Filter
6.3 Cleaning the grease filter You are advised to clean the grease filter after two roasting operations or after baking if the oven gets appropriately soiled. Push the grease filter upwards and remove it. Clean the grease filter in hot rinsing detergent or in a dishwasher. -
Page 27: Maintenance
If the power supply is functioning correctly, but your appliance still does not work, please contact your dealer or your local Gaggenau customer service agency. Specify the appliance type (see rating plate). Repairs may only be carried out by authorised electricians, in order to guarantee the safety of the appliance. -
Page 28: Disassembly Of The Front Window
7.3 Disassembly of the front window The oven door is actively ventilated. Dust and grease particles may therefore settle after some time. Detach the front window to remove this soiling. Proceed as follows: – Remove the bottom screw from the door handle. –... -
Page 29: Assembly Instructions
8. Assembly instructions 8.1 Technical data 8.2 How to do it The appliance must only be connected by an Rating: 230 V AC, 16 A authorised specialist, paying attention to the Heating power: relevant regulations of the power supply companies Infrared grill 3100 W and the regional construction regulations. - Page 30 Proceed as follows: – When unpacking the appliance, check it for transport damage. – Please remove the transport protection under the handle, and the adhesive tape which protects the door during transportation. – A flexible cable should be used as the mains m in .
- Page 31 GAGGENAU HAUSGERÄTE GMBH CARL-WERY-STR. 34 · D - 81739 MÜNCHEN Y (0 89) 45 90 - 03 FAX (0 89) 45 90 - 23 47 www.gaggenau.com...
Need help?
Do you have a question about the EE 214/215 and is the answer not in the manual?
Questions and answers