
Related Manuals for Gaggenau VK 230-610


Summary of Contents for Gaggenau VK 230-610
- Page 1 Operation and assembly instructions VK 230-610 Cooker and steam cooker...
-
Page 2: Table Of Contents
VK 230-610 Preface Important safeguards Page 3 1. Important notes Pages 4-5 1.1 For your safety Page 4 1.2 Operating for the first time Page 4 1.3 About use Page 5 2. Structure and operating principle Pages 6-7 2.1 Structure of the appliance Page 6 2.2 Accessories/special accessories... - Page 3 Consult the “Practical tips" if you cannot set the function you require. Please contact Gaggenau after-sales service if these tips are not enough. And now we wish you lots of fun cooking.
-
Page 4: Important Safeguards
Important safeguards Read all instructions. 2. Do not touch hot surfaces. Use handles or knobs. 3. To protect against electrical shock do not immerse cord or plug in water or liquid. 4. Close supervision is necessary when any appliance is used by or near children. 5. -
Page 5: Important Notes
1. Important notes 1.1 For your safety 1.2 Operating for the first time You must not operate the appliance if it is Before operating the appliance for the first time, damaged. please pay attention to the following notes: – The appliance must be installed and connected The appliance must only be connected by an by a specialist before it is operated for the first authorised specialist, paying attention to the... -
Page 6: About Use
(limiter) no longer appears on the display. responsible Gaggenau customer service. Note: If the symbol (limiter) appears in the display, this may have several causes (see chapter “Structure and operating principle"). -
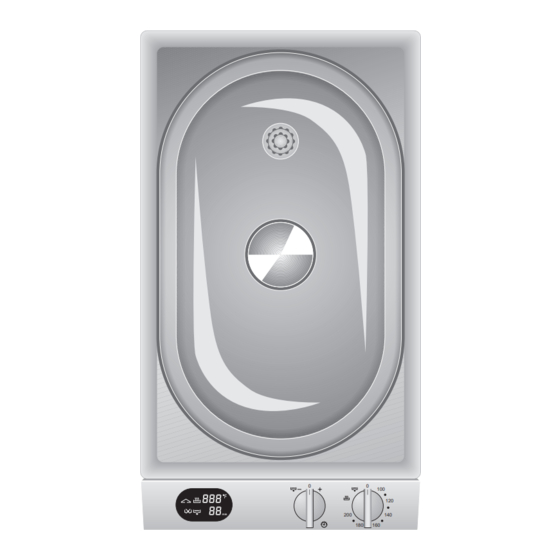
Page 7: Structure And Operating Principle
2. Structure and operating principle 2.1 Structure of the appliance 1 Display 2 Glass cover 3 Steam outlet opening 4 Splash edge 5 Cooking basin 6 “Timer" knob (adjustment range 1-90 minutes) and “Drain" function 7 “Temperature" knob with “Steam cooking level" and “Drain"... -
Page 8: Operating Principle
2.3 Operating principle In the steam cooker you can cook, steam cook Steam cooking consists of cooking in a steam flow. and blanch. The temperature range is around 200 °F. The The steam envelopes the food that is being steam transmits the heat. Suitable foodstuffs are cooked and prevents a loss of nutrients in the vegetables, potatoes, fish and yeast dumplings. -
Page 9: Operation
3. Operation Boiling point adjustment (calibration) The boiling point must be adjusted (calibration) before first-time operation and whenever you change location. Proceed as follows: – Fill the steam cooker's cooking basin with water up to the bottom marking and fit the glass cover. –... -
Page 10: Operation With The Timer
Operation with the timer: – Turn the “Temperature" knob to the temperature you require or to the steam cooking level before setting the timer, otherwise the timer will run without switching off the appliance. – Turn the “Timer" knob to the + or – setting until the time you require appears on the display (Fig. -
Page 11: Operating The Child Lock
Operating the child lock Activating the child lock – Turn the “Timer" control knob to the left to the minus position. Hold the knob in this position. – Turn the “Temperature" control knob to any temperature on the right. – Turn the “Temperature" control knob back to the 0 position. -
Page 12: Draining The Cooking Liquid
Draining the cooking liquid from the cooking basin: Proceed as follows: – If you do not have a permanently fitted water connection, place a vessel (e.g. a 10 l bucket) under the drain valve of the additionally installed drain installation set AG 060-000. –... -
Page 13: Cleaning And Care
4. Cleaning and care Do no use any abrasive and caustic cleaning – If a white coating should form in the cooking agents. Use plastic pot cleaners or a soft basin owing to very limy water, wipe out the dishwashing brush and normal detergent. Do not basin with a water and vinegar mixture or a use any abrasive sponges either. -
Page 14: Maintenance
If the power supply is functioning correctly, but your appliance still does not work, please contact your Gaggenau dealer who will provide you with the address and telephone number of your nearest manufacturer’s authorized service agent or contact Gaggenau USA on (800) 828-9165. -
Page 15: Practical Tips
6. Practical tips 6.1 Operating areas of the appliance Cooking in steam Cooking in simmering water – Fill the steam cooker to the bottom marking. – Fill the steam cooker up to the foaming edge. – Place the cooking insert with the food inside it in –... -
Page 16: Cooking Table
6.2 Cooking table Steaming / Cooking Setting: steam cooking Foodstuff Water Cooking insert Food quantity Preparation Cooking times* (cups) selection (minutes) Meat Meatballs perforated 500 g 15 - 20 place herbs, e.g. 1/2 teasp. Fillet of beaf unperforated 400 g 15 - 20 thyme in the cooking basin Chicken breast,... -
Page 17: Cooking Table
Foodstuff Water Cooking insert Food quantity Preparation Cooking times* (cups) selection (minutes) Side dishes 250 g Rice, untreated unperforated 40 - 45 2 cups water 250 g Parboiled-rice unperforated 2 cups water according to Pasta Noodle basket 500 g manufacturer’ s specifications Swabian noodles, Noodle basket... -
Page 18: Recipes
6.3 Recipes Chicken breast wrapped in leek Halibut cutlets with bunched carrots For 4 persons: (complete menu with two steam cooking inserts) Ingredients For 4 persons: 4 chicken breasts (app. 120 g each) Ingredients 2 teaspoons of horseradish (from a jar) 500 g bunched carrots 1 leek (app. -
Page 19: Tips And Tricks
– Food cooked in steam has a more intensive taste than food cooked by conventional means. – Please inform your local Gaggenau after-sales Therefore, you can largely dispense with the service if the (limiter) symbol does not go off need for additional spicing. -
Page 20: Assembly Instructions
Possible damage, caused by failure to observe accessible after installtion of the appliance. these instructions cannot be recognised. If damaged, the mains cable must be replaced by a TYPE: HLVK 230 VK 230-610 special mains connecting cable. The mains 208/220-240 V AC 60Hz 1800/2200 W... -
Page 21: Installation
7.3 Installation – Produce the recess for one or several Vario appliances in the worktop. Proceed as shown in the installation sketch and the dimension table. The dimension table contains the space requirement for the connecting strip between the appliances. Important: the angle between the cut surface and the worktop must amount to 90°. -
Page 22: Drain Installation
7.4 Drain installation A permanent drain connection using our drain installation set (AG 050-000) is recommended. This requires a drain connection in the base cabinet. A non-return valve must be installed. It can be connected permanently (Fig. 18) or with a free fall (Fig. -
Page 23: Drain Installation
If the water connection is located in a neighbouring base cabinet, connection can be established with a connecting pipe or hose (Fig. 20). A non-return valve must be installed. During installation, pay attention to a constant downward flow of the connecting pipe. - Page 24 GAGGENAU HAUSGERÄTE GMBH 5551 McFADDEN AVENUE CARL-WERY-STR. 34 · 81739 MÜNCHEN HUNTINGTON BEACH, CA 92649 GERMANY Y (0 89) 45 90 - 03 Y (800) 828-9165 · FAX (714) 901-0979 FAX (0 89) 45 90 - 23 47 www.gaggenau-usa.com...
Need help?
Do you have a question about the VK 230-610 and is the answer not in the manual?
Questions and answers