Table of Contents
Advertisement
Quick Links
Download this manual
See also:
User Manual
Advertisement
Table of Contents

Related Manuals for Electrolux EHET66CS


Summary of Contents for Electrolux EHET66CS
- Page 1 Ceramic glass hob EHET66CS, EHET96CS...
-
Page 2: Table Of Contents
2 electrolux Electrolux. Thinking of you. Share more of our thinking at www.electrolux.com Contents Safety instructions ........2 Technical data ........13 Description of the Appliance ....3 Disposal ..........13 Operating the appliance ......6 Installation Instructions ......14 Tips on cooking and frying .... -
Page 3: Description Of The Appliance
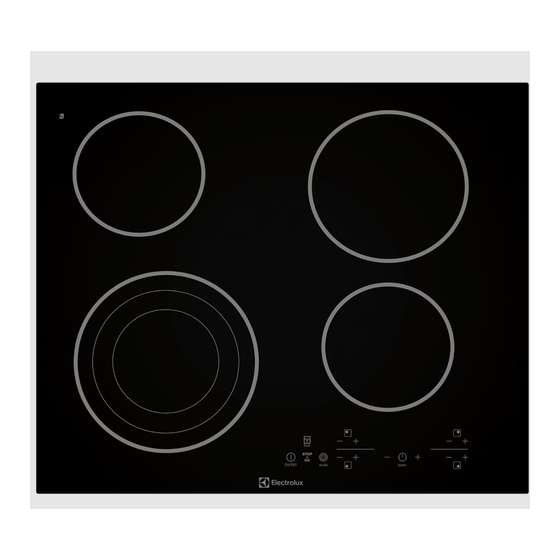
• The edge of the glass ceramic can be damaged by being knocked by the cook- ware. Description of the Appliance Cooking surface layout EHET66CS Single cooking zone 1200W Control panel Single cooking zone 1800W Triple cooking zone 2300/1600/800W Single cooking zone 1200W... - Page 4 Single cooking zone 1200W Control panel Multi-purpose cooking zone Triple cooking zone 2300/1600/800W 2200/1400W Single cooking zone 1800W Control panel layout EHET66CS On/Off with power indicator Cooking zone indicators Timer function Lock with pilot light Timer display A triple ring cooking zone Timer...
-
Page 5: Touch Control Sensor Fields
electrolux 5 EHET96CS On/Off with power indicator Timer display Lock with pilot light Multipurpose cooking zone A triple ring cooking zone Timer Heat setting selection Zone selection indicator Display Stop+Go function Cooking zone indicators Timer function Touch Control sensor fields The appliance is operated using Touch Control sensor fields. -
Page 6: Operating The Appliance
6 electrolux Display Description Residual heat Cooking zone is still hot Child safety device Lock/child safety device is activated Automatic switch off Switch off is active Residual heat indicator Warning! Risk of burns from residual heat. After being switched off, the cooking zones need some time to cool down. - Page 7 electrolux 7 Multi-purpose zone Sensor field Pilot light To switch off outside ring goes out Touch for 1-2 seconds Switching the STOP+GO function on and off The STOP+GO function simultaneously switches all cooking zones that are switched on to the keep warm setting and then back to the heat setting that was previously set. Timer functions are not stopped by STOP+GO locks the whole control STOP+GO.
- Page 8 8 electrolux Heat setting Length of the automatic warm up [min:sec] 10:10 2:00 3:30 4:30 Using the child safety device The child safety device prevents unintentional use of the appliance. Switching on the child safety device Step Control panel Display/Signal Switch on appliance.
- Page 9 electrolux 9 Using the timer Function Condition Outcome after the time has elapsed Automatic cut-out a heat setting is set acoustic signal and flashes, the cooking zone switches itself Countdown timer cooking zones not in use acoustic signal and flashes Selecting a cooking zone Step Control panel...
-
Page 10: Tips On Cooking And Frying
10 electrolux Changing the time Step Control panel Indicator Pilot light of the selected cooking zone Select for the cooking zone flashes faster. Time remaining is dis- played Touch minutes After a few seconds, the pilot light flashes more slowly. The time is set. The time counts down. Displaying the time remaining for a cooking zone Step Control panel... -
Page 11: Cleaning And Care
electrolux 11 Energy saving Bottom of pans and cooking zones should be the same size. Always place cookware on the cooking zone before it is switched on. Switch cooking zones off before the end of the cooking time, to take advantage of residual heat. -
Page 12: What To Do If
12 electrolux Remove stubborn residues with a Warning! Residues from cleaning cleaner for glass ceramic or stain- agents will damage the appliance. less steel. Remove residues with water and washing up liquid. Scratches or dark stains on the glass ceramic that cannot be re- moved do not however affect the functioning of the appliance. -
Page 13: Technical Data
electrolux 13 Problem Possible cause Remedy Electronics fault Disconnect the appliance from the and number are dis- electrical supply for a few minutes played (Take the fuse out of the house’s wiring system) If after switching on again, is displayed again, call the customer service department If you are unable to remedy the problem If the appliance has been wrongly... -
Page 14: Installation Instructions
14 electrolux your household waste disposal service or the identified by markings, e. g., >PE<, shop where you purchased the product. >PS< etc. Please use markings to dispose of the packaging materials Packaging material. in the appropriate container at the The packaging materials are envi- community waste disposal facilities. -
Page 15: Assembly
electrolux 15 Warning! Once connected to the around the outside edge ensuring that it is not stretched. The two ends of the tape mains supply check that all cooking zones are ready for use by briefly should join in the middle of one side. After switching each on in turn at the trimming the tape (allow it to overlap by 2-3 mm), press the two ends together. -
Page 16: Warranty
Rating plates EHET 66CS PNC: 949163050 220 - 240 V AC Made in China Model: EHET66CS 220 - 240 V APP NO.:55HAD GL A0 AU APP NO.:S/91 S NO: 80200950 50Hz 6.5 KW EHET 96CS... - Page 17 electrolux 17 – 'Warranty Period' means lux service area, please phone 13 13 49 i) where you use the Appliance for per- in Australia, or 0800 10 66 10 in New sonal, domestic or household purpo- Zealand. ses in Australia the period of 24 7.
-
Page 18: Service
18 electrolux Trading Act in New Zealand, imply war- payment of the cost of having the ranties or conditions, or impose obliga- services re-supplied; tions, upon Electrolux which cannot be and in the case of Appliances or services excluded, restricted or modified. To the supplied in New Zealand, loss or dam- extent permitted by law, the liability of age whether direct or indirect or conse-... - Page 19 electrolux 19 – three digit letter-number combination for glass ceramic...
- Page 20 www.electrolux.com www.electrolux.com.au 892930001-N-052008...
Need help?
Do you have a question about the EHET66CS and is the answer not in the manual?
Questions and answers