
Related Manuals for Everdure DAINTREE ESEE


Summary of Contents for Everdure DAINTREE ESEE
- Page 1 ASSEMBLY, OPERATION & MAINTENANCE INSTRUCTIONS FOR EVERDURE 4 BURNER ESEE GAS BARBECUES Models Included: DAINTREE ESEE KIMBERLEY ESEE KIMBERLEY STYLE, GRILLED TO PERFECTION...
-
Page 2: Table Of Contents
ASSEMBLY, OPERATION AND MAINTENANCE INSTRUCTIONS FOR EVERDURE 4 BURNER ESEE GAS BARBECUE RANGE DAINTREE ESEE & KIMBERLEY ESEE OUTDOOR BARBECUES CONTENTS SECTION PAGE NO. General Safety Instructions ……………… Appliance Details ………………………… Gas Connections …………………………. Outdoor Installation Guide ……………… Operating Instructions ……………………... -
Page 3: General Safety Instructions
(such as a domestic pool), as these chemicals can cause the appliance materials to deteriorate (and void the warranty). Regular cleaning and covering with an Everdure barbecue cover can help can help to reduce this. DO NOT OPERATE THIS APPLIANCE BEFORE READING THE INSTRUCTION BOOKLET... -
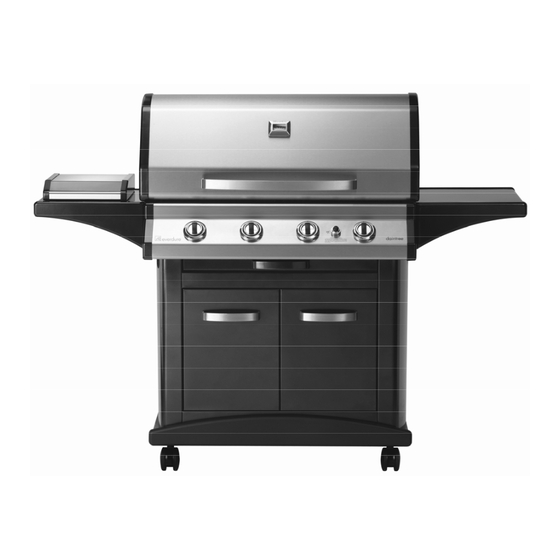
Page 4: Appliance Details
All barbecues are supplied for use with propane gas. For natural gas usage, a conversion kit must be purchased and installed by a gas fitter or Everdure Service Technician. Please see the separate NG conversion and installation instruction sheet supplied with this barbecue for details. -
Page 5: Outdoor Installation Guide
OUTDOOR INSTALLATION GUIDE This Appliance shall only be used in an above ground open-air situation with natural ventilation, without stagnant areas, where gas leakage and products of combustion are rapidly dispersed by wind and natural convection. This appliance must not be used indoors. Do not use your barbecue in garages, porches, sheds or other enclosed areas. -
Page 6: Operating Instructions
LIGHTING THE BARBECUE USING THE ELECTRONIC IGNITION The Everdure 4 burner barbecue has 1 battery operated igniter to operate the appliance. The sparker ignites the second burner in from the right hand side. The remaining burners are ignited by a cross over channel. Before attempting to light the barbecue, please ensure that a battery has been placed in the battery operated igniter. -
Page 7: Cooking
(between 145-160ºC). Once this temperature has been reached, apply a small amount of oil to both the hot plate and grill plate. Everdure recommends the use of Canola oil, or oils with a high smoke point (such as Sunflower or Safflower). Immediately after adding the oil, place items onto the cooking surfaces. -
Page 8: Lighting System Instructions
Ensure that the centre burners remain Off, leaving only the two outside burners on Hi. This is most important as severe overheating and spoilt food will result if the two central burners are left on Hi. This is a general guide for roasting only – please check www.everdure.com for any updated cooking guides. AFTER COOKING When finished, make sure burner control knobs are turned OFF. -
Page 9: Troubleshooting
Remove plate and visually check ignition box for a spark. Check that the cable is not broken or disconnected. Also check the alignment of the sparker. If there is no spark, contact Everdure Service. Injector is blocked Clean injector with a toothbrush. Do not drill out or use wire. Do not remove injector. -
Page 10: Assembly Instructions
ASSEMBLY INSTRUCTIONS PARTS LIST Barbecue Chassis Carton: Cooking Plates Pack: Burner Pack: Barbecue Chassis (with light switch & cable) Hot Plate 4 x Burners Fat Tray Grill Plate Gas Hose & Regulator Vapouriser Cross-over Tube Steel Trolley Carton: Roasting Hood Carton: Trolley Base Roasting Hood (with lights) Trolley Frame... - Page 11 BOTTOM DOOR INFILL PANEL RIGHT HAND DOOR LARGE INFILL PANEL CABINET TOP LEFT HAND DOOR NOTE: KIMBERLEY NOTE: KIMBERLEY DOORS ARE FROSTED GLASS DOORS ARE FROSTED GLASS LEGEND DA : DAINTREE ESEE KI : KIMBERLEY ESEE STYLE, GRILLED TO PERFECTION...
- Page 12 4 BURNER FASTENER COMPONENTS M6 x 50 BOLT M5 x 20 SCREW M5 x 12 SCREW 6g SCREW M5 NUT M6 NUT M5 LOCK NUT 8g SCREW DOOR HINGE SPACER 5mm DIAMETER WASHER FIBRE WASHER 6mm DIAMETER WASHER KI x2 'L' BRACKET MAGNETIC CATCH CASTOR...
- Page 13 4 BURNER HOOD COMPONENTS HOOD WITH GLASS WINDOW M5 NUT FIBRE WASHER M5 x 20 COUNTERSUNK SCREW 4 BURNER POWER ADAPTOR COMPONENTS POWER ADAPTOR AND CABLE M4 NUT M4 x 15 SCREW STYLE, GRILLED TO PERFECTION...
- Page 14 DAINTREE ESEE & KIMBERLEY ESEE TROLLEY ASSEMBLY FRONT VIEW OF NUTSERTS FINAL VIEW OF FITTED CASTOR FITTING OF THE CASTORS TO THE BASE ASSEMBLY 1. PLACE TROLLEY BASE (PART 2) UPSIDE DOWN, AS SHOWN IN THE DIAGRAM ABOVE. 2. PLACE A CASTOR (PART 27) ONTO THE BASE FRAME AS SHOWN.
- Page 15 DAINTREE ESEE & KIMBERLEY ESEE TROLLEY ASSEMBLY FINAL VIEW SHOWING REAR PANEL FITTED FITTING OF INFILL PANELS TO THE BASE ASSEMBLY 1. PLACE THE BARBECUE TROLLEY BASE IN IT'S UPRIGHT POSITION AS SHOWN. 2. PLACE THE LARGE INFILL PANEL (PART 11) INTO POSITION AND ALIGN THE HOLES OF THE LARGE INFILL PANEL AND THE BASE PLATE.
- Page 16 DAINTREE ESEE & KIMBERLEY ESEE TROLLEY ASSEMBLY NOTE: PLEASE ENSURE THE HOLE FOR THE SIDE BURNER HOSE IS TO THIS SIDE FRONT OF BARBECUE NOTE: THE BARBECUE CARCASS IS UPSIDE DOWN FOR THIS STAGE OF ASSEMBLY ATTACHMENT OF TROLLEY SIDE PANELS 1.
- Page 17 DAINTREE ESEE & KIMBERLEY ESEE TROLLEY ASSEMBLY ATTACHING TOP DOOR INFILL PANEL 1. THE TOP DOOR INFILL PANEL (PART 7) CAN BE ATTACHED TO THE TROLLEY SIDES, WHILE THE BARBECUE IS UPSIDE DOWN. 2. PLACE THE INFILL PANEL INTO THE POSITION SHOWN IN THE ABOVE DIAGRAM.
- Page 18 DAINTREE ESEE & KIMBERLEY ESEE TROLLEY ASSEMBLY ENLARGED VIEW FOR ATTACHMENT OF TROLLEY SIDE AND BOTTOM DOOR INFILL PANEL NOTE: FOR ALL BARBECUES, ENSURE THAT THE LARGE HOLE IN THE BASE IS TO THE LEFT HAND SIDE, WHEN LOOKING AT THE BARBECUE FROM THE FRONT.
- Page 19 DAINTREE ESEE & KIMBERLEY ESEE TROLLEY ASSEMBLY ENLARGED VIEW OF HOLES FOR FITTING THE MAGNETIC CATCHES FITTING OF THE MAGNETIC CATCHES TO THE CABINET 1. PLACE 1 x MAGNETIC CATCH (PART 25) INTO POSITION AS SHOWN ABOVE. 2. ATTACH THE CATCH BY USING 2 x 6g SCREWS (PART 16) AND A PHILLIPS HEAD SCREW DRIVER.
- Page 20 KIMBERLEY ESEE TROLLEY ASSEMBLY ENLARGED VIEW TO SHOW FINAL ATTACHMENT OF THE 'L' BRACKETS AND FASTENERS FITTING OF THE 'L' BRACKETS 1. ALIGN THE HOLES IN THE 'L' BRACKET (PART 26) WITH THE HOLES IN THE TROLLEY BASE. 2. PLACE 1 x M5 SCREW (PART 14) THROUGH THE HOLE OF THE 'L' BRACKET (PART 26) AND THROUGH THE HOLE OF THE TROLLEY BASE PANEL.
- Page 21 KIMBERLEY ESEE TROLLEY ASSEMBLY VIEW "A" ENLARGED VIEW TO SHOW INFILL PANEL ROTATED FINAL ASSEMBLED VIEW ATTACHMENT OF THE DOORS TO THE CABINET 1. TAKE THE LEFT HAND DOOR (PART 9 WITH GLASS) AND ALIGN THE HOLE IN THE BOTTOM DOOR INFILL PANEL. 2.
- Page 22 DAINTREE ESEE TROLLEY ASSEMBLY VIEW "A" ENLARGED VIEW TO SHOW INFILL PANEL ROTATED FINAL ASSEMBLED VIEW ATTACHMENT OF THE DOORS TO THE CABINET 1. TAKE THE LEFT HAND DOOR (PART 9) AND ALIGN THE HOLE IN THE BOTTOM DOOR INFILL PANEL.
- Page 23 DAINTREE ESEE & KIMBERLEY ESEE TROLLEY ASSEMBLY FITTING OF SERVERIES TO THE BARBECUE CARCASS FITTING OF THE SERVERIES 1. ALIGN THE HOLES IN THE SERVERY (PART 5) WITH THE NUTSERTS IN THE BARBECUE CARCASS. SEE ENLARGED VIEW. 2. PLACE 1 x M5 SCREW (PART 14) THROUGH THE TOP HOLE AT THE FRONT OF THE SERVERY, AND SCREW IT INTO THE NUTSERT.
- Page 24 STYLE, GRILLED TO PERFECTION...
- Page 25 DAINTREE ESEE & KIMBERLEY ESEE TROLLEY ASSEMBLY VIEW 'A' ATTACHING THE CABINET TOP TO THE TROLLEY 1. PLACE THE CABINET TOP (PART 12) ONTO THE BARBECUE CARCASS ENSURING THAT THE SAFETY EDGES ARE FACING DOWN. SEE VIEW 'A' ABOVE FOR DETAILS.
- Page 26 DAINTREE ESEE & KIMBERLEY ESEE HOOD ASSEMBLY ATTACHING THE HOOD TO THE BARBECUE 1. THE HOOD CARTON CONTAINS IT'S OWN HARDWARE PACK, CONSISTING OF FOUR M5 NUTS (PART 30), FOUR M5 x 20 SCREWS (PART 29) AND FOUR FIBRE WASHERS (PART 31).
- Page 27 STYLE, GRILLED TO PERFECTION...
- Page 28 DAINTREE ESEE & KIMBERLEY ESEE COMPLETE BARBECUE ASSEMBLY NOTE: THE HOOD IS NOT SHOWN FOR CLARITY. NOTE: THE KIMBERLEY ESEE HAS FROSTED GLASS DOORS. STYLE, GRILLED TO PERFECTION...
-
Page 29: Barbecue Accessories
Polyester Oxford-PVC backed fabric Model No. AC4VC EVERDURE BARBECUE ROTISSERIE Everdure barbecue hoods are designed to fit a 240 volt rotisserie, which will allow you to cook your favourite meats. Main Features: Full Stainless Steel rod and rotisserie forks (adjustable and lockable) -
Page 30: Warranty
PRODUCTS COVERED: DAINTREE ESEE & KIMBERLEY ESEE IMPORTANT Please keep your receipt, as this must be presented if making a claim under the terms of the Everdure warranty. We suggest you pin or staple your purchase receipt to this page and file. -
Page 31: Warranty
Everdure so chooses. 8. Proof of purchase of the Everdure barbecue must be provided with all warranty claims. This will help confirm the purchase date which will aid in establishing the warranty period. Only the original purchaser is covered under this warranty. - Page 32 A division of Shriro Australia Pty Ltd 23-27 Chaplin Drive Lane Cove NSW 2066 1300 766 066 www.everdure.com IM Ref: DCD 0480E 24/2009/06FC F O R O U T D O O R U S E O N L Y...
Need help?
Do you have a question about the DAINTREE ESEE and is the answer not in the manual?
Questions and answers