Table of Contents
Advertisement
Quick Links
INSTALLATION
INSTRUCTIONS
For use with models
GXRV10,
GXRM10,
PNRQ15,
PNRQ20,
PNRV12
(beginning
on page 1) and PNRV18
(beginning
on page 4)
INSTALLATION
NOTES
• Use pipe thread_ealing
rope (provided)
on threaded
COIlnefiliOIlS.
• Tubing
may
be cot
1o desired
length.
• When
connecting
Ihe kit to a refligerator
water dispenser,
a slightly lower dispenser
water pressure
may be noticed.
This is llormal.
• It is normal
for tile GREEN light to flash on tile faucet
monitor
when tile icemaker
or dispenser
calls for water (on some
models).
• Before installing the icemaker ki_ install the Reverse Osmosis
Filtration System according to the installation instructions,
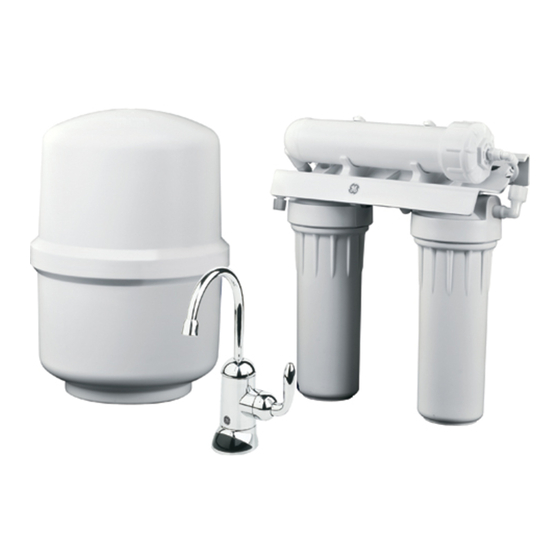
KIT CONTENTS
• Storage
tank
• Tank adapter
• 6 ft. 3/8" orange
robing
• 2 "lee fit/ings with
push-to-connect
ends
• Brass tubing
adapter,
nut and
washer asseInhly
• 33 IL 3/8" blue robing
• Pipe lhread
tape
• 1 ft. 3/8" orange
robing
TOOLS
AND
MATERIALS
REQUIRED
• Ufilily knife
• Pliers and adjuslablejaw
wrench
CONNECTING
THE AUXILIARY
TANK
FOR MODELS
GXRV10,
GXRM10,
PNRQ15,
PNRQ20,
PNRV12
I, Turn off file iceInaker.
2 Turn off the water supply m tile Reverse Osmosis
Fihra/ion
System by closing
the water supply valve (Fig. 1).
3, Dr'ain the RO system and tank. Ttlrn Oil file RO faucet located
on Ihe sink or counterlop
(Fig. 1). Let tile water drain
fkom tile
s_teIn
until water has stopped
flowing. On models
equipped
wifll a tank shomffvalve,
make sure tile valve is open
_) that tile
tank will drain.
(lose
tile RO fauceL
5.
Cut the 3/8"
tubing
that coIlnefils
the storage
tank to Ihe RO
s_teIn
(Fig. 2); this robing
will be either
orange,
gray or while,
depending
on model
Make sure the cot is clean and straight
widl IlO burrs or crimps.
Insert on "lee titling between
tile two
cut ends of tile robing
(Fig. 2). Push Ihe tobing
into lhe fitting
until it slops--about
1/2".
Give robing a lug m Inake sure it is
seated securely.
ConIlect
tile tank to file Tee
osiIlg
file 6 ft. lengfll
orange
robing.
Fig. 1
_)_
_
RO watt'r
faucet
(lift lever to open)
H
H
H
H
H
H
H
H
!!
,,
*_lveWater
suppl_To
drain
Fig. 2
Smrage
tmik
Reverse
Osmosis
_in
Iut
Tce fitdng
Auxilim T
storagetm_k
(induded
with R'_NIT)
215C1044P031
(II-04JR)
49-50138
www.GEAppliances.com
GENEtb\L
ELECTRIC
COMPANY,
Appliance
Park, Louisville,
KY 40225
Advertisement
Table of Contents

Related Manuals for GE SmartWater GXRM10


Summary of Contents for GE SmartWater GXRM10
- Page 1 For use with models PNRV12 (beginning • Use pipe thread_ealing rope (provided) COIlnefiliOIlS. • Tubing be cot 1o desired length. • When connecting Ihe kit to a refligerator a slightly lower dispenser water pressure This is llormal. KIT CONTENTS • Storage tank •...
- Page 2 CONNECTING TO THE ICEMAKER L Locate the 3/8" robing that supplies RID fauco. It will be bhm, gray or white, depending model. DO not confuse the product water tubing with the drain water tubing that also goes to the faucet (black or white on most models), At a convenient point between...
- Page 3 SANITIZING See your Reverse Osmosis System Owner's Manual for complete Sanitization Instructions. I. Turn off' the icemaker (if attached 2. Turn off' the water supply to dm systeIn. 3. Turn on tile RO f_mcet to drmn that tank (it may take several minutes).
- Page 4 CONNECTING I, Turn off tile water supply m 1tie Reverse Osmosis closing (clockwise rotation) tile water supply valve (Hg. 9). Shut off the waler from the Reverse Osmosis closing Ihe RED tank shutoff valve (Fig. 10). Lift tile lever oil Ihe RO water faucet located oil Ihe sink or counlertop.
- Page 5 CONNECTING I. Locate 3/8" robing I}lat suppfies file product water 1(7dm RO fsuco. At a couveuieut point hel_veen lhe fhucet mid tile electronics box, cut tile robing aud iustall the 3/8" Conuect one end of tile 33 fi. leugth lee, as showu ill Fig. 13. :2.
- Page 6 SANITIZING Sanitize upon installation of the Reverse Osmosis system and after servicing inner parts of the Reverse Osmosis system, including replacement of prefilter, posffilter and Reverse Osmosis cartridge. It is important to wash hands with anti-bacterial soap before handling inner parts of the system. A CAUTION: ffiustallingunitinNewCoustruction, eusure house plumbing is flushed thoroughlybefore opening the water supply...
Need help?
Do you have a question about the SmartWater GXRM10 and is the answer not in the manual?
Questions and answers