Siemens IC60 User Manual
Hide thumbs
Also See for IC60:
- User manual (132 pages) ,
- Manual (132 pages) ,
- Quick start manual (40 pages)
Table of Contents
Advertisement
Advertisement
Table of Contents

Related Manuals for Siemens IC60


Summary of Contents for Siemens IC60
-
Page 1: User Manual
IC60 User Manual 11-2006 Building Technologies Fire Safety & Security Products... - Page 2 Sous réserve de modifications techniques et de la disponibilité. © 2006 Copyright by Siemens Switzerland Ltd Wir behalten uns alle Rechte an diesem Dokument und an dem in ihm dargestellten Gegenstand vor. Der Empfänger anerkennt diese Rechte und wird dieses Dokument nicht ohne unsere vorgängige schriftliche Ermächtigung ganz oder teilweise Dritten zugänglich machen oder außerhalb des Zweckes verwenden, zu dem es ihm übergeben worden ist.
-
Page 3: Table Of Contents
General.....................4 Country specific standards................4 Security Information ..................4 Notes on graphics ..................4 EC Directives ....................5 Operating panel..................6 Operating panel layouts ................6 Description of the Operating panel keys and indicators ......6 Key functions ....................8 2.3.1 Changing the LCD backlight ..............8 2.3.2 Keypad button backlight................8 2.3.3 Changing the frequency of the keypad buzzer .........8 Using the system ..................9... -
Page 4: General
Warning panel. The manuals can be downloaded at: www.siemens.com/homesecurity This manual describes the functions corresponding to a general programmed setting of the control panel. Nevertheless, the functions could be configured by the installer in a different way and there- fore not be available. -
Page 5: Ec Directives
EN 301489-3 EN 300220-3 Radio Spectrum Matters: The EC Declaration of Conformity is made available by: Siemens Building Technologies Fire & Security Products GmbH & Co. oHG D-76181 Karlsruhe Additionally the product complies with the following standards: Analog PSTN interface... -
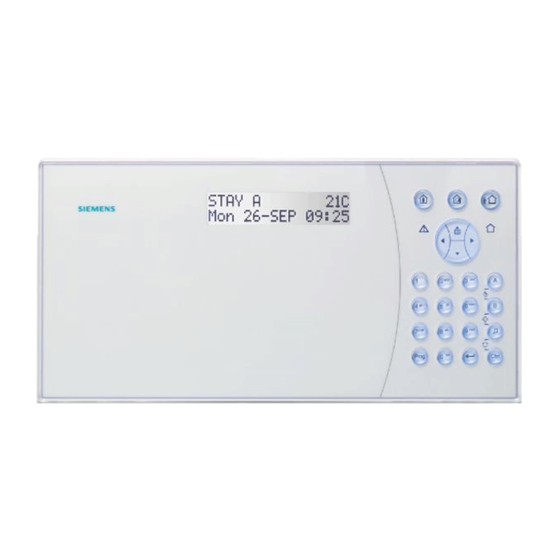
Page 6: Operating Panel
Operating panel Operating panel Operating panel layouts Vertical control unit or external keypad Horizontal control unit Keypad layouts Tab. 1 Description of the Operating panel keys and indicators Symbol Key/Indicator. Description Internal system activated Button: Arm in Stay mode <STAY> LED: Stay arming mode activated Bypass key Button: Bypass Zones... - Page 7 Operating panel Symbol Key/Indicator. Description Menu navigation to the left <LEFT> arrow Menu navigation to the right <RIGHT> arrow Menu navigation down <DOWN> arrow Numeric keys 0 to 9 with characters A to Z <0>…-<9> …. Zone A key 'A' Zone- <A>...
-
Page 8: Key Functions
Operating panel Key functions 2.3.1 Changing the LCD backlight Increasing the LCD backlight: Press <CTRL>followed by the <LEFT> arrow after at max. 2 seconds. By holding down the <CTRL> button and repeatedly pressing the <LEFT> arrow button the LCD backlight level can be increased to the maximum. Reducing the LCD backlight: Press <CTRL>... -
Page 9: Using The System
Using the system Using the system The system can generally be operated in two different ways: by navigating through the clear text menu with the arrow keys; by programming all functions with the special programming codes. Entering the User/Installer program mode There are two program mode levels , the CLIENT mode and the INSTALLER mode. -
Page 10: Exiting The Program Mode
Using the system Entering the Installer program mode To access the INSTALLER mode, it is a prerequisite that the system is NOT armed 1. Press <PROG> 2. ENTER: Master/ Installer pin code (default: 258369) 3. <ENTER> DISPLAY: Installer: User If there is a single long beep at this point and the program LED does not turn on, this means that you can not access the PROGRAM MODE with your code. -
Page 11: Arming The System While People Stay At Home
Using the system Used keys: Arming with a code CODE <CODE> <ENTER> 1. Enter your PIN <CODE>. 2. Press <ENTER> to arm the system. The <OK> indicator lights up to indicate that the system is armed. There is an exit delay prior to the system being armed. During this delay time, a slow beep sounds to indicate that the system is not armed yet and to remind you to vacate the protected area. -
Page 12: Disarming The System
Using the system Quick stay arming 1. Press <STAY> to arm the system. During the exit delay you can leave the premises. If you wish to stay, or if you do not want any- body to enter the protected premises, you may cancel the Entry/Exit delay by pressing the <EN- TER>... -
Page 13: How To Bypass Zones
Using the system How to bypass zones Used keys: ZONE <BYPASS> 01…16 <ENTER> Bypass any zone that cannot be closed. You may bypass selected zones prior to arming. This feature is also used to temporarily exclude a faulty zone requiring re- pair from service. -
Page 14: Emergency Alerts
Using the system 3.11 Emergency alerts The functions of these three special keys are best programmed by your installer to suit your individual situation. Most commonly they are used in a panic situation. The alarms keys are: PANIC FIRE MEDICAL An alarm can be generated by simultaneous pressing of two buttons. -
Page 15: Messages And Events
Using the system 3.13 Messages and events 3.13.1 How to read system messages Any system failure that may occur is indicated by system messages. System mes- sages are automatically displayed and are listed in the tables below. Read the messages and call for service if necessary. Message Description –... -
Page 16: How To Display Events In The Memory
Using the system 3.13.3 How to display events in the memory The system memory stores the latest events. Used keys: <CTRL> (MEM) 1. Press the < UP> arrow (MEM) to display a list of events. The system will display the latest event and automatically scroll to the next one every 2.5 seconds;... -
Page 17: How To Add Or Change The User Code
Using the system 3.14.2 How to add or change the user code Enter the CLIENT mode: 1. Press: <PROG> 2. Enter: Master/User Pin Code (default 147258) 3. Press <ENTER> DISPLAY: Client: User Change the code: 1. Press <1> 2. Press <ENTER> 3. -
Page 18: How To Set Time And Date
Using the system 3.15 How to set time and date The alarm system has an internal clock that may be used to automatically arm or disarm the alarm or turn outputs on or off. It is also used to identify when events have occurred in the memory via the LCD keypad. -
Page 19: Remote Control
Remote control Remote control Using the remote control To use the system in a very easy way, you can operate all main functions from the remote control. The remote control is a radio device. The system can manage up to 16 remote controls, if all the 5 channels of each remote control are programmed. The working distance between a remote control and a control unit may vary be- tween 20-200m, depending on the environment. -
Page 20: Summary Of The System Main Functions
Summary of the system main functions Summary of the system main functions The main functions of the system are listed in the table below. Function Keys Description Notes Full or Partition Arm <CODE> & ◄┘ Initiates full arm Full Arm <ARM>... -
Page 21: Notes
Notes Notes Building Technologies 009929_a_en_--.doc Fire Safety & Security Products 11.2006... -
Page 22: Keyword Index
Keyword index Keyword index Initiate Panic 14 Installer program mode 10 Alarm 10 Arm Partition 12 Arming before EXIT 10 keypad layout 6 Arming in Stay Mode 11 Keypad LED 8 Arming the System 10 LCD backlight 8 Battery Low 15 Local program Mode 9 Buzzer tone 8 Bypass a selected zone 13... - Page 24 Siemens Switzerland Ltd Building Technologies Group International Headquarters Fire Safety & Security Products Gubelstrasse 22 CH-6301 Zug Tel. +41 41 724 24 24 Fax +41 41 724 35 22 www.sbt.siemens.com Document no. 009929_a_en_-- P/N 7161700 Rev. A Edition 11.2006...
Need help?
Do you have a question about the IC60 and is the answer not in the manual?
Questions and answers