Table of Contents
Advertisement
Available languages
Available languages
Quick Links
Advertisement
Table of Contents

Related Manuals for Hoover IRONSPEED SRD 4107


Summary of Contents for Hoover IRONSPEED SRD 4107
- Page 2 Summary English...........1 Français..........16 Deutsch..........31 Italiano..........46 Nederlands..........61 Português..........76 Español..........91...
-
Page 3: Parts Description
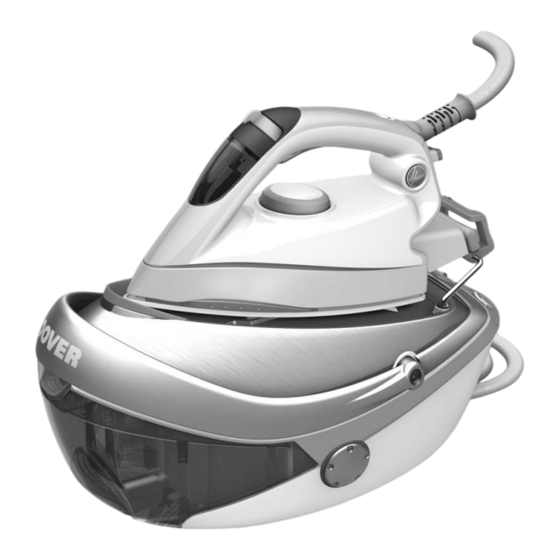
Parts Description English Control Panel Iron Lock System Iron Resting Mat Carry Handle Removable Water Tank Cord Storage for Hose and Mains Mains Cord Supply Hose Filling Inlet Fig. 1: Base and Tank Description Removable Water Tank Knob Soleplate Soleplate Temperature Dial Steam Trigger Multi Steam Technology Selector Soleplate Temperature Indicator... - Page 4 On/O Iron with Power-On Light “Water Tank Empty” Light “Automatic Shut-O ” Light “Steam Ready” Light Boiler Rinse Indicator and Reset Fig. 3: Domestic Iron Control Panel On/O Boiler with Power-On Light On/O Iron with Power-On Light Fig. 4: Pro Iron Control Panel Ironspeeed_SR__1-15_union_pprod3.indd 2 11-12-2009 9:59:54...
- Page 5 48001378-1 - Ironspeeed_SR_final.pdf 12/01/2010 12:03:44 Bristles Steam Trigger Comfort Handle Professional Brush Support and Cord Storage Fig. 5: Professional Steam Brush Removable Water Tank Knob Soleplate Soleplate Temperature Dial Steam Trigger and Steam Trigger Lock Multi Steam Technology Selector Soleplate Temperature Indicator Calc Removal Cap Fig.
-
Page 6: Important Safety Instructions
Introduction Dear customer, First of all, we would like to congratulate you for purchasing this Hoover ironing system and to thank you for the con dence you have in Hoover brand. This appliance has been manufactured with great care, respecting all of our quality criteria and has been tested several times. - Page 7 48001378-1 - Ironspeeed_SR_final.pdf 05/01/2010 09:19:31 ter 1.1 - ontrol Panel appliance is switched on (Only models with domestic iron). Recommended for dry ironing session. (only with professional iron). that iron switch (1G) needs to be switched on for heating up the boiler (only with professional iron).
-
Page 8: Chapter 1.3 - Carry Handle
Fig. 7: Domestic Iron Lock System Fig. 8: Pro Iron Lock System To unlock it, do the opposite of the instructions. Warning: Do not carry your appliance by the iron. Use the designed handle (4). Chapter 1.3 - Carry Handle Your steam generator is equipped with an ergonomic carry handle (4) that will allow you to comfortably transport your appliance when required. - Page 9 Chapter 2.1 - What Kind of Water May be Used? The Hoover ironing system has been designed to be used with tap water only. There is no need to use distilled or pure distilled water. Nevertheless, in case your water is very hard, you can mix 50% of distilled water with 50% of tap water.
- Page 10 48001378-1 - Ironspeeed_SR_final.pdf 24/12/2009 11:23:06 Warning: Do not put any vinegar, hot water, perfume, or any other kind of chemical agents or any other contents in the water tank. It could damage the steam generator and shorten its life use. Chapter 2.3 - Switching on the Appliance Domestic Iron Models: Connect the appliance with the mains cord to the earthed socket.
- Page 11 48001378-1 - Ironspeeed_SR_final.pdf 12/01/2010 12:13:21 Chapter 3.2 - Ironing Dry Ironing Domestic Iron Models: Select the temperature of the soleplate following the indications of chapter 3.1. Start your ironing without pressing the steam trigger (13), when the soleplate reaches the appropriate temperature. Professional iron models: Switch on only the iron switch (1g).
- Page 12 Here are the suggestions to obtain the best results: Textile Steam Type Soleplate T°C Wrinkled Textiles Precise Power Tricky Zone Precise Power Jeans Profound Care Cotton Profound Care Linen Profound Care Starched Clothes Profound Care Velvet/Alcantara Profound Care Wool Profound Care Silk Di use Caresse Cashmere...
- Page 13 48001378-1 - Ironspeeed_SR_final.pdf 13/01/2010 08:40:41 Chapter 3.4 - Vertical Steam Ironing Set the soleplate temperature (12) to the max temperature and set the Multi-Steam Technology selector (14) to the Profound care program. Hang curtains and clothes (jackets, suits, coats). Hold the iron in vertical position at a short distance of the fabric to avoid burning it.
- Page 14 Chapter 4.2 - Rinsing the Boiler for Scale Maintenance In order to extend the life of your appliance, you should rinse the boiler to avoid scale deposit in the boiler. You should rinse it every 2 months or wait until the “rinse”...
-
Page 15: Chapter 4.3 - Storage
Chapter 4.3 - Storage Put the iron on the heat-resistant iron-resting mat (3). Switch o the appliance and unplug it. Empty the water tank. Wait at least 30 minutes allowing the soleplate and the generator to cool down. Lock the iron thanks to the iron lock system (2). Please report to the dedicated chapter 1.2 for further instructions. -
Page 16: Troubleshooting
Troubleshooting Problem Cause Solution The appliance does There is a connection Check the mains cord, the not become hot problem plug and the wall socket The appliance is not Press on the on/o switch switched on The soleplate temperature Set a higher temperature of is too low the soleplate The appliance does... - Page 17 Important Information Hoover spares and Consumables Always replace parts with genuine Hoover spares. These are available from your local Hoover dealer or direct from Hoover. When ordering spare parts, always check your model number. Hoover Service Should you require service at any time, please contact your local Hoover Service gher temperature of O ce.
- Page 18 Description Français Panneau de commande Système de blocage du fer Tapis support Poignée transport Réservoir d’eau amovible cordon Cordon d’alimentation Flexible d’alimentation Ori ce de remplissage g. 1: Description de la base et du réservoir Bouton du réservoir d’eau amovible Semelle Cadran de température de la semelle...
- Page 19 Bouton de Marche/Arrêt du fer avec témoin Témoin de réservoir vide Témoin d’arrêt automatique Témoin de vapeur prête Témoin de rinçage de la chaudière et réinitialisation g. 3: Panneau de commande du fer domestique Bouton de Marche/Arrêt de la chaudière avec témoin Bouton de Marche/Arrêt du fer avec témoin g.
- Page 20 48001378-1 - Ironspeeed_SR_final.pdf 12/01/2010 13:53:18 Poils Déclencheur de vapeur Poignée ergonomique Bouton de Marche/Arrêt. Support pour brosse professionnelle et rangement du cordon Bouton du réservoir d’eau amovible Semelle Cadran de température de la semelle Déclencheur et bloqueur de vapeur Sélecteur Multi Steam Technology Témoin de température de la semelle Bouchon d’élimination du calcaire...
-
Page 21: Instructions Importantes De Sécurité
Avant d’utiliser votre nouvel appareil Hoover, prenez le temps de lire attentivement ce manuel. Si vous avez besoin d’informations supplémentaires ou si vous rencontrez des problèmes non traités dans ce manuel, veuillez contacter le service après vente ou votre revendeur local. -
Page 22: Chapitre 1.1 - Panneau De Commande
48001378-1 - Ironspeeed_SR_final.pdf 05/01/2010 09:25:22 Chapitre 1.1 - Panneau de commande Bouton de Marche/Arrêt (1A): Un témoin s’allume sur le commutateur pour indiquer que l’appareil est allumé (Concerne les modèles de fers pour usage domestique uniquement). Fer allumé/éteint (1G): Quand ce bouton est allumé, la semelle commence à (uniquement avec un fer professionnel). - Page 23 g. 7: Système de blocage du fer domestique g. 8: Système de blocage du fer professionnel Pour le débloquer, suivez les instructions en sens inverse. Mise en garde poignée prévue à cet e et (4). Chapitre 1.3 - Poignée transport La centrale vapeur est dotée d’une poignée de transport ergonomique (4) qui vous permettra de transporter facilement votre appareil quand vous le souhaitez.
-
Page 24: Chapitre1.4 - Arrêt Automatique
à repasser ou une surface résistante à la chaleur. Chapitre 2.1 - Quel type d’eau peut être utilisé ? Le système de repassage Hoover a été conçu pour être utilisé avec de l’eau du robinet. Il n’est pas nécessaire d’utiliser de l’eau distillée ou pure. Cependant, si vous vivez dans une région où... -
Page 25: Chapitre 3: Utilisation De La Centrale Vapeur
48001378-1 - Ironspeeed_SR_final.pdf 24/12/2009 11:25:37 Mise en garde: N’ajoutez pas de vinaigre, d’eau chaude, de parfum ou tout autre agent chimique ou autre dans le réservoir à eau. Cela risquerait d’endommager la centrale vapeur et d’écourter sa durée de vie. Chapitre 2.3 - Mise sous tension de l’appareil Modèles de fers domestiques: Branchez l’appareil à... - Page 26 ? Pour obtenir des résultats optimaux, il est fondamental de régler correctement la température de la semelle et le débit de vapeur à utiliser. Votre appareil Hoover est doté d’un sélecteur Multi Steam Technology (14) unique. Si vous l’utilisez correctement, cette fonction rendra votre repassage plus facile et rapide, et vous permettra d’obtenir des résultats exceptionnels.
- Page 27 Voici quelques conseils pour obtenir des résultats optimaux : Tissus Type de vapeur T°C semelle Tissus froncés Precise Power Zones délicates Precise Power Jeans Profound Care Coton Profound Care Profound Care Vêtements amidonnés Profound Care Velours/alcantara Profound Care Laine Profound Care Soie Di use Caresse Cachemire...
-
Page 28: Chapitre 4: Entretien Et Nettoyage
48001378-1 - Ironspeeed_SR_final.pdf 13/01/2010 08:45:49 Chapitre 3.4 - Repassage vertical à vapeur Réglez la semelle à la température (12) maximum et mettez le sélecteur Multi Steam Technology (14) sur le programme Profound Care. Suspendez les rideaux ou vêtements (vestes, tailleurs, manteaux). Tenez le fer en position verticale à... - Page 29 Chapitre 4.2 - Rinçage de la chaudière pour éliminer le calcaire éviter les dépôts de calcaire. Rincez-la tous les deux mois ou attendez que le témoin de rinçage (1e) clignote. Modèles dotés du témoin de rinçage Quand le témoin de rinçage (1e) clignote, continuez normalement votre repassage, mais n’oubliez pas de nettoyer la chaudière avant la prochaine utilisation du fer.
- Page 30 Chapitre 4.3 - Rangement Placez le fer sur le tapis résistant à la chaleur (3). Éteignez l’appareil et retirez la che. Videz le réservoir d’eau. Attendez au moins 30 minutes que la semelle et le générateur refroidissent. Verrouillez le fer à l’aide du système prévu à cet e et (2). Veuillez consulter le Pour le modèle SRD 41110, mettez la brosse à...
-
Page 31: Dépannage
Dépannage Problème Motif Solution L’appareil ne chau e Il y a un problème au niveau Véri ez le cordon de la connexion d’alimentation, la che et la prise L’appareil n’est pas allumé Appuyez sur le bouton de Marche/Arrêt La température de la Réglez la semelle à... - Page 32 Informations importantes Pièces détachées et consommables Hoover sont disponibles auprès de votre revendeur Hoover. Lors de la commande de pièces de Service Hoover Pour toute intervention à tout moment, veuillez contacter le service après-vente Hoover le plus proche. Sécurité Selon Hoover, l’approbation de chacun est le meilleur moyen de démontrer la sécurité...
Need help?
Do you have a question about the IRONSPEED SRD 4107 and is the answer not in the manual?
Questions and answers