
Related Manuals for NAIM Amplifiers


Summary of Contents for NAIM Amplifiers
- Page 1 W O R L D C L A S S H I - F I O W N E R S M A N U A L Preamplifiers, Integrated Amplifier, Power Amplifiers, Power Supplies...
- Page 2 Contents IMPORTANT Page Section Equipment Installation In order to comply with current European safety regulations it is essential that the Naim loudspeaker connectors supplied Audio Connections with amplifiers and loudspeakers are used. Mains Power Connection General Installation Do not under any circumstances allow anyone to modify your...
-
Page 3: Audio Connections
Product specific information begins in Section 5. 1 Equipment Installation Normally your Naim Audio equipment will have been installed by the dealer who sold it to you - even if you live outside their immediate vicinity. In any event however your dealer is responsible for making sure that the system sounds as it should. -
Page 4: General Installation
Your Naim hi-fi system can be damaged by lightning. Power specifically related to Naim equipment as well as amplifiers are particularly at risk and should be turned off and more general warnings about the use of domestic disconnected from the mains when there is risk of lightning audio products. -
Page 5: Installation And Operation
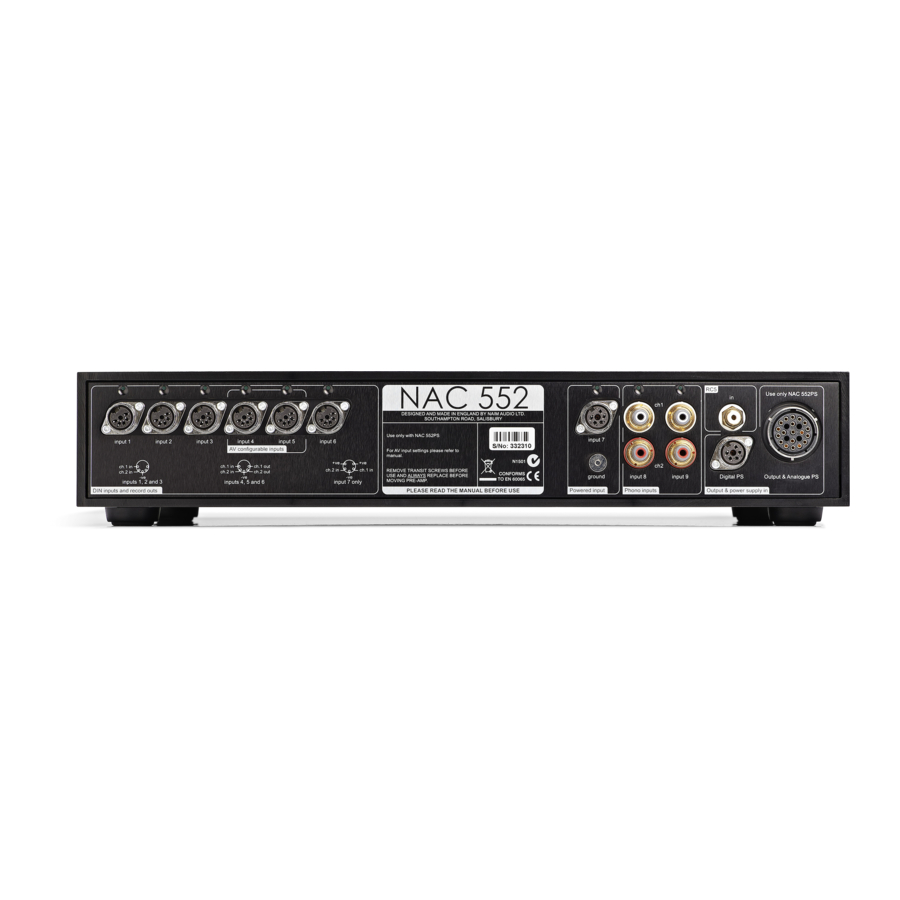
The four transit screws on the underside of the NAC 552 case should be removed before use and must be replaced if the unit is to be re-packed and shipped. These transit screws must not be used in any other Naim product. Do not invert the NAC 552 once the transit screws are removed. -
Page 6: Remote Control
NAC 552 5.6 Handset Volume and Balance Control The remote handset mono (Flash) or (Narcom 3) key can also be used to set up automatic source switching. Automatic The remote handset volume balance keys provide some input switching only becomes operational on exiting from alternative control characteristics. - Page 7 Note: For best performance the Burndy and 5 pin DIN cables should be run as close together as possible. additional signal output mains input to mono or dual mono to stereo power and fuse power amplifiers amplifiers Interconnect Cables 7. NAC 552/NAC 552PS Specification cable direction NAC 552 Burndy Input Sensitivities: 75mV, 47kΩ...
-
Page 8: Automatic Input Switching
Naim source component is 8.5 Handset Volume and Balance Control operated. For example, if the tuner input is selected on the NAC... - Page 9 Preamplifier NAC 252 8.6 Mute and Mono 8.9 Remote Control Mute and mono functions can be controlled independently for NARCOM remote handset supplied with the NAC 252 source and record signals via the front panel buttons to the left duplicates all configuration and control functions. See Section of the two banks of source and record selection buttons.
- Page 10 The RS232/comms interface is an optional upgrade. It can be specified at time of order or fitted retrospectively. Contact your local representative or Naim Audio directly for further information. 9.3 NAC 252 Connected to Supercap Note: For best performance the Burndy and 5 pin DIN cables should be run as close together as possible.
- Page 11 Naim power amplifier incorporating a preamplifier power output, or with an appropriate Naim power supply. A separate NAPSC supply that provides power to the display and control circuits is also supplied. Diagrams 12.3 and 12.4 illustrate two NAC 282 power supply options.
- Page 12 DC power supply. The two sockets must not be used simultaneously. (out) Note: The RS232/comms interface is an optional upgrade. It can (out) be specified at time of order or fitted retrospectively. Contact your local representative or Naim Audio directly for further information.
- Page 13 12.4 NAC 282 Connected to Hi-Cap and NAPSC to stereo power amplifiers Interconnect Cables cable direction 240° 5 to 5 pin DIN marker 13. NAC 282 Specification...
-
Page 14: Handset Volume Control
The NAC 202 preamplifier does not incorporate an internal power supply but must be used in conjunction with either a Naim power amplifier incorporating a preamplifier power output, or with an appropriate Naim power supply. An optional separate NAPSC supply to provide power to the display and control circuits is also available. Diagram 15.3 illustrates the NAC 202 connected to a Hi-Cap power supply. - Page 15 Preamplifier NAC 202 14.6 Mute 14.10 Switch-on mute button silences and restores the output signal. After switch-on, via the power supply or power amplifier power button, the NAC 202 will remain muted for 30 seconds while 14.7 Record Monitor control systems and circuits stabilise. button operates the record monitor circuit enabling the Note: A flashing mute indicator after switch-on indicates that the...
-
Page 16: Table Of Contents
The RS232/comms interface is an optional upgrade. It can be specified at time of order or fitted retrospectively. Contact your local representative or Naim Audio directly for further information. 15.3 NAC 202 Connected to Hi-Cap and NAPSC to stereo power amplifiers... - Page 17 The NAC 112x preamplifier does not incorporate an internal power supply but must be used in conjunction with either a Naim power amplifier incorporating a preamplifier power output, or with an appropriate Naim power supply. Diagram 18.3 illustrates the NAC 112x connected to a Flatcap 2 power supply.
-
Page 18: Channel Balance
NAC 112x 17.6 Channel Balance 17.10 Display Channel balance adjustment is operated electronically within the The NAC 112x front panel button display can be switched off preamplifier and is controlled by the remote handset keys by pressing the remote handset (in preamplifier mode) disp only. -
Page 19: Inputs 1, 2 & 6
Contact your Note: The NAC 112x features various technologies to reduce local representative or Naim Audio directly for further information. microphonic effects. Some movement of the board and sockets when connecting and disconnecting cables is normal. - Page 20 European legislation the Naim connectors supplied mode the NAIT 5i will return to normal mode automatically. should be used. Naim Audio speaker cable will provide the best results, however, a wide range of speaker cable types can be The front panel tape button will illuminate if automatic input used without risk of damage to the amplifier.
-
Page 21: Integrated Amplifier
Integrated Amplifier NAIT 5i 20.7 Display functions. See Section 25 for more information. The Flash NARCOM 3 handsets will also control the NAIT 5i. See Sections The NAIT 5i front panel button display can be switched off 23 and 24 for more information. by pressing the remote handset (in preamplifier mode) disp 20.9 Connections Notes... - Page 22 Flash Handset 23.1 Introduction PRE (preamplifier mode) Flash is factory pre-programmed to operate any Naim Page 1 of 2 preamplifier or cd player, the NAT 05 tuner and AV2 source + Selects the next input source. audio-visual processor. Additional Naim sources may be source - Selects the previous input source.
-
Page 23: Remote Handset
NARCOM 3 AV (av processor mode) 24.1 Introduction NARCOM 3 is a multi-functional remote control handset Page 1 of 3 designed to be used with Naim Audio CD players, input+ Selects the next input. input- Selects the previous input. integrated amplifiers, preamplifiers and preset tuners. -
Page 24: Soft Keys
NARCOM 3 Enables the output of appropriately equipped tape prog key can also be used to delete tracks from a play machines to be heard while recording. The source order. To delete a track, press and hold the prog key until the to be recorded is chosen by the input selection prog indicator in the CD display illuminates then delete the track numeric keys... - Page 25 Pauses the cd. Stops cd play. used with Naim Audio CD players, integrated and pre- Starts cd play. amplifiers. The handset control configuration is based Selects the previous track or index point.
- Page 26 The mains earth (ground) should always be connected regardless of what other equipment is used in conjunction with Naim power amplifiers. This only grounds the case and the electrostatic screen within the transformer, and is not connected to the signal negative. In order to avoid hum loops, the signal negative of the whole system should be connected to the mains earth (ground) in one place.
-
Page 27: Nc Ch2
Power Amplifier NAP 500 27.1 NAP 500 Connected to NAP 500PS signal right left signal input ch1 speaker speaker input ch2 mains input and fuse Interconnect Cables Input Ch1 Input Ch2 cable direction NAP 500PS Burndy marker 28 NAP 500/NAP 500PS Specification Power Output: 140 Watts per channel, 8Ω... - Page 28 The mains earth (ground) should always be connected regardless of what other equipment is used in conjunction with Naim power amplifiers. This only grounds the case and the electrostatic screen within the transformer, and is not connected to the signal negative. In order to avoid hum loops, the signal negative of the whole system should be connected to the mains earth (ground) in one place.
-
Page 29: Signal In
Power Amplifier NAP 300 30 NAP 300 Connected to NAP 300PS signal left right signal speaker input ch2 input ch1 speaker mains input and fuse Interconnect Cables Input Ch1 Input Ch2 cable direction NAP 300PS Burndy marker 31 NAP 300/NAP 300PS Specification Power Output: 90 Watts per channel, 8Ω... -
Page 30: Input
In order to avoid hum loops, the signal Only Naim Audio speaker cable should be used to connect a negative of the whole system should be connected to the mains loudspeaker to the output of the NAP 250. - Page 31 In order to avoid hum loops, the signal Only Naim Audio speaker cable should be used to connect a negative of the whole system should be connected to the mains loudspeaker to the output of the NAPV 145.
-
Page 32: Ch1 (Out) Ch2
The power button is located on the front panel. The NAP 200 can provide power for an appropriate Naim Audio preamplifier. The power supply output is carried on the DIN input socket. - Page 33 The power button is located on the rear panel. The NAP 150x can provide power for an appropriate Naim Audio preamplifier. The power supply output is carried on the DIN input socket.
- Page 34 “ground” regardless of any other equipment used. In order to avoid hum-loops the signal negative of the whole system should Only Naim Audio speaker cable should be used to connect a be connected to the mains earth in one place. This should be loudspeaker to the output of the NAP V175.
-
Page 35: Installation And Connection
Serious damage is likely to occur if yellow shorting plugs 47.2 Protection are used on Naim equipment other than the nap 6-50. The NAP 6-50 uses a fan to assist heat dissipation. Fan speed The negative input and output connections within each zone... -
Page 36: Ve -Ve
Power supplies should be installed in their final location before connecting cables or switching on. Ensure that power amplifiers are switched off and the preamplifier volume is turned down before power supplies are switched on. The power buttons are located on the front panel. -
Page 37: Power Supply
51 Installation Power supplies should be installed in their final location before connecting cables or switching on. Ensure that power amplifiers are switched off and the preamplifier volume is turned down before power supplies are switched on. The Flatcap 2 and NAPSA are heavy and care should be taken when lifting or moving them. -
Page 38: Power Supplies
Preamplifiers - NAC 552, NAC 252, NAC 282, NAC 202, NAC 112x Integrated Amplifier - NAIT 5i Power Amplifiers - NAP 500/NAP 500PS, NAP 300/NAP 300PS, NAP 250, NAPV 145, NAP 200, NAP 150x, NAPV 175, NAP 6-50 Power Supplies - Supercap, XPS, Hi-Cap, Flatcap 2, NAPSA, NAPSC... - Page 40 Naim Audio Limited, Southampton Road, Salisbury, England SP1 2LN Part No. OWMDV Part No. OWMDV Naim Audio Limited, Southampton Road, Salisbury, England SP1 2LN Part No. 0WMAM 12-001-0041 Telephone: +44 (0) 1722 332266 Fax: +44 (0) 1722 412034 www.naim-audio.com Drawing No. NA102001-400 Telephone: +44 (0) 1722 332266 Fax: +44 (0) 1722 412034 www.naim-audio.com...
Need help?
Do you have a question about the Amplifiers and is the answer not in the manual?
Questions and answers