Table of Contents
Advertisement
Advertisement
Table of Contents

Subscribe to Our Youtube Channel
Related Manuals for Leica DM4000B


Summary of Contents for Leica DM4000B
- Page 1 Leica DM4000 B Leica DM4000 M Leica DM5000 B Operating Manual...
- Page 2 Published 2003 by: Leica Microsystems Wetzlar GmbH Ernst-Leitz-Straße D-35578 Wetzlar (Germany) Responsible for contents: Katja Peter, Karin Schwab Phone +49(0)6441-292261 Marketing CM, Compound Microscopy, Product Management +49(0)6441-292255 In case of questions, please contact: E-mail: MQM-Hotline@leica-microsystems.com...
- Page 3 Leica DM4000 B Leica DM4000 M Leica DM5000 B Operating Manual...
- Page 4 Copyrights Copyrights All rights to this documentation are held by Leica Microsystems Wetzlar GmbH. Reproduction of text or illustrations (in whole or in part) by print, photocopy, microfilm or other methods (includ- ing electronic systems) is not allowed without express...
-
Page 5: Table Of Contents
5.8 Polarizer and Analyzer ......27 5.9 DIC Prisms ..........28 Imaging Procedure for 5.10 Optional Accessories ....... 29 Leica DM4000 B/Leica DM5000 B ..53 5.11 Connection to the Power Supply .... 30 8.1 Transmitted Light ........53 5.12 Connection to the 8.1.1 Bright Field ........ - Page 6 Contents 8.2 Fluorescence ..........57 Imaging Procedure for 12. Essential Leica DM4000 M ........58 Wear and Spare Parts ......66 9.1 Incident Light ..........58 9.1.1 Bright Field ........58 13. Abbreviations and Pictograms ....67 9.1.2 Dark Field ......... 58 9.1.3 Polarization ........
-
Page 7: Important Notes About This Manual
1. Important Notes about this Manual 1. Important Notes about this Manual Caution! This operating manual contains important in- This operating manual is an essential com- structions and information for the operational ponent of the microscope, and must be read safety and maintenance of the microscope and carefully before the microscope is put into accessories. -
Page 8: Safety Notes
2.1 General Safety Notes General specifications This safety class 1 device is constructed and tested in accordance with EN 61010-1/IEC 1010-1, Leica CTR5000 electronics box (for DM5000 B) safety regulations for electrical measuring, con- For indoor use only. trol, and laboratory devices. - Page 9 Through connection to the grounding con- nection, ancillary equipment with its own and/or extra power supply may be brought to the same ground wire potential. For connections without a ground connector, Leica Service must be consulted.
-
Page 10: Overview Of The Instrument
3. Overview of the Instrument 3. Overview of the Instrument Leica DM4000 B / DM5000 B Specification Leica DM4000 M • transmitted light: BF, DF, PH, Imaging Procedure • transmitted BF, DF, PH Pol (DM5000 B also ICT) light: ICT, Pol •... - Page 11 3. Overview of the Instrument Specification Leica DM4000 B / DM5000 B Leica DM4000 M Condenser • motorized condenser head • motorized condenser turret for light rings, DF stop, DIC prisms • optional polarizer integrated and motorized • automatic Köhler Illumination Magnification Changer •...
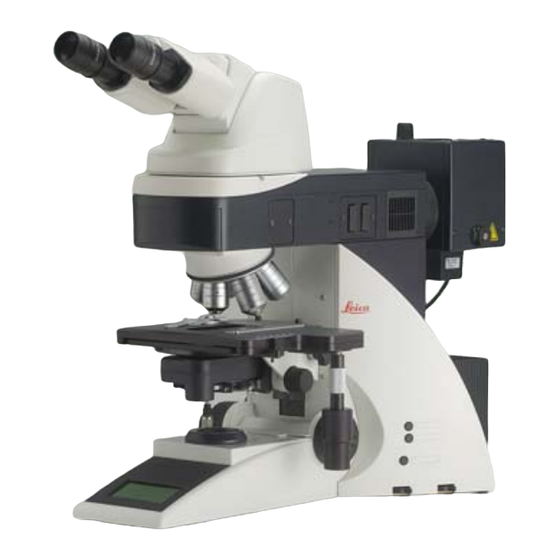
- Page 12 3. Overview of the Instrument Fig. 1 Leica DM4000 M left side of the stand with AET22 advanced ergotube 1 Eyepiece 8 Function keys field diaphragm 2 Eyepiece tube 9 Transmitted light/incident light switch 3 Tube 10 Function keys aperture diaphragm...
- Page 13 3. Overview of the Instrument 19 18 Fig. 2 Leica DM4000 B right side of the stand with Advanced Ergotube AET22 15 Lamp housing for incident light 16 Lamp housing for transmitted light 17 Transmitted light filter, optional 18 Transmitted light filter, optional...
-
Page 14: Unpacking The Microscope
The external ebq 100 supply unit* is delivered in The device is delivered in two boxes. separate packaging. The stand box contains the following compo- For the Leica DM5000 B microscope: nents: The CTR5000 electronics box is also delivered in separate packaging. - Page 15 4. Unpacking the Microscope Installation location Transport Work with the microscope should be performed For shipping or transporting the microscope in a dust-free room, which is free of oil vapors and its accessory components, the original and other chemical vapors, as well as extreme packaging should be used.
-
Page 16: Assembling The Microscope
5. Assembly 5. Assembling the Microscope When using intermediate systems and optical The microscope components are logically as- accessories, the sequence may vary. sembled in this order: In this case, read Chapter, "5.10 Optional accessories" p. 29 • Stage • Condenser •... -
Page 17: Stage
• Using the condenser height adjuster (3.2), turn Note: the condenser holder completely upwards, i.e. as close to the stage as possible. For thicker specimens (Leica DM4000 M) the stage can be set to a correspondingly lower • Loosen the stage clamp (3.3) slightly. level. -
Page 18: Condenser
5. Assembly 5.2 Condenser Note: The condenser must be centered before using • Using the condenser height adjuster (5.4), turn the microscope. the condenser holder (5.1) completely down- Köhler illumination p. 37. wards. • Unscrew the clamping screw for the con- Fig. -
Page 19: Tube And Eyepieces
5. Assembly 5.3 Tube and Eyepieces Fig. 9 Fastening the tube Clamping screw The tube is mounted to the stand either directly or with the use of intermediate modules. It is fastened in place with the side clamping screw (9.1). •... -
Page 20: Light Sources For The Transmitted Light Axis
5. Assembly 5.5 Light Sources for the Transmitted Light Axis Fig. 12 Lamp housing 107/2 Releasing the Caution: fastening screw Be sure that the lamp housing is discon- nected from the power supply. Unplug the power plug and the power supply during as- sembly. -
Page 21: Light Sources For The Incident Light Axis
5. Assembly 5.6 Light Sources for the Incident Light Axis This lamp housing is used with a 12V 100W halo- gen lamp or various gas discharge lamps. Caution: Inserting the 12V 100W halogen lamp into the 106 z lamp housing During assembly, always unplug the power •... - Page 22 5. Assembly • Insert the lamp with the dust cover straight • Place the lamp housing in the incident light into the socket until it stops. lamp housing receptacle (18.1) and fasten it with the clamping screw on the side. •...
- Page 23 5. Assembly Inserting the gas discharge lamps (Hg and Xe) into the 106z lamp housing Hg and Xe lamps are powered by the separate ebq 100 supply unit. Read the separate instruction manual provided with this supply unit. The following gas discharge lamps may be used and require different lamp mounts (Fig.
- Page 24 5. Assembly • To open the 106 z lamp housing, unscrew the fastening screws on the cover. Caution: • Remove the transport anchorage (red plastic Hg 50 burner: rod in place of the burner) in the lamp mount. After installation, the labeling must be upright. To do so, remove the lower clamp (19.1).
- Page 25 5. Assembly • Insert the lamp mount, with the burner in- stalled, into the lamp housing and tighten it with the screws (20.8). • Put the lid down again. Plug in the contact Fig. 20 106 z lamp housing (on the side, open) plug as far as it goes and retighten the Cover raised screws.
-
Page 26: Equipping The Incident Light Filter Turret
5. Assembly 5.7 Equipping the Incident Light filter turret Fig. 23 Filter cube Fig. 24 Filter cube front side back side The receptacles on the turret are numbered. According to your equipment, the individual filter and/or reflector cubes have already pre- assigned positions. -
Page 27: Polarizer And Analyzer
5. Assembly ICT/P transmitted light polarizer Fig. 27 Assembly of the ICT/P transmitted light polarizer Clamping screw • Using the left clamping screw, fasten the ICT/P transmitted light polarizer to the underside of the condenser holder (Fig. 27). • Make sure that the red index point on the front of the polarizer is aligned with 0. -
Page 28: Dic Prisms
• Insert the polarizer into the receptacle until it latches in place (Fig. 30). • With the microscope Leica DM5000 B the DIC objective prisms are already mounted in the DIC turret above the objective revolving Motorized analyzer nosepiece(Fig. - Page 29 5. Assembly Ergomodule • Remove the clamping ring from the filter slide. For raising the eye level of the tube opening, the • Insert the Booster Lens or Excitation ergomodule may be used. Manager. It is fastened in place with the side clamping screw.
-
Page 30: Connection To The Power Supply
"Microscope" jack (35.1) on the rear of the electronics box. Use the cable with the 25-pin plug. Fig. 34 Rear side of stand Leica DM4000 B/M 1 Power switch • Connect the electronics box to the power sup- 2 Power supply ply using the power cable (35.2). -
Page 31: Startup
6. Startup 6. Startup 6.1 Functional Principle The microscope’s most important functions may be easily accessed using function keys. • The microscope may be switched between various contrast processes by pressing a single button. • The microscope recognizes the objective chosen and the respective contrast process. There- fore, the values for intensity (INT), aperture diaphragm (AP) and field diaphragm (FD) are al- ways set correctly. - Page 32 6. Startup Possible Assignments for the Function Keys For Leica DM4000 B/DM5000 B: Function key Meaning Bright field (Transmitted light) Phase contrast (Transmitted light) Interference contrast (Transmitted light) Dark field (Transmitted light) Polarization (Transmitted light) CHANGE TL Switch through all transmitted light processes...
- Page 33 6. Startup For Leica DM4000 M: Function key Meaning Bright field (Incident light) Interference contrast (Incident light) Dark field (Incident light) Polarization (Incident light) CHANGE RL Switch through all incident light processes Increase brightness (incident light) Reduce brightness (incident light)
- Page 34 After initialization is complete, the display on the controls. stand shows the current microscope setting (Fig. 37). 6.3 The Display (Leica DM4000 B/DM4000 M) The microscopic components such as dia- phragms, condenser, light and phase rings are already pre-centered in the factory. However, re-centering may be necessary due to transpor- tation and assembly.
-
Page 35: The Display
6. Startup The display shows the current microscope set- Light Intensity tings. The display depends on the microscope’s configuration. In the first column, corresponding The actual brightness setting is graphically de- pictograms indicate the type of information: con- picted by a beam. Additionally, the light intensity trast method, magnification, light intensity, dia- is indicated in 20 (coarse adjustment) or in 255 phragms, light splitting for photo tubes. -
Page 36: The Function Keys
6. Startup There is a row of function keys both on the right and left side of the stand. Some of these keys Variable function keys: are defined, and some of them are variable. The A factory preset is performed which fits your variable function keys have various meanings microscope configuration. - Page 37 6. Startup However, depending on how the condenser is • Insert the specimen in the stage’s specimen disassembled and reassembled, it may be nec- holder (39.3). essary to re-adjust the condenser in some cases. Therefore, check condenser • Focus on the specimen. The focus wheel on centering.
- Page 38 6. Startup • Open the field diaphragm just enough for it to Do not adjust the aperture diaphragm. The aper- disappear from the field of view (41d). ture diaphragm is already set optimally for each objective. 6.6. Checking Phase Contrast Rings Caution: Fig.
-
Page 39: Checking Phase Contrast Rings
6. Startup If your microscope is equipped for the use of phase contrast, the light rings that fit the objec- • In the place of an eyepiece, insert the focus- tives are built into the condenser. ing telescope (Fig. 42) into the observation The light rings are already leveled in the factory. -
Page 40: Adjusting The Light Sources
6. Startup • Insert the centering key through the corre- Fig. 44 Light ring centering 1 Clamping screw sponding openings (44.1) in the condenser holder. • Turn the centering screws until the dark ring (phase ring in the objective) is congruent with the slightly narrower bright ring (light ring in condenser) (43 c). - Page 41 On the left side of the microscope, there is an function key. FLUO (Leica DM4000 B/ DM5000 B) adjustment window (1.14, p. 12) for mapping the or IL (Leica DM4000 M) appears in the display. light source. • Insert the reflector for lamp adjustment While observing the light source in the adjust- (Fig.
- Page 42 6. Startup • In the adjustment window, you see the direct Fig. 47 Direct lamp filament image focused, but not centered filament image and the mirror image, which in (in reality, the image is less focused) most cases are shifted together. •...
- Page 43 6. Startup Fig. 50 Direct arc image focused but decentered (in reality, the image is less focused) • Focus the direct image with the collector (46.6). • Use the adjusting buttons on the rear side of the lamp housing (46.2,46.4) to pivot the arc’s mirror image to the side or completely out of the beam path.
- Page 44 6. Startup Fig. 53 Direct arc image focused but not centered (in reality, the image is less focused) • Focus the direct image with the collector (46.6). • Use the adjusting buttons to pivot the arc’s mirror image on the rear side of the lamp housing (46.2,46.4) to the side or completely out of the beam path.
- Page 45 6. Startup In older lamps, the structure of the arc is no longer clearly recognizable. The image is then more like that of a HG 50 lamp. The im- age and mirror image can no longer be su- perimposed exactly. In this case, align both images.
-
Page 46: Operation
7. Operation 7. Operation 7.1 Switching on the Microscope 7.2 Stages and Specimen Displacement When using a gas discharge lamp, the ebq 100 external supply unit must be turned on separately (56.1). Lengthening the coaxial pinion Then switch-on the microscope at the power •... -
Page 47: Focusing
7. Operation Rotating the Stage 7.3 Focusing The swiveling range of the rotating stages is There is a focus dial on the left side of the stage for 0°- 110°. coarse and fine focus adjustment (Fig. 59). • In order to revolve the stage, loosen the fas- On the right side of the stand, there is also a tening screw (59.1). -
Page 48: Tubes
7. Operation 7.4 Tubes Adjusting the Viewing Angle • For the AET22 and EDT22 ergotubes, the view- ing angle can be adjusted by tilting the binocu- Note: lar viewer in the range of 5° - 32° (Fig. 61). Close any unused tube openings, as otherwise stray light can interfere with observation. -
Page 49: Eyepieces
7. Operation Beam Splitting in Photo Tubes 7.5 Eyepieces EDT22 tube: The beam splitting between the observation and Note: documentation outputs has a definite presetting (50:50). The eyepiece’s aperture protector must be removed,or at least folded back, during BDT25+ tube: microscopy while wearing eyeglasses. -
Page 50: Objectives
7. Operation • Start with a small level of magnification. Then 7.6 Objectives switch to the next higher objective. The objective must be moved manually into the • For immersion objectives use the appropriate light path. Be sure that the nosepiece turret immersion medium. -
Page 51: Magnification Changer
7. Operation For lockable immersion objectives: 7.7 Magnification Changer • Lock these by pushing the front part upwards Optionally, a coded magnification changer can until it stops (approx. 2 mm). be used, which is manually operated. On the knurled ring, the following magnification •... -
Page 52: Light Sources
7. Operation 7.8 Light Sources 7.9 Aperture Diaphragm and Field Diaphragm • The brightness is set using the function keys Both diaphragms are already factory-set to the (65.5). Then, the INT function keys are as- optimum setting for the current objective. signed to the currently active axis for trans- mitted light (TL) or incident light (IL). -
Page 53: Imaging Procedure For Leica Dm4000 B/Leica Dm5000 B
8. Imaging Procedure for Leica DM4000 B/DM5000 B 8. Imaging Procedure for Leica DM4000 B/ Leica DM5000 B 8.1 Transmitted Light 8.1.2 Phase Contrast 8.1.1 Bright Field (TL) • Switch to the transmitted light axis (TL) by • Switch to the transmitted light axis (TL) by pushing the TL/IL button. -
Page 54: Dark Field
8. Imaging Procedure for Leica DM4000 B/DM5000 B 8.1.3 Dark Field (TL) Notes: • Switch to the transmitted light axis (TL) by pushing the TL/IL button. • The microscope automatically selects the correct light ring in the condenser. • Select the DF (dark field) contrast method. -
Page 55: Polarization
Combined procedure: Mechanical procedure: • For the Leica DM4000 B and Leica DM5000 B • Turn the polarizer on the underside of the microscopes, it is possible to combine condenser in the light path (Fig. 66). Make sure mechanical and motorized components. -
Page 56: Differential Interference Contrast
8. Imaging Procedure for Leica DM4000 B/DM5000 B 8.1.5 Differential Interference Contrast (TL) Alternatively: • Manually rotate the polarizer on the underside (only for DM5000 B) of the condenser into the light path (Fig. 66). • Switch to the transmitted light axis (TL) by •... -
Page 57: Fluorescence
8. Imaging Procedure for Leica DM4000 B/DM5000 B 8.2 Fluorescence • The fluorescence intensity can be increased using the Booster Lens on the right side of the • Switch to the fluorescent light axis (FLUO) by stand (Fig. 69). pushing the TL/IL button. -
Page 58: Imaging Procedure For Leica Dm4000 M
9. Imaging Procedure for Leica DM4000 M 9. Imaging procedure for Leica DM4000 M 9.1 Incident Light 9.1.2 Dark Field 9.1.1 Bright Field • Switch to the incident light axis (IL) by pushing the TL/IL button. • Switch to the incident light axis (IL) by pushing the TL/IL button. -
Page 59: Polarization
9. Imaging Procedure for Leica DM4000 M 9.1.3 Polarization Automatic procedure: • Switch to the incident light axis (IL) by pushing • The ICR filter cube is automatically brought the TL/IL button. into the light path. • Select the POL (polarization) contrast method. -
Page 60: Interference Contrast
9. Imaging Procedure for Leica DM4000 M 9.1.4 Interference Contrast 9.2 Transmitted Light • Switch to the incident light axis (IL) by pushing 9.2.1 Bright Field the TL/IL button. • Switch to the transmitted light axis by pushing the TL/IL button. -
Page 61: Trouble Shooting
10. Trouble Shooting 10. Trouble Shooting Problem Cause/Remedy Stand The microscope does not respond. Make sure that voltage is impressed. Make sure that the microscope is connected to the power supply. Check the cable connections. Inform service technician to change the fuses. Illumination The image is completely dark. - Page 62 10. Trouble Shooting Problem Cause/Remedy Bright Field The specimen can not be brought into focus. Use the correct immersion medium. Lay the specimen with the cover glass to- wards the top. Make sure that the cover glass thickness is correct and that is conform to the indication on the objective.
- Page 63 10. Trouble Shooting Problem Cause/Remedy Polarization No polarization contrast is possible. Bring the polarizer and analyzer into cross po- sition until they reach maximum darkness (without specimen) ( p. 55, 59). Fluorescence The image is completely dark (no fluorescence). Open the shutter ( p.
-
Page 64: Care Of The Microscope
11. Care of the Microscope 11. Care of the Microscope Caution! Caution: Unplug the power supply before performing Residual fiber and dust can create unwanted cleaning and maintenance work! background fluorescence. Protect electrical components from moisture! Cleaning Coated Parts Microscopes in warm and warm-damp climatic Dust and loose dirt particles can be removed zones require special care in order to prevent with a soft brush or lint-free cotton cloth. -
Page 65: Handling Acids And Bases
If damage appears on inner sur- Caution: faces, the objectives must be sent to your Be absolutely certain to prevent the optics Leica subsidiary for repair. We also advise and mechanical parts from coming these against cleaning the inside surfaces of the chemicals. -
Page 66: Essential Wear And Spare Parts
12. Wear and Spare Parts 12. Essential Wear and Spare Parts Order No. Material No. Name Used for Replacement Lamp 500 974 Halogen lamp 12 V 100 W 107/2 lamp housing 500 137 High-pressure mercury burner 50 W 106 z lamp housing 500 138 High-pressure mercury burner 100 W 106 z lamp housing... -
Page 67: Abbreviations And Pictograms
13. Abbreviations and Pictograms 13. Abbreviations and Pictograms Contrast method Magnification Light intensity/diaphragms Beam splitting Transmitted light shutter open Transmitted light shutter closed Incident light shutter open Incident light shutter closed Advanced Ergo Tube Aperture diaphragm Brifght field COMBI Combination contrast method CUBE Filter cube Darkfield... -
Page 68: Index
Lamp housing receptacle 20, 22, 25 incident light analyzer 28 Electrical safety 8 Light intensity 35 Transmitted light axis 10 Electronics box Leica CTR5000 8, 30 Light sources 41, 52 Transmitted light filter 13 Ergomodule 29 Light sources (incident light axis) 21... -
Page 69: Eu Declaration Of Conformity
15. EU Declaration of Conformity 15. EU Declaration of Conformity...
Need help?
Do you have a question about the DM4000B and is the answer not in the manual?
Questions and answers