Table of Contents
Advertisement
Advertisement
Table of Contents

Related Manuals for Foxconn nT-425H


Summary of Contents for Foxconn nT-425H
- Page 1 NETBOX User’s Manual...
-
Page 2: Symbol Description
Trademark: All trademarks are the property of their respective owners. Version: User’s Manual V1.0 for NETBOX. P/N: 3A2226300-000-G Symbol description: Caution : refers to important information that can help you to use NETBOX better, and tells you how to avoid problems. Warning: indicating a potential risk of hardware damage or physical injury may exist. -
Page 3: Safety Notice
Safety Notice : Before using this product, please read the below safety notice carefully, this will help to extend the product’s lifecycle, and work normally. ■ When NETBOX is working, please make sure its ventilation system is working. ■ The power adapter is dissipating heat during normal use, please be sure not to cover it and keep it away from your body to prevent discomfort or injury by heat exposure. -
Page 4: Table Of Contents
TABLE OF CONTENTS Chapter 1 Introduction of NETBOX Product Overview ..................2 LED Indicator Introduction ................4 Chapter 2 Placement and connection of NETBOX Placement of NETBOX On the Desk ..................6 On the Display Back ................6 Connection of NETBOX Connect the Antenna ................8 Connect the Monitor ................8 Connect the USB Devices ..............8 Connect the Network Cable ..............9... - Page 5 The NETBOX is a compact and easy to use desktop. It features all the desktop capabilities but with a slim body design which enables your to browse the internet in a relaxable and comfortable way. This chapter introduces the following information: ■...
-
Page 6: Product Overview
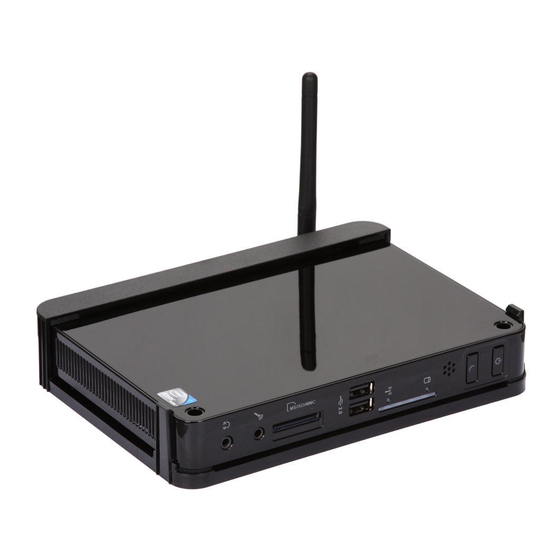
NETBOX features all the desktop capabilities but with a slim body design which enables you to browse the internet in a relaxable and comfortable way. 1-1 Product Overview 1. Top View (190mm) 7.5in 2. Front Side View LLS_LED1 LLS_LED5 Name Description Headphone Port Connects to a headphone... - Page 7 3. Back Side View Name Description RF(Radio Frequency) Port Connects to antenna USB Ports Connect to USB devices Display Output Port(VGA) Connects to display device HDMI Port Connects to HDMI audio and video Network Port Standard RJ-45 network port Line Out and S/PDIF Out Port Connects to powered analog speakers or record- ing devices with optical connectors(3.5mm jack) Power Input Port...
-
Page 8: Led Indicator Introduction
1-2 LED Indicator Introduction Suspend_ Power_ HDD_ WLAN_ LLS_ LLS_ LLS_ LLS_ LLS_ Indication LED1 LED2 LED3 LED4 LED5 Boot Green Blink S0(Working Mode) Green S1(Power-Saving Mode) Green S3(Standby Mode) Blink [Press Suspend Button] S4(Hibernation Mode)& S5(System Power Off Mode) Blue, CPU Initialization Error Blink... -
Page 9: Placement Of Netbox
In this chapter, the placement and the connection of some neces- sary peripherals will be introduced. This chapter includes the following information: ■ Placement of NETBOX ■ Connection of NETBOX... -
Page 10: On The Desk
2-1 Placement of NETBOX 1. On the Desk You can install your NETBOX in the mount directly. If there is enough space on your desk, you can simply put your NETBOX with Magnet-Metal- Feet on the tabletop. 2. On the Display Back This is the best space-saving way. - Page 11 2.2. Fit the NETBOX into the bracket with power button locating at the top for easy touch. 2.3. After that, you can connect the antenna to your NETBOX. Remove the antenna before lifting up the NETBOX straight to take it out.
-
Page 12: Connection Of Netbox
2-2 Connection of NETBOX 1. Connect the Antenna Connect the antenna to the RF port of the NETBOX. You can fold the antenna and rotate it in different angle as you want. 2. Connect the Monitor Connect a monitor to the NETBOX through VGA connector or HDMI connector. 3. -
Page 13: Connect The Network Cable
4. Connect the Network Cable Connect LAN cable to the RJ-45 port, with the other end connected to a hub or switch. Switch 5. Connect the Power Cord Connect the power adapter to the power input port of the NETBOX, and push the power button to start it. -
Page 14: Chapter 3 Install Windows Os
This chapter introduces the following information: ■ Install Windows XP ■ Install Windows 7 ■ Appendix - Display Features Notice... - Page 15 Make sure you have these ready : 1. NETDVD. (It is an optional accessory. If there is no NETDVD in this package, you need other purchase an external USB DVD-ROM drive.) 2. NETBOX driver CD. (In this package) 3. Windows XP Install CD/Windows 7 Install CD. (Other purchase) Before we continue : ■...
- Page 16 1.4. The computer will reboot, and it will start installing Windows XP Operating System. Windows XP Professional Setup Welcome to Setup. This portion of the Setup program prepares Microsoft(R) Windows(R) XP to run on your computer. ● To set up Windows XP now, press ENTER. ●...
- Page 17 1.8. In this biggest hard disk size screen, you can press [C] to create partitions as you wish, assign them C:, D: or E: logical drive names. Windows XP Professional Setup The following list shows the existing partitions and unpartitioned space on this computer. Use the UP ad DOWN ARROW keys to select an item in the list.
-
Page 18: Install Drivers In Windows Xp
2. Install Drivers in Windows XP 2.1. When the Windows XP is completely installed, you have to install the necessary drivers before using the NETBOX. Take out the Windows XP Install CD from the DVD-ROM drive, and put the NETBOX driver CD inside. 2.2. -
Page 19: Install Windows 7
3-2 Install Windows 7 1. Install Windows 7 1.1. Push power button to turn on your computer, then press <Del> key to enter BIOS Setup. 1.2. Put the Windows 7 Install CD into the NETDVD or USB DVD-ROM drive. 1.3. Select and go to the “Boot” menu, enter “Boot Device Priority”, set the “1st Boot Device” to “USB: Optical DVD RW”, press <F10>... - Page 20 1.8. Later the setup will display the hard disk partitions of your system. If there were other systems (such as Linux) installed previously, you need select them and click “Drive options (advanced)” to delete them. When all partitions are clean, setup will display the biggest size of your hard drive.
- Page 21 To ensure that all Windows features work correctly, Windows might create an additional parti- tions for system files, so you will see a system reserved partition. Select the 70GB partition and click “Next” to continue. 1.10. From this step we start to install windows 7 into your hard disk, including copying Windows files, expanding Windows files...etc.
- Page 22 1.11. When the installation is completed, setup will prepare your compute for the first use. Then you can follow steps to select system settings, create an account, set a password...etc, until the whole process is completed and enter Windows 7 operating system. 2.
-
Page 23: Appendix - Display Features Notice
Appendix - Display Features Notice 1. HDMI Resolution Setup in BIOS You can set the HDMI Resolution in BIOS as below, there are four options: BIOS SETUP UTILITY Main Advanced Security Boot Exit Select HDMI solution Advance Settings WARNING: Setting wrong values in below sections may cause system to malfunction. - Page 24 2.2. In Windows 7 system, the output sequence in the Intel® Graphics Media Accelerator Driver and the OS display properties are nonmatched, the “Primary Device” match for “2”, and the Secondary Device match for “1”. 2.3. For the VGA user, after installing VGA Driver, and rebooting into system, the VGA default Operating Mode is "Intel(R) Dual Display Clone", and the "Screen resolution"...
-
Page 25: First Boot
FoxMC is a newly developed Linux Operating System. If it was purchased and pre-installed by factory, the first time you start your computer, it will automatically launch "First Boot". This chapter will guide you through the setup and introduce the desk- top features and operation system recovery method. - Page 26 4-1 First Boot For the first time, when you start NETBOX with FoxMC, the computer will automatically launch "First Boot". This section will guide you through the setup. Please follow the steps below to complete the setup. 1. Browse the [Welcome] page and click “Forward” to continue. 2.
- Page 27 3. Select “Yes” and click “Forward”. 4. Set the Date and Time, then click “Finish” to complete the setup. 5. According to the prompt click “Next” to login.
- Page 28 4-2 Desktop Overview FoxMC stands for Fox Media Center, it incorporates the functions of internet surfing, entertainment, office work, document management and various system settings on one desktop. With its dynamic user interface, simple desktop style, wealth of application software, clear system management and complete hardware support.
- Page 29 such as adjust the parameters for videos, music and pictures, change the skin of ap pearance, set the features of hardware and so on. Favorites: When you add the videos, music and pictures to the favorites, you can open the files by this icon.
- Page 30 4-3 Recovery of FoxMC 1. System Recovery from the DVD 1.1. Power on the computer, insert the system Installation DVD into the DVD driver. When the prompt message appears on the screen, press “F11” to enter Boot Menu and set DVD as the first boot device.
- Page 31 1.4. It starts to format hard disk and install system. 1.5. When the installation is complete, click "Reboot" to restart the system.
- Page 32 2. System Recovery from the Hard Disk If FoxMC was purchased and pre-installed by factory, they should have created a recovery parti- tion in the hard disk. Now we can use the hard disk to recover the system. 2.1. Start the system, during the screen prompt, press any key to enter Grub interface. The picture will show as below: 2.2.
- Page 33 2.4. Click "Next" to format partition(hd0,0) and recover system from hard disk. The picture will show as below: 2.5. When the installation is complete, click "Reboot" to restart the system.
- Page 34 Statement: This device complies with part 15 of the FCC Rules. Operation is subject to the following two conditions: (1) This device may not cause harmful interference, and (2) this device must accept any interference received, including interference that may cause undesired operation. Warning: FEDERAL COMMUNICATIONS COMMISSION INTERFERENCE STATEMENT This equipment has been tested and found to comply with the limits for a Class B digital...