Table of Contents
Advertisement
Advertisement
Table of Contents

Related Manuals for Foxconn NETBOX nT-A3500


Summary of Contents for Foxconn NETBOX nT-A3500
- Page 1 NETBOX User’s Manual...
-
Page 2: Symbol Description
Trademark: All trademarks are the property of their respective owners. Version: User’s Manual V1.0 for NETBOX. P/N: 3A2231600-000-G Symbol description: Caution : refers to important information that can help you to use NETBOX better, and tells you how to avoid problems. WEEE: The use of this symbol indicates that this product may not be treated as household waste. - Page 3 Safety Notice : Before using this product, please read the below safety notice carefully, this will help to extend the product’s lifecycle, and work normally. ■ When NETBOX is working, please make sure its ventilation system is working. ■ The power adapter is dissipating heat during normal use, please be sure not to cover it and keep it away from your body to prevent discomfort or injury by heat exposure.
-
Page 4: Table Of Contents
TABLE OF CONTENTS Chapter 1 Introducing the NETBOX Top View View ....................2 Front Side View View ..................2 Back Side View View ..................3 Bottom View Bottom View .....................3 Chapter 2 Placing and connecting the NETBOX Placement of NETBOX On the Desk ..................5 On the Display Back ................5 Connection of NETBOX Connect the Antenna... -
Page 5: Top View View
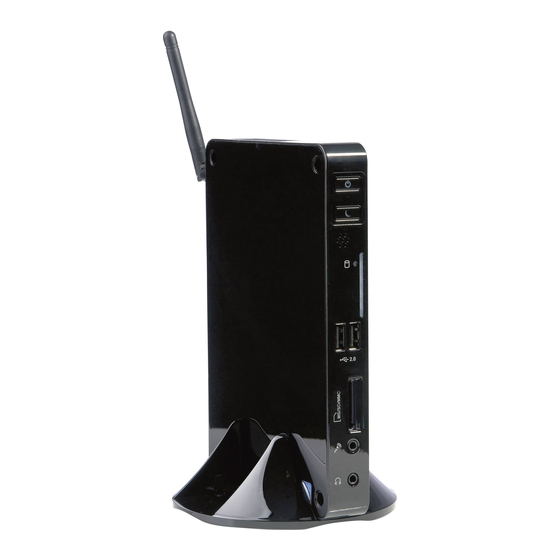
The NETBOX is a compact and easy to use desktop. It features all the desktop capabilities but with a slim body design which enables your to browse the internet in a relax and comfortable way. This chapter introduces NETBOX’s outlook : ■... - Page 6 Introduction NETBOX features all the desktop capabilities but with a slim body design which enables you to browse the internet in a relaxable and comfortable way. 1-1 Top View 190mm 1-2 Front Side View Name Description Headphone Port Connects to a headphone Microphone In and S/PDIF In Connects to a microphone or playback devices with Port...
-
Page 7: Back Side View View
1-3 Back Side View Name Description RF(Radio Frequency) Port Connects to antenna USB 2.0 Ports Connects to USB devices Display Output Port Connects to display device HDMI Port Connects to HDMI audio and video Network Port Standard RJ-45 network port Line Out and S/PDIF Out Port Connects to powered analog speakers or record- ing devices with optical connectors(3.5mm jack) -
Page 8: Placement Of Netbox
In this chapter, the placement and the connection of some neces- sary peripherals will be introduced. This chapter includes the following information: ■ Placement of NETBOX ■ Connection of NETBOX... -
Page 9: On The Desk
2-1 Placement of NETBOX 1. On the Desk 1. You can install your NETBOX in the mount like the right image. 2. If there is enough space on your desk, you can simply put your NETBOX on the tabletop as shown below. 2. - Page 10 2. Fit the NETBOX into the bracket with power button locating at the top for easy touch. 3. After that, you can connect the antenna to your NETBOX. Remove the antenna and lift up the NETBOX straightly to take it out.
-
Page 11: Connection Of Netbox
2-2 Connection of NETBOX 1. Connect the Antenna Connect the antenna to the RF port of the NETBOX. You can fold the antenna and rotate it in dif- ferent angle as you want. 2. Connect the Monitor Connect a monitor to the NETBOX through DVI connector. 3. - Page 12 4. Connect the Network Cable Connect LAN cable to the RJ-45 port, with the other end connected to a hub or switch. Switch 5. Connect the Power Cord Connect the power adapter to the power input port of the NETBOX, and push the power button to start it.
-
Page 13: Install Windows 7
This chapter introduces the Windows installation : ■ Install Windows 7 ■ Install Drivers in Windows 7... - Page 14 Make sure you have these ready : 1. NETDVD. (It is an optional accessory. If there is no NETDVD in this package, you need other purchase an external USB DVD-ROM drive.) 2. NETBOX driver CD. (In this package) 3. Windows 7 Install CD. (Other purchase) Before we continue : ■...
- Page 15 4. The computer will reboot, and it will start loading the files for installing the Windows 7 Operating System. 5. After the computer reboots it will start loading the files for installing Windows 7. Click “Next” to continue and click “Install now” button to start the setup. 6.
- Page 16 9. In the hard disk size screen, you can click the “new” button to create partitions as you need. In this example we are creating a 70GB partition to install Windows. Make your modifications and click “Apply”. To ensure that all Windows features work correctly, Windows might create additional partitions for system files.
- Page 17 10. The setup program will then start to install Windows 7 on your hard disk. During the installa- tion, your computer will restart several times. 11. When the installation is complete, setup will prepare your computer for it’s first use. You can then follow the steps to select system settings, create an account, set a password...etc, until the whole process is complete.
-
Page 18: Install Drivers In Windows 7
3-2 Install Drivers in Windows 7 1. When the Windows 7 is completely installed, you have to install the necessary drivers before using the NETBOX. Take out the Windows 7 Install CD from the USB DVD-ROM drive, and put the NETBOX driver CD inside. 2.
Need help?
Do you have a question about the NETBOX nT-A3500 and is the answer not in the manual?
Questions and answers