Table of Contents
Advertisement
Quick Links
READ AND UNDERSTAND
OPERATOR'S MANUAL
BEFORE USING THIS UNIT.
FAILURE TO FOLLOW
OPERATING
INSTRUCTIONS COULD
RESULT IN INJURY OR
DAMAGE TO PROPERTY.
© COPYRIGHT 2005 by HUFFY SPORTS
A DIVISION OF RUSSELL CORPORATION
Pool System
Owners Manual
Customer Service Center
• N53 W24700 South Corporate Circle • Sussex, WI 53089 • U.S.A.
WARNING!
Toll-Free Customer Service Number for U.S: 1-800-558-5234,
For Canada: 1-800-284-8339,
For Europe: 00 800 555 85234 (Sweden: 009 555 85234),
For Australia: 1-800-333 061
Internet Address: http://www.huffysports.com
REQUIRED TOOLS AND MATERIALS:
• (2 each) Wrenches and/or
• 2 People
Socket Wrenches and
Sockets.
• Optional: Large &
Small Adjustable
Wrenches
1
• Garden Hose or
Sand
Deep sockets recommended.
1/2"
9/16"
AND/OR
1/2"
9/16"
10/05
ID#
21198805
Advertisement
Table of Contents

Related Manuals for Huffy 540D


Summary of Contents for Huffy 540D
-
Page 1: Owners Manual
DAMAGE TO PROPERTY. 1/2" 9/16" Toll-Free Customer Service Number for U.S: 1-800-558-5234, For Canada: 1-800-284-8339, For Europe: 00 800 555 85234 (Sweden: 009 555 85234), For Australia: 1-800-333 061 Internet Address: http://www.huffysports.com 10/05 21198805 © COPYRIGHT 2005 by HUFFY SPORTS... -
Page 2: Safety Instructions
• Climate, corrosion and excessive use or misuse could result in system failure. • Check tank regularly for leakage. Slow leaks could cause system to tip over unexpectedly. • If technical assistance is required, contact Huffy Customer Service Center. • Adult supervision is recommended when adjusting system. - Page 3 NOTICE TO ASSEMBLERS ALL Huffy Sports Basketball Systems, including those used for DISPLAYS, MUST be assembled and ballasted with sand or water according to instructions. Failure to follow instructions could result in SERIOUS INJURY. It is NOT acceptable to devise a makeshift weight system.
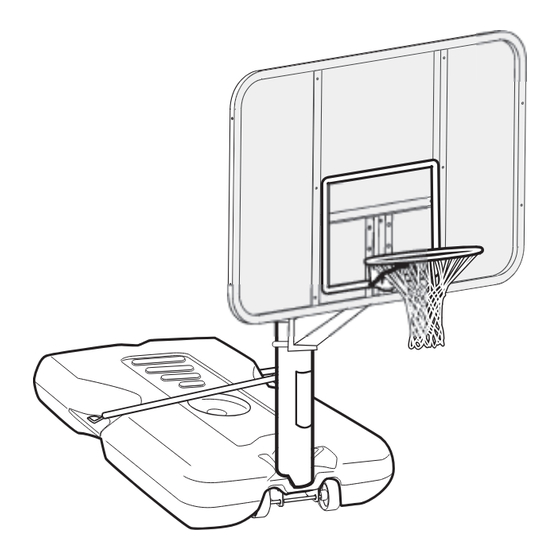
- Page 4 Get to know the basic parts of your basketball system..FRONT STRUTS EXTENSION ARM POLE BASE WHEEL CARRIAGE ASSEMBLY 21198805 10/05...
- Page 5 WARNING FAILURE TO FOLLOW THESE WARNINGS MAY RESULT IN SERIOUS INJURY AND/OR PROPERTY DAMAGE. Warning Area = PMS 02 Owner must ensure that all players know and Size = 4" x 10" follow these rules for safe operation of the system. Corner Radius = 3/8"...
- Page 6 PARTS LIST (See Hardware Identifier) Item Qty. Part No. Description Item Qty. Part No. Description 206740 Tank (White) 902006 Extension Arm, White 200628 Wheel Axle 203309 Washer, 1 O.D. 226401 Wheel 203104 Bolt, Hex Flange, 5/16-18 x 2 Long 908121 Bottom Pole Section 200837 Spacer, Plastic 202820 Rod, 3/8 O.D.
-
Page 7: Section A: Assemble The Base
SECTION A: ASSEMBLE THE BASE This is what your system will look like when you’ve finished this section: NOTE: * Units with 42” steel frame acrylic backboard do not require the use of included board struts (.75” x 22”) HARDWARE USED IN THIS SECTION TOOLS REQUIRED FOR THIS SECTION (not actual size) Item #5... - Page 8 Remove contents from tank Install rod (5) through holes in bottom pole section (4) and eyebolt (6). 21198805 10/05...
- Page 9 Install wheel axle (2) through wheel carriage (7) and install wheels (3) onto wheel axle (2) with spacers (26) as shown. Insert pole assembly into tank assembly as shown. Secure bottom pole (4) to tank and wheel bracket as shown, a deep socket is recommended. IMPORTANT! DO NOT OVER TIGHTEN.
- Page 10 Secure non-secured ends of tank struts (11) to tank as shown. Repeat for opposite side. Attach extension arm (18) to pole using U-bolt (22), washers (19), nuts (8), as shown. Install pole cap (24) as shown. WARNING! DO NOT LEAVE ASSEMBLY UNATTENDED WHEN EMPTY;...
-
Page 11: Section B: Assemble The Backboard
SECTION B: ASSEMBLE THE BACKBOARD This is what your system will look like when you’ve finished this section: TOOLS REQUIRED FOR THIS SECTION HARDWARE USED IN THIS SECTION 1/2” Item #15 Item #17 Item #20 Item #19 Item #29 1/2” 10/05 21198805... - Page 12 Install backboard assembly to the pole assembly as shown. Attach backboard and rim (16) to the extension arm (18) using bolts (20), spacers (21), washers (10, 19) and nuts (15) as shown. Tighten completely. Attach bolt covers (29). WARNING! NOTE: TWO PEOPLE REQUIRED Peel protective FOR THIS PROCEDURE.
- Page 13 WARNING: Use of this product without proper installation of net Install net clips. clips, or when all net clips are not present could result in bodily harm. Be sure to follow directions carefully. WARNING! CLIP “ARM” USE OF THIS PRODUCT WITHOUT PROPER INSTALLATION OF SMART CLIPS...
- Page 14 NET INSTALLATION SIDE VIEW NETCLIP Insert net into bottom of clip as shown. SIDE VIEW Twist net until it snaps into position. Net must be centered through clip. NETCLIP 21198805 10/05...
-
Page 15: Section B: Securing The System
SECTION B: SECURING THE SYSTEM Place assembled unit to desired location. Fill tank with water (30 gallons/114 liters) or sand (360 lb./163 kg) and snap tank cap (28) in place. Insert T-strap (27) through slot on back of base as shown. Secure unit to ground by twisting tie down stake (25) into ground and hooking T-strap (27) onto tie down stake (25). -
Page 16: Section C: Apply Height And Moving Label
SECTION C: APPLY HEIGHT AND MOVING LABEL Apply Height and Moving label on pole as shown. WARNING! DO NOT LEAVE ASSEMBLY UNATTENDED WHEN EMPTY; IT MAY TIP OVER. MOVING SYSTEM 1. While holding pole, rotate basketball system forward until wheels engage with ground.
Need help?
Do you have a question about the 540D and is the answer not in the manual?
Questions and answers