Furuno FM-8500 Operator's Manual
Furuno vhf radiotelephone operator's manual model fm-8500
Hide thumbs
Also See for FM-8500:
- Installation manual (47 pages) ,
- Operator's manual (2 pages) ,
- Manual (493 pages)
Table of Contents
Advertisement
Advertisement
Table of Contents

Related Manuals for Furuno FM-8500


Summary of Contents for Furuno FM-8500
- Page 1 VHF RADIOTELEPHONE FM-8500 MODEL...
- Page 2 All rights reserved. All rights reserved. Printed in Japan Printed in Japan PUB.No. PUB.No. OME-56030 OME-56030 ( ( TATA TATA ) ) FM-8500 FM-8500 Your Local Agent/Dealer Your Local Agent/Dealer FIRST EDITION : FIRST EDITION : DEC. DEC. 1995 1995 : MAY.
- Page 3 CANCELLING A FALSE DISTRESS ALERT 1. Switch off transmitter immediately. 2. Switch equipment on and set to Channel 16. 3. Make broadcast to "All Stations" giving your vessel's name, callsign and DSC number, and cancel the false distress alert. Example message: All Stations, All Stations, All Stations This is NAME, CALLSIGN, DSC NUMBER, POSITION.
- Page 5 WARNING Do not open the equipment except to replace paper or fuse. Hazardous voltage which can cause electrical shock, burn or serious injury exists inside the equipment. Only qualified personnel should work inside the equipment. Do not disassemble or modify the equipment.
-
Page 6: Table Of Contents
4.8 Transmit/Receive Message Memory ...4-19 5. Other Calling Types and Other Functions 5.1 Other Calling Types...5-1 5.2 Making Telephone Calls ...5-4 5.3 Receiving Telephone Call from Coast Station ...5-7 5.4 Other Station IDs and Telephone Nos..5-8 Table of Contents... - Page 7 6. Other Settings 6.1 Printer Setup (Auto/Manual) ...6-1 6.2 Turning Keyboard Click ON/OFF...6-4 6.3 Aural Alarm Setup ...6-5 7. System Confirmation 7.1 Confirming Own Ship’s ID ...7-1 7.2 Confirming ROM Version ...7-2 7.3 Confirming VHF Section Settings ... 7-3 7.4 Confirming VHF Channels ...7-4 7.5 Confirming Tx Output Power ...7-5 8.
-
Page 8: Foreword
Your VHF Radiotelephone FM-8500 will perform to the utmost of its ability only if it is operated and maintained in accordance with the correct procedures. -
Page 9: System Configuration
System Configuration CH70 Antenna VHF Antenna External Power Supply Position-fixing Speaker PR-300 Equipment DSC Section Handset MIC Receptacle FM-8500 VHF Section Distress Message Controller Printer Interface DMC-5 IF-8500 Printer Figure 1 FM-8500 system configuration viii... - Page 10 This page is intentionally left blank.
-
Page 11: Vhf Radiotelephone Operational Overview
The FM-8500 system consists of a main transceiver unit and two antennas. The transceiver unit contains a VHF transmitter, receiver, and channel 70 watch receiver module. The performance and op- eration are controlled on its front panel. The antenna may be of any type available from FURUNO or market and the recommended type is a vertically polarized non-directional type. -
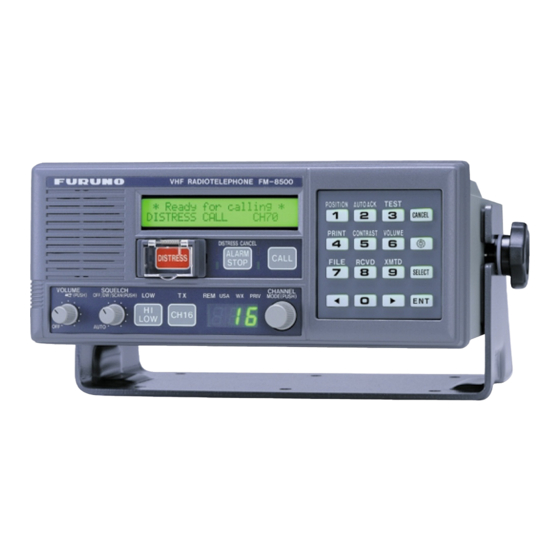
Page 12: Controls, Indications
1.1 Controls, Indications Controls LOUDSPEAKER Indications CHANNEL/ Selects a channel. Pressing the Channel Selector MODE (rotary control) changes the mode from INTL, USA, WX, and PRIV in this order. (Appears when USA/WX and PRIV mode are registered.) SQUELCH/ Mutes the receiver when no signal is present on DW/SCAN the channel selected. -
Page 13: Telephone Operation
International, USA (in the case of USA ver- sion), private (if authorized), or weather mode (USA version). The International version of FM-8500 has no such selection. On the weather channel mode, a beep is emitted when the weather alert tone is received. -
Page 14: Output Power
To turn the loudspeaker on/off, press the VOLUME control. The loudspeaker off mark appears when the speaker is off. The loud- speaker is automatically turned off when the telephone handset is used on semi-duplex channels. Press the [CH16] key to select channel CH16, International Call- ing and Safety Channel. - Page 15 This is done to prevent break in communications. Automatic acknowledge is automatically restored once voice communications are terminated. The priority of the equipments is as follows. DSC section of FM-8500 > Wing handset > Handset of FM-8500 > Remote Station RB-700 4… 16…...
- Page 16 This page is intentionally left blank.
-
Page 17: Dsc Terminal Operational Overview
5. Telecom1: Telecommand Operational Overview The contents of a DSC message change with format specifier (call- ing category). IND: Individual Call TEL: Telephone Call ALL: All Ships Call R/A: Relay All Ships Call R/S: Relay Specific Ships Call GRP: Group Call POS: Position Request Call IDs starting with “00”... - Page 18 6. Channel: Voice communication channel 7. Pos: Ship’s position 8. UTC: Universal Time Coordination 9. ACK RQ (BQ): To communicate with a coast station, a station sends its position data to the coast station and the coast station determines the chan- nel to use.
-
Page 19: Controls, Leds
Transmits the distress alert. Open cover on [DISTRESS] key and press the key 4 seconds continuously. Figure 2-1 FM-8500 transceiver unit The four LEDs surrounding the [DISTRESS] key light when the key is pressed, 4 seconds continuously. • The upper two of the four LEDs surrounding the [ALARM STOP] key blink (and alarm sounds) when distress or urgent message is received. - Page 20 Enter numeric data. Cancels wrong data and restores previous menu. CANCEL Adjusts illumination of LED and keys in four levels. 1. Display “Set up menu” (Main menu). SELECT 2. Changes settings of items appearing with blinking question mark. Registers key input. (Blinking item is registered when key is pressed.) 1.
-
Page 21: Basic Operation
When blinking question mark appears When the FM-8500 is turned on, the following display appears. This display is known as the “normal display.” Watch VHF CH70 auto [2] key pressed to get “auto” screen. Should you get lost in operation you can return to the normal dis- play by pressing the [CANCEL] key several times. - Page 22 Preparing and Transmitting Messages Preparing message for immediate transmission Preparing and storing message for later transmission There are two methods by which you can prepare and transmit messages, and they are shown below. Prepare message and then transmit it. Normal display Press the [ENT] key.
- Page 23 Status of FM-8500 during DSC Call Key entry of VHF When the distress alert is transmitted (by pressing the [DISTRESS] key), the output power of the FM-8500 is automatically set to maxi- mum (25 W). The FM-8500’s keyboard accepts no key input while DSC mes- sage is transmitted.
-
Page 24: Auto Acknowledge
2.4 Auto Acknowledge Turning & AUTO ACK on/off “auto” function “manual” function Auto acknowledge functions to automatically acknowledge indi- vidual calls. Press the [2] (AUTO ACK) key to automatically trans- mit the acknowledge back (ACK BQ) to the sending station when an individual call is received. - Page 26 Transmitting the distress call Watch VHF CH70 auto 1 Open cover on [DISTRESS] key. 2 Press [DISTRESS] key 4 seconds DISTRESS CALL CH70 34 40N To announce nature of distress, press appropriate key for nature of distress within 3 sec. after pressing the If no numeric [DISTRESS] key.
- Page 27 Distress call Distress communications (from previous page) * Received * DISTRESS ACK ID : 001234567 ID of station (usually coast station) which transmitted DIST ACK. Commence voice communications with coast station on CH16. 1. Provide the following information to the coast station: (1) Speak slowly and distinctly, “MAYDAY, MAYDAY, MAY- DAY”, pronounced as the French expression “m’aider”.
-
Page 28: Manual Entry Of Ship's Position And Time
3.2 Manual Entry of Ship’s Position and Time Entering data manually * VHF call message * Format: DISTRESS Press [ENT], [ENT] [SELECT] in this order. Position < NORTH= ˚ Enter latitude. To move blinking cursor from NORTH position to SOUTH, press the [s] key. Confirming Ship's Position and Time Canceling manually entered data If automatic position input is lost for one minute the message "EPFS... -
Page 29: Receiving Distress Alert From Other Ship
1. When the FM-8500 receives a distress alert from another ves- sel the upper two LEDs (Red) near the [ALARM STOP] key blink and the FM-8500 sounds the distress alarm. - Page 30 Flow chart - Action by ships upon reception of VHF DSC distress alert DSC Distress alert received. Press [ALARM STOP] key to silence alarm. Listen on CH16 for 5 minutes. Did you receive acknowledge from CS and/or RCC? CS = Coast Station RCC = Rescue Co-ordination Center Enter details in log.
- Page 31 Transmitting DIST ACK over CH16 Select VHF CH16 and transmit DIST ACK to vessel in distress. No reply Reply received Transmit DIST ACK to vessel in Communicate with vessel in distress. distress over DSC CH70. Relay the distress alert to a coast station by DSC. Follow the instructions of the coast station.
- Page 32 Begin search and rescue operations for the vessel in distress, com- municating with the vessel over CH16 (automatically set) on the FM-8500. Relay distress alert to coast station by MF DSC. Fi- nally, follow instruction of the coast station. >...
-
Page 33: Distress Relay
3.4 Distress Relay General Procedure If a vessel in distress is obviously near own ship and is not able to transmit the distress alert by itself, you can relay (transmit) the alert on behalf of the vessel in distress. You may relay a distress alert in the following conditions;... - Page 34 (from previous page) Manually enter position of vessel in distress, referring to page 3-4. If position is unknown enter "9999" (no information). Manually enter time. (“9999” means no information.) (continued on next page) 3-10 Address < No inform > input DIGITS= Enter ID of vessel in distress.
- Page 35 For All Ships Call only (When selecting "R/A" in call type.) Returns to normal display. Watch on CH16, following instructions of a coast station. (from previous page) DISTRESS RELAY ALL Dist ship ID: * Call in progress * DISTRESS RELAY ALL Distress alert transmitted (relayed) for about 3 seconds.
- Page 36 This page is intentionally left blank.
-
Page 37: Dsc Communication
4.1 Transmitting Individual Calls General General procedure 4. DSC Communication The individual call is for sending message to a specific station. After transmitting message (called ACK RQ transmission), wait to receive the acknowledge back (ACK BQ) signal from receiving station. You should receive it within five minutes. 2 Acknowledge back (ACK BQ signal) 1 Individual call... -
Page 38: Detailed Procedure
Detailed procedure Prepare and transmit a message as follows. Watch VHF CH70 Press the [ENT] key. * VHF call message * Format? Press the [SELECT] key. (To select format.) Call type < > IND TEL ALL --- Place the cursor on “IND”. Press the [ENT] key. - Page 39 Address? Category: Press the [SELECT] key. (To enter other station ID.) Address < > input digits = Entry of other station ID Ship station: 9 digits Coast station: 00 + 7 digits Press the [ENT] key. Address: Category? Press the [SELECT] key. (To select category.) Category <...
- Page 40 (From previous page.) After receiving the ACK BQ signal, do the following: * Wait for ack BQ * Next CH70 When the ACK BQ signal is received; Received ACK BQ ROUTINE Received station ID 1Alarm sounds. To silence, press the [ALARM STOP] key.
-
Page 41: Receiving Individual Call (Ack Rq)
4.2 Receiving Individual Call (ACK RQ) General Setting of “ABLE” or “UNABLE” When an individual call is received, the FM-8500 responds to the call depending on the setting of automatic acknowledge (AUTO ACK) function: • AUTO ACK: ON (“auto” appears.) The DSC transmits the acknowledge back (ACK BQ) signal automatically. - Page 42 ABLE Press the Press the [ENT] key. [ENT] key. Returns to normal display. The FM-8500 sends the ACK BQ signal automatically. Automatic transmission of ACK BQ (Alarm sounds.). ABLE or UNABLE appears. * Auto ack * • When “able to comply” is selected.
- Page 43 Receiving ACK RQ with AUTO ACK Off After verifying contents of receive message, manually transmit the ACK BQ signal by pressing the [CALL] key within five minutes. If the signal is transmitted more than five minutes after reception of ACK RQ signal, it is treated as an ACK RQ signal rather than ACK BQ.
- Page 44 (*1) (from previous page) When changing communication mode. Telecom1 < > Example when selecting “Unable”. (Proposal from transmittion station is not acceptable.) Press the [ENT] key. Telecom unable comply? No reason Press the [SELECT] key. (To select reason why unable to comply.) Unable <...
-
Page 45: Transmitting All Ships Calls
The All Ships Call is used to transmit important ship’s safety mes- sage, safety of life at sea message or meteorological warning. After transmitting message, you can communicate by voice over the FM-8500. Own Ship Figure 4-3 All Ships Call Open file to transmit, or prepare message. - Page 46 Detailed procedure Watch VHF CH70 auto * VHF call message * Format? Call type < IND TEL ALL --- Place the cursor on “ALL”. * VHF call message * Format: ALL SHIPS Category? Telecom1: Category < DIS URG SAF ROU Select category desired.
- Page 47 ALL SHIPS CALL CH70 * Call in progress * ALL SHIPS CALL CH70 Returns to nornmal display. Since the channel of the FM-8500 is automatically set to CH16 (designated above), you can commence voice communication immediately. > Press the [ENT] key.
-
Page 48: Receiving All Ships Calls
4.4 Receiving All Ships Calls General Status of FM-8500 Procedure for on hook status Basic procedure 4-12 When an all ship’s call is received while conducting voice com- munications, press [2] (AUTO ACK) to switch to VHF channel. The all ship’s call, transmitted by coast station or ship station, pro- vides navigation and weather alerts and emergency information. - Page 49 Detailed procedure Channel is auto- matically changed. Listen to voice message. Procedure for off hook status Basic procedure Watch VHF CH70 auto * Received * ALL SHIPS CALL ID: 007654321 Safety Press the [ENT] key. SIMPLEX NO INFORM Channel: CH25 Press the [ENT] key.
- Page 50 Detailed procedure 4-14 Below is the sequence for manually acknowledging an All Ships Call when the handset is off hook. Watch manual * Received * ALL SHIPS CALL ID: 007654321 Safety Press the [2 (AUTO ACK)] key followed by the [ENT] key to change channel.
- Page 52 File No. (blinking) 4-16 (from previous page) Prepare a message by referring to page 4-9 (All Ships) and page 4-1 (individual). * Ready for filing * Press the [ENT] key. (To select file number under which to save message.) Call message < >...
-
Page 53: Writing Over Files
4.6 Writing Over Files General Procedure Enter new name, referring to previous page. You may write over unnecessary files. Simply prepare a message and store it under file number of unnecessary file. Example: You want to write over file saved under file number 01. Watch VHF CH70 Press the [SELECT] key, and press the [7] key, and press the [ENT] key. -
Page 54: Retrieving, Transmitting Files
4.7 Retrieving, Transmitting Files Retrieving a file File name Transmitting a file 4-18 Watch VHF CH70 Press the [7 (FILE)] key. / (Enter file no.) / Press the [ENT] key. Call message < > /59: To view contents of message, press the [ENT] key successively. -
Page 55: Transmit/Receive Message Memory
4.8 Transmit/Receive Message Memory General Retrieving a transmit message The transmit message memory stores sages (numbered 1 to 50) on a first-in, first-out basis. This means each time you save a transmitted message it is filed as log no. 1 and the log no. - Page 56 Transmitting retrieved message 4-20 You can transmit a retrieved message as follows. Xmitted log No. <1/50> Press the [ENT] key. [Example: Individual message is retrieved.] Routine DUP TP No infor Press the [ENT] key. Channel: EOS: ACK RQ Press the [ENT] key. Call again <...
-
Page 57: Receive Message Memory
Receive message memory Retrieving a receive message All received messages are automatically saved to the memory and filed according to category, DISTRESS or ORDINARY. The re- ceive message memory can store 1 to 50) of each category on a first-in, fist-out basis. This means each time the unit receives a message it saves it as log no.1 and changes the log no. - Page 58 Transmitting retrieved message Press the [t] key. (To return to previous menu.) 4-22 You can send the acknowledged call (DIST ACK or ACK BQ) under certain conditions after retrieving a received message. Refer to page 3-5 for transmitting the DIST ACK signal. Example: Transmit acknowledge back (ACK BQ) signal in response to an individual call (Refer to page 4-5.) Received call <...
-
Page 59: Other Calling Types And Other Functions
Calling Type 5. Other Calling Types and The FM-8500 provides 12 calling types. Of these, individual, all ships and distress were discussed in previous chapters. This sec- tion describes the other types of calls available. The procedure for preparing and transmitting other calls is the same as that for indi- vidual and all ships calls: Select type of call, prepare message and transmit it by pressing the [CALL] key. - Page 60 Enter latitude (34N). • IND :Individual call (Refer to page 4-1.) • TEL :Telephone call (semi-auto/auto call. Refer to page 5-4.) Call a terrestrial network, for example, your office through a coast station. • ALL :All ships call (Refer to page 4-9.) •...
- Page 61 • POS :Position request individual call) Find position of other ship by entering its ID number. • POL :Polling call (individual call) Confirm that own ship is within communi- cation range with other ship. This provides only negative response; it does not provide position information.
-
Page 62: Making Telephone Calls
Coast AD? Tel No. Press the [SELECT] key. (To enter coast station ID.) When the coast station serves PSTN telephone service you can make Telephone Call via Coast Station. 1. Selection of Format specifier. 2. Entry of Coast Station ID. - Page 63 Try again after 15 min Recall after 15 minutes. (NOTE 1) When you receive “unable to comply” (BUSY) command instead of “able”, the FM-8500 waits for “Ring back call” from coast station for 15.5 minutes. Then, if it is received, carrier is automatically transmitted.
- Page 64 (1) When you end voice communication by pressing the [CAN- CEL] key or hanging the handset on the hanger of the VHF, the display of the FM-8500 changes as follows. Display 1 Working channel Counts down.
-
Page 65: Receiving Telephone Call From Coast Station
* Call in progress * PSTN CALL ACK CH70 * Auto ack * ABLE PSTN CALL Pick up the handset! Alarm of FM-8500 sounds. Take the handset from VHF hanger within 60 seconds. NOTE 1 (2) When coast station terminates communication, the display of the FM-8500 is as follows. -
Page 66: Other Station Ids And Telephone Nos
“END” then press the [ENT] key. Next file memory < Press the [ENT] key. Returns to normal display. You can program often-used station IDs and telephone numbers under a file name. > ADDRESS TEL No. - Page 67 Press the [7] key. > Tel < 01/50 Select desired telephone file number with the arrow keys. Display 1 Press the [ENT] key. Telephone number selected is input into the transmit message. A1/ZZ: File Name Blinking > Display 2 (Alphabetical order)
- Page 68 This page is intentionally left blank.
-
Page 69: Other Settings
6.1 Printer Setup (Auto/Manual) Procedure Automatic printing You can select either automatic or manual printing by following the procedure shown below. (Factory setting: Auto) Watch VHF CH70 Press the [SELECT] key. Set up menu < > 1 2 3 --- Press the [4] key. -
Page 70: Manual Printing
Manual printing Printing Contents of {VHF call message} Contents of all transmitted logs {Xmitted log No. < >} Contents of specific log no. (for example, log no. 1) {Xmitted log No. <1/50>} Press the [ENT] key. Call message (again) Call again CALL END…... -
Page 71: Example Printout
: DUPLEX TP Telecom2 : RES No.18 Channel : 23 : ACK BQ DSC ch : 70 **** Call message file **** 01: FURUNO Individual 02: CAPTAIN All ships ***** Xmitted log ***** Xmt message 12:34 Format : INDIVIDUAL Address... -
Page 72: Turning Keyboard Click On/Off
6.2 Turning Keyboard Click ON/OFF You can turn keyboard click (response) on or off as follows: Watch VHF CH70 auto Press the [SELECT] key. Set up menu < > 1 2 3 4 6 7 9 ALM Press the [6] key. Keyboard click <... -
Page 73: Aural Alarm Setup
6.3 Aural Alarm Setup Procedure Ordinary alarm < Select ON or OFF and press the [ENT] key. Normal display appears. The aural alarm which sounds when messages other than distress and urgency are received may be turned on or off and the distress alarm tone may be selected. - Page 74 This page is intentionally left blank.
-
Page 75: System Confirmation
Overview 7.1 Confirming Own Ship’s ID Procedure 7. System Confirmation This chapter shows how to confirm the system; no items can be changed. Own Ship’s ID can be confirmed as follows: Watch VHF CH70 auto Press the [SELECT] key. Set up menu 1 2 3 4 Press the [9] key, or the [s] key seven times and the [ENT] key. -
Page 76: Confirming Rom Version
7.2 Confirming ROM Version Procedure You can see ROM Version (as registered in the memory) as fol- lows: At screen 1 previous page, select “V” and press the [ENT] key. ROM version RT:1.06 DSC:1.10 To escape, press the [CANCEL] key three times. RT is the VHF section’s ROM version. -
Page 77: Confirming Vhf Section Settings
Procedure Press the [CANCEL] key to go to previous display. You can confirm VHF section settings as follows: If you want to change VHF section settings, contact FURUNO agent or dealer for service. RT 1-Mode: USA/WX PRIV protected Press the [ENT] key. -
Page 78: Confirming Vhf Channels
7.4 Confirming VHF Channels Procedure VHF channel status You can confirm VHF channels registered as follows: At screen 1, select “CH” and press the [ENT] key. INTL CH: 016-Tx SIMP HI protected sel[MODE]/[CH] Press the [CANNEL] key to select channel mode. USA CH: 16-Tx SIMP LOW protected sel[MODE]/[CH] Rotate the [CHANNEL] key control to view channels. -
Page 79: Confirming Tx Output Power
7.5 Confirming Tx Output Power Procedure Appears when private channels are registered. The Tx output power on three VHF bands (low, CH60; med, CH14, high, CH88) can be confirmed as shown below. Tx output power on private mode channels can also be confirmed if applicable. At screen 1 on page 7-1, select “PO”... - Page 80 This page is intentionally left blank.
-
Page 81: Maintenance & Troubleshooting
1. Check if power plug is firmly connected. 2. Check breaker at the rear of the equipment. If it has tripped, push it in to reset. 3. If power cannot be turned on, contact a FURUNO agent or rep- resentative. -
Page 82: Diagnostic Test
8.3 Diagnostic Test Procedure Watch VHF CH70 auto Press the [3 (TEST)] key. * Text in progress * please wait! Several seconds later * Completed * Daily test VHF DSC: GOOD Distress alarm sounds and red LED near the [DISTRESS] key lights. Press [ALARM STOP] to silence the aural alarm. - Page 83 If NG appears, have a technician replace corresponding p.c. board. NOTE:Do not open the equipment at any time. Electrical shock hazard exists inside the equipment. Contact FURUNO agent or dealer for service. TRANSMIT POWER : NG = P.A. of transmission section...
- Page 84 This page is intentionally left blank.
-
Page 85: Specifications
General Channel Programs: Oscillator: Communication System: Class of Emission: Antenna Impedance: Dimensions and Mass: Temperature: Relative Humidity: Waterproofing: Power Supply: Color: Transmitter Frequency Range: RF Output Power: Modulation AF Response: Frequency Deviation: Spurious Emission: Modulation System: 9. Specifications INTL Channel: 55 USA Channel: 55 WX Channel: PRIV Channel: 20 (authorization required) - Page 86 Receiver Frequency Range: Receiving System: Intermediate Frequency: Sensitivity: Adjacent Channel Selectivity: Spurious Response Rejection: Audio Output: DSC Section Protocol: Modulation Rate: Modulation: Modulation Frequency: Nav. Equipment Interface: CH70 Receiver Sensitivity: 155.000 to 166.075 MHz Double-Conversion Superheterodyne First IF: 21.4 MHz Second IF: 455 kHz -8dBmV at SINAD 12 dB 70 dB min.
-
Page 87: Menu List
EEPROM (Contens of EEPROM) KEY-CLICK MESSAGE (Storing message. Max. 59) ADDRESS (Storing other station ID. Max. 99) TEL No. (Storing telephone number. Max. 50) (Confirmation of ROM version number) P (Protection of data) ID (Own ship ID) Threse settings can not... - Page 88 • Normal display Press the [ENT] key. * VHF Call mesage * Format FORMAT INDIVIDUAL ADDRESS TELEPHONE COAST ADDR (DIALPHONE) ALL SHIPS CATEGORY R/A (DISTRESS RELAY…ALL SHIPS) R/S (DISTRESS RELAY…INDIVIDUAL) DISTRESS NATURE OF DISTRESS GROUP GROUP ADDR GEOGRAPHIC AREA OCEAN ADDR...
- Page 89 • Normal display Press the [8 (RCVD)] key. Received call < > DISTRESS ORDINARY ORDINARY LOG No. (1 - 50) DIST ACK DISTRESS RELAY LOG No. (1 - 50) NEXT • Normal display Press the [9 (XMTD)] key. Xmitted log No. < CALL XMITTED LOG No.
- Page 90 This page is intentionally left blank.
-
Page 93: Appendix 3 Digital Interface (Iec 61162-1 Edition 2
Digital Interface (IEC 61162-1 Edition 2) Input sentences GGA, GLL, RMA, RMC, ZDA Schematic diagram NMEA 05P0620 RD-A RD-B F.GND 1000p 1000p Load requirements as listner Isolation Optocoupler Input impedance 560 ohms Max. Voltage Threshold 4 mA APPENDIX 3 05P0616 R103 1SS190 TLP121-GB... -
Page 94: Gga - Global Positioning System (Gps) Fix Data
GGA - Global positioning system (GPS) fix data AP-4... - Page 95 GLL - Geographic position - latitude and longitude AP-5...
- Page 96 RMA - Recommended minimum navigation information - Loran C data AP-6...
- Page 97 RMC - Recommended minimum specific GPS/TRANSIT data ZDA-Data and time AP-7...
- Page 98 INDEX arrow key ... 2-5 Automatic acknowledge ... 1-5 AUTO squelch ... 1-3 Calling Types ... 5-1 Comply status ... 4-5 DIS ... 2-1 Front panel ... 1-1 ID number ... 2-1 INTL ... 1-2 MAYDAY ... 3-3 Nature of distress ... 3-2 ON hook ...
Need help?
Do you have a question about the FM-8500 and is the answer not in the manual?
Questions and answers