Table of Contents
Advertisement
Quick Links
2" or 3" Dirty Water PumP
Set uP, oPerating, anD Servicing
Distributed exclusively by Harbor Freight tools
visit our website at: http://www.harborfreight.com
read this material before using this product.
Failure to do so can result in serious injury.
Save tHiS manuaL.
©
Copyright
2008 by Harbor Freight Tools
contained herein may be reproduced in any shape or form without the express written consent of
Harbor Freight Tools. Diagrams within this manual may not be drawn proportionally. Due to continuing
improvements, actual product may differ slightly from the product described herein. Tools required for
assembly and service may not be included.
For technical questions or replacement parts, please call 1-800-444-3353.
65322 or
inStructionS
3491 Mission Oaks Blvd., Camarillo, CA 93011
®
. All rights reserved. No portion of this manual or any artwork
65323
using an engine indoors can KiLL you in
minuteS.
engine exhaust contains carbon monoxide.
this is a poison you cannot see or smell.
never use inside
a home or garage,
even iF doors and
windows are open.
only use outSiDe
and far away from
windows, doors, and
vents.
®
.
Advertisement
Table of Contents
Troubleshooting

Related Manuals for Pacific hydrostar Pacific Hydrostar 2" or 3" Dirty Water Pump 65322


Summary of Contents for Pacific hydrostar Pacific Hydrostar 2" or 3" Dirty Water Pump 65322
- Page 1 Harbor Freight Tools. Diagrams within this manual may not be drawn proportionally. Due to continuing improvements, actual product may differ slightly from the product described herein. Tools required for assembly and service may not be included.
-
Page 2: Table Of Contents
contentS Page # contents Page # contents Cover and Contact Information Crankcase Assembly Diagram and Parts List Table of Contents Crankcase Cover Assembly 3 - 6 Important Safety Information Diagram and Parts List Pump Specifications Cylinder Head and Cover As- Unpacking and Set Up sembly Diagram and Parts List Operating Instructions... -
Page 3: Important Safety Information
Save tHiS manuaL notice is used to address practices Keep this manual for the safety warn- not related to personal injury. ings and precautions, assembly, operat- caution, without ing, inspection, maintenance and cleaning the safety alert procedures. Write the product’s serial symbol, is used to address number in the back of the manual near the practices not related to... - Page 4 HazarD Use only accessories that are recom- using an engine indoors mended by Harbor Freight Tools for can KiLL you in your model. Accessories that may be minuteS. suitable for one piece of equipment Engine exhaust contains carbon may become hazardous when used monoxide.
- Page 5 These carry impor- Before use, check for misalignment tant information. If unreadable or or binding of moving parts, breakage missing, contact Harbor Freight Tools of parts, and any other condition that for a replacement. may affect the equipment’s operation.
-
Page 6: Pump Specifications
When unpacking, check to make sure that the item is intact and undamaged. If any parts are missing or broken, please call Harbor Freight Tools at the number shown on the cover of this manual as soon as possible. Included Accessories: a. -
Page 7: Operating Instructions
Set uP inStructionS included) will be needed depending on the specifics of use. read the entire imPortant Remove the Pipe Clamps (13) from SaFety inFormation both Inlet and Outlet Ports of the section at the beginning of this Pump Housing (10) by turning coun- manual including all text under terclockwise. -
Page 8: Checking And Filling Fuel
Wipe off dipstick area, remove dip- Fill the Fuel Tank to about 1 inch un- stick and wipe it off with a clean rag. der the fill neck of the gasoline tank with the stabilized unleaded gasoline Reinsert the dipstick (do not thread mixture. -
Page 9: Break In Period
IMPORTANT: Allow the engine to run Locate the pump as close to the wa- at no load until warm (1-5 minutes) ter as possible. The pump should be with no load after each start-up to al- on a firm, level surface. low the engine to stabilize. -
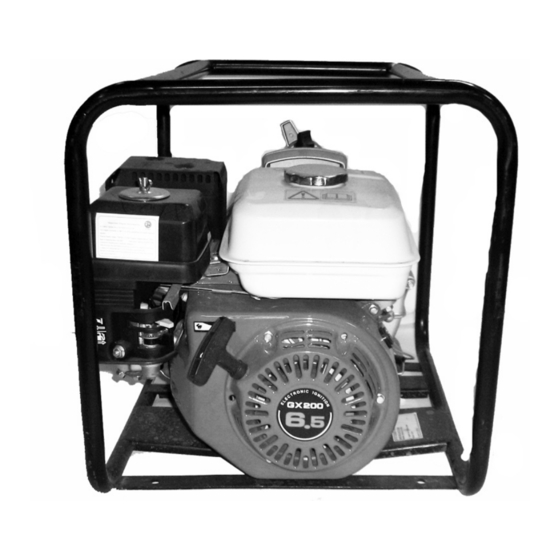
Page 10: Engine Controls And Indicators
engine controLS anD inDicatorS Note: For clarity, pump not shown. Muffler Spark Plug Air Filter Fuel Tank Cap Muffler Oil Dip Stick Oil Fill Port Oil Drain Plug Carburetor Filter Cup Oil Fill Plug Oil Dip Stick Engine Switch Oil Drain Plug Throttle Choke Starter Pull Cord... -
Page 11: Pre Operation Checks
Pre-oPeration cHecKS check air Filter. (See illustration below.) Unscrew Air Filter Wing Nut caution: Failure to add oil to the Engine before use will damage the Engine and void the factory warranty. En- gine oil is the key factor in engine performance. -
Page 12: Starting & Stopping The Engine
line containing at least 91 octane. Do the way out. Slowly guide the Pull not top-off tank, leave at least 1 inch Cord back into the starter. The En- of open space at top of tank. gine should start. Try again if it does not start. -
Page 13: Technical Specifications
tecHnicaL Servicing SPeciFicationS to Prevent SeriouS injury 6.5 HP, OHV, 4 Stroke, Engine Type From acciDentaL Gas Engine Starting: Bore x Stroke 68 x 54 mm turn the Power Switch of the Starter Type Manual Recoil Pull Type equipment to its “oFF” Ignition Electronic Ignition position, wait for the engine to... -
Page 14: Air Filter Element Maintenance
Place a drain pan (not included) un- and mild detergent several times. derneath the crankcase’s drain plug. Rinse. Squeeze out excess water and allow it to dry completely. Soak Remove the Dip Stick and Oil Drain the filter in lightweight oil briefly, then Plug and, if possible, tilt the crank- squeeze out the excess oil. -
Page 15: Fuel Filter Replacement
cleaning, maintenance, and Fuel Filter replacement Lubrication Schedule Warning! to Prevent SeriouS injury From note: This maintenance schedule is Fire: intended solely as a general guide. Replace the fuel filter in a If performance decreases or if equip- well-ventilated area away from igni- ment operates unusually, check sys- tion sources. -
Page 16: Storage
Storage gasoline has been sitting beyond the fuel stabilizer’s recommended time period, or if the engine does not start engine Storage Preparation properly. Wait for engine to cool, then clean engine with clean cloth. Pump Storage Preparation When the equipment is to remain idle Be sure the pump has been drained. -
Page 17: Engine Troubleshooting
engine troubleshooting Problem Possible causes Probable Solutions engine will not FUEL RELATED: FUEL RELATED: start No fuel in tank or fuel valve closed. Fill fuel tank and open fuel valve. Choke not in start position, Move choke to start position if especially with cold engine. - Page 18 engine troubleshooting Problem Possible causes Probable Solutions Engine misfires Spark plug wire loose. Check wire connections. Incorrect spark plug gap or Re-gap or replace spark plug. damaged spark plug. Defective spark plug wire. Replace spark plug wire. Old or low quality gasoline. Use only fresh 89+ octane unleaded gasoline.
-
Page 19: Pump Troubleshooting
Pump troubleshooting Problem Possible causes Probable Solutions Pump fails to Air leaks in flexible hoses or fittings. Repair any air leaks. prime or low Air Leak at Shaft Seal (3). Repair or replace shaft Seal. output Input basket filter not submerged. Submerge input basket filter. -
Page 20: Pump Assembly Diagram
PumP aSSembLy Diagram SKU 65322 or 65323 For technical questions, please call 1-800-444-3353. Page 20... -
Page 21: Crankcase Assembly Diagram
cranKcaSe aSSembLy Diagram Note: When ordering parts from this list, specify: Parts List A, CRANKCASE ASSEM- BLY, and the Item Number from the table below. Part # Description qty. Part # Description qty. Dipstick / Drain Plug Bolt m6 x 14 O-Ring Regulating Shaft Bearing 6205... -
Page 22: Crankcase Cover Assembly
cranKcaSe cover aSSembLy Diagram Note: When ordering parts from this list, specify: Parts List B, CRANKCASE COVER ASSEMBLY, and the Item Number from the table below. Part # Description Part # Description Oil Fill Plug with Seal Set Pin Oil Fill Plug Oil Dipstick Oil Plug Seal Oil Dipstick with Seal... -
Page 23: Cylinder Head And Cover As
cyLinDer HeaD anD cover aSSembLy Diagram Note: When ordering parts from this list, specify: Parts List C, CYLINDER HEAD AND COVER ASSEMBLY, and the Item Number from the table below. Part # Description Part # Description Bolt m6 x 12 Stud m8 x 34 Air Duct Spark Plug F6TC... -
Page 24: Crankshaft, Piston And Connect
cranKSHaFt, PiSton anD connecting roD aSSembLy Diagram Note: When ordering parts from this list, specify: Parts List D, CRANKSHAFT, PISTON AND CONNECTING ROD ASSEMBLY, and the Item Number from the table below. Part # Description Part # Description Piston Ring (I) Connecting Rod Piston Ring (II) Connecting Rod Cover... -
Page 25: Camshaft And Rocker Valve As
camSHaFt anD rocKer vaLve aSSembLy Diagram Note: When ordering parts from this list, specify: Parts List E, CAMSHAFT AND ROCK- ER VALVE ASSEMBLY, and the Item Number from the table below. Part # Description Part # Description Lock Nut Camshaft Assembly Sleeve Exhaust Valve Rocker Arm... -
Page 26: Carburetor Assembly Diagram
carburetor aSSembLy Diagram Note: When ordering parts from this list, specify: Parts List F, CARBURETOR ASSEM- BLY, and the Item Number from the table below. Part # Description Part # Description Inlet Gasket Choke Stem Connecting Block Air Seal Washer Carburetor Gasket Throttle Lever Idle Adjustment Screw... -
Page 27: Fuel Tank Assembly Diagram
FueL tanK aSSembLy Diagram Note: When ordering parts from this list, specify: Parts List G, FUEL TANK ASSEMBLY, and the Item Number from the table below. Part # Description Part # Description Pipe Clamp Filter Cup Pipe Outlet Packing Ring Bolt m6 x 22 Fuel Filler Cap Connector... -
Page 28: Air Cleaner Assembly Diagram
air cLeaner aSSembLy Diagram Note: When ordering parts from this list, specify: Parts List H, AIR CLEANER ASSEM- BLY, and the Item Number from the table below. Part # Description Part # Description Wing Nut Screw m5 x 12 Air Cleaner Cover Air Cleaner Base Filter Element Gasket... -
Page 29: Muffler Assembly Diagram And
muFFLer aSSembLy Diagram Note: When ordering parts from this list, specify: Parts List J, MUFFLER ASSEMBLY, and the Item Number from the table below. Part # Description J-Screw m5 x 8 Muffler Hood Nut m8 Muffler Exhaust Muffler Exhaust Gasket SKU 65322 or 65323 For technical questions, please call 1-800-444-3353. -
Page 30: Recoil Starter Assembly Dia
recoiL Starter aSSembLy Diagram Note: When ordering parts from this list, specify: Parts List K, RECOIL STARTER AS- SEMBLY, and the Item Number from the table below. Part # Description Part # Description Friction Spring Bolt m6 x 22 Spring Lid Crankcase Side Plate Assembly Set Screw... -
Page 31: Regulator Control Assembly
reguLator controL aSSembLy Diagram Note: When ordering parts from this list, specify: Parts List L, REGULATOR CONTROL ASSEMBLY, and the Item Number from the table below. Part # Description Part # Description Nut m6 Spring Setting Panel Back Spring Patch Spring Fine Regulating Spring Hand Grip Pull Rod... -
Page 32: Flywheel Assembly Diagram
FLyWHeeL aSSembLy Diagram Note: When ordering parts from this list, specify: Parts List M, FLYWHEEL ASSEMBLY, and the Item Number from the table below. Part # Description Nut m14 x 1.5 Starting Flange Flywheel Fan Flywheel SKU 65322 or 65323 For technical questions, please call 1-800-444-3353. Page 32... -
Page 33: Ignition Coil Assembly Diagram
ignition coiL aSSembLy Diagram Note: When ordering parts from this list, specify: Parts List N, IGNITION COIL ASSEM- BLY, and the Item Number from the table below. Part # Description Screw m6 x 22 Engine Stop Cable Ignition Coil Spark Plug Cap Ignition Coil Assembly SKU 65322 or 65323 For technical questions, please call 1-800-444-3353. -
Page 34: Wiring Diagram
Wiring Diagram SKU 65322 or 65323 For technical questions, please call 1-800-444-3353. Page 34... -
Page 35: Warranty
The United States Environmental Protection Agency (herein normal wear and tear, or to lack of main- EPA) and Harbor Freight Tools (herein HFT) are pleased to explain the emission control system warranty on your 1997 and later Small tenance. We shall in no event be liable for Off-Road Engine (herein engine). - Page 36 If you have any questions regarding your warranty rights as required maintenance or are scheduled only for regular and responsibilities, you should contact the Harbor Freight Tools inspection to the effect of “repair or replace as necessary” Customer Service Department at 1-800-444-3353.
Need help?
Do you have a question about the Pacific Hydrostar 2" or 3" Dirty Water Pump 65322 and is the answer not in the manual?
Questions and answers