
Subscribe to Our Youtube Channel
Related Manuals for Wildview InfraredXtreme STC-TGLX35IR


Summary of Contents for Wildview InfraredXtreme STC-TGLX35IR
- Page 1 STC-TGLX35IR User’s Manual Toll Free Customer Support 1-888-304-6125 www.wildviewcam.com Version 3.0 07/10...
- Page 2 Grand Prairie, Texas 75053-5189 Wildview Limited Warranty Your Wildview scouting camera is covered by a One Year Limited Warranty on parts and labor from the date of original purchase, and purchases must be made through an authorized dealer. The warranty covers defects in workmanship and materials.
-
Page 3: Table Of Contents
STC-TGLX35IR Manual Contents Camera overview Camera kit contents Battery and memory Installation Definitions Programming Mounting the camera Viewing images Saving and Deleting images Memory compatibility chart Technical Specs General Information Image Capacity Chart Moon Phase Chart www.wildviewcam.com Toll Free 888-304-6125... -
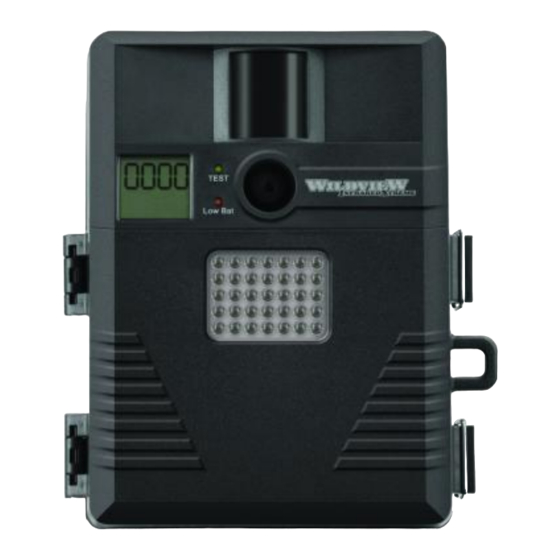
Page 4: Camera Overview
STC-TGLX35IR Camera overview Front view Side view www.wildviewcam.com Toll Free 888-304-6125... - Page 5 STC-TGLX35IR Open view image with major parts indication www.wildviewcam.com Toll Free 888-304-6125...
-
Page 6: Camera Kit Contents
STC-TGLX35IR Camera kit contents STC-TGLX35IR Digital Scouting Camera User Manual Strap www.wildviewcam.com Toll Free 888-304-6125... -
Page 7: Battery And Memory Installation
Doing so will damage the camera and will void the warranty. The Wildview Camera is designed to operate using two different types of battery power options. NOTE: Always have camera in the OFF position when installing or removing batteries. - Page 8 (sold separately). This will enhance the camera’s field life. Battery cable and complete 12V Lead Acid battery kits are available wherever Wildview scouting cameras are sold, or call toll free 888-304-6125. Only Wildview external battery accessories are recommended. Insert the external battery barrel plug into the DC 12V jack on the bottom of camera housing.
- Page 9 STC-TGLX35IR Memory Options Your Wildview scouting camera is equipped with the following: Model SDRAM STC-TGLX35IR 32MB The camera is also equipped with an expandable media card slot capable of accepting up to 16GB SD card (sold separately). With no memory card inserted into the slot, the camera will use the built in SDRAM memory to store images.
- Page 10 STC-TGLX35IR Inserting SD card Make sure camera is in the OFF position whenever adding or removing memory. Insert SD memory card in to the SD card slot completely and in the correct direction, as shown by the SD picture shown on inner housing.
-
Page 11: Definitions
STC-TGLX35IR Definitions Time out: To set the amount of preset time in minutes the camera will sleep between PIR triggering. Resolution: The resolution selection that you have chosen. Model 5.0M 1.3M STC-TGLX35IR Day and Time: Displays the date and time that you have set on still image. - Page 12 STC-TGLX35IR 6P: Six images continuous capturing per PIR triggering. AVI: Adjustable 15 / 30 / 60 seconds of video clip per PIR triggering. FULL: When memory capacity is full, the front LCD screen will show “FULL.” www.wildviewcam.com Toll Free 888-304-6125...
-
Page 13: Programming
STC-TGLX35IR Programming your Wildview Camera The following setting must be performed before you turn on the camera. 1. Select the time out interval by sliding the time out toggle switch to the desired preset time interval in minutes. 1 / 5 / 10 / 20 minutes. - Page 14 STC-TGLX35IR g. Press [SET] button to enter year setting. Date & YY will blink. Press [UP] or [DN] to adjust year. h. Press and hold [SET] button for 2 seconds to exit the setting mode and enter into PIR count down mode. Display will show date and number of pictures taken.
-
Page 15: Mounting The Camera
STC-TGLX35IR Mounting the camera It is recommended that you mount the camera 4-5 ft off the ground with the camera pointed at a slight downward angle. Be sure to avoid mounting the camera facing east or west, as the rising and setting of the sun could produce false triggers and overexposed images. - Page 16 STC-TGLX35IR Mounting the camera with the supplied strap: Insert the strap through the strap slots on the rear housing. Wrap the strap around the mounting surface. Secure the strap and tighten the buckle in order to secure the camera.
- Page 17 STC-TGLX35IR Testing the camera coverage area: One of Wildview Scouting Camera’s features is the ability to test the coverage area. After mounting the camera, open front housing and slide the power switch to Test position. The front LCD will display the word “tESt”.
- Page 18 STC-TGLX35IR NOTE: Make sure you slide the power switch from TEST mode to PIR mode before you leave the field, otherwise the Camera will not take any pictures. Switch use: Do not move the switch from TEST directly to PIR. Doing so will cause the camera not to operate.
-
Page 19: Viewing Images
Viewing images Viewing images by computer download: Your Wildview Scouting Camera is a plug and play USB storage device for users of Windows 2000 / ME / XP / Vista / Windows 7 operating systems. This camera is not MAC compatible. - Page 20 STC-TGLX35IR available USB port on your computer. Plug the other end of USB cable into the camera. The camera will automatically power ON. Front LCD screen will show “USb.” At the same time, your computer will recognize the camera as a mass storage device, and will be found under MY COMPUTER.
-
Page 21: Saving And Deleting Images
STC-TGLX35IR Saving and Deleting images SAVING IMAGES To save images on to your PC, simply copy and paste, or drag and drop from the memory to your PC desk top. Please note, if you use an SD card to save your images, the computer will display the images stored on the SD card. - Page 22 STC-TGLX35IR screen shows “ESC” then press [SET] again to exit. d. This will only delete the last image saved in the memory. Delete All pictures: a. Press [SET] button to enter delete setting. Display will show “ESC” b. Press [UP] or [DN] to select d-ALL (delete all) c.
- Page 23 STC-TGLX35IR CAUTION: Do not remove the batteries until you have downloaded all the images in the internal SDRAM. Once the batteries are removed, all images in the internal SDRAM will be deleted. (This does not apply to images stored in SD card) Red LED indicator will blink when battery is low.
-
Page 24: Memory Compatibility Chart
STC-TGLX35IR SD card Compatibility Chart The following cards have been tested and approved for use in the Wildview series model. Kingmax SanDisk 2G, 4G, 8G Toshiba 2G, 4G, 8G, 16G. Kingston 2G, 4G, 8G, 16G. First Champion 1G, 2G, 4G, 8G, 16G. -
Page 25: Technical Specs
STC-TGLX35IR Technical Specifications System Requirements and Compatibility Windows Me/2000/XP/Vista/Windows 7 Pentium 4, 2GHz or above 1GB RAM (2GB recommended) 32 bits color, resolution 800 x 600 or above. Built in 128MB video memory 2GB free hard disc space ... - Page 26 STC-TGLX35IR Camera Features and Specification Resolution Option Mega Built in Model Pixel Memory High Video STC- 5.0M 32MB 5.0M 1.3M TGLX35IR Auto white balance and auto expose IR Emitter Range – 36ft 4 digits LCD Image counter ...
- Page 27 STC-TGLX35IR Standby current: < 6mA Capture current: <280mA Interface type: USB 1.1 Power: “C” size alkaline Batteries x 4 Image format: Standard JPEG. & Motion JPEG (AVI) www.wildviewcam.com Toll Free 888-304-6125...
-
Page 28: General Information
Use a soft lens cloth for cleaning the lens. Avoid touching lens with fingers. Remove dirt or stains with a soft cloth dampened with water or neutral detergent. Keep the Wildview scouting camera in a dry and cool dust-free environment, or container when it is NOT in use. ... - Page 29 STC-TGLX35IR Avoid dropping the Wildview scouting camera on to hard ground. Do not disassemble the Wildview scouting camera. Do not mix new and old batteries. Do not open the camera for unauthorized service. This could cause serious damage to the unit and will void the warranty.
-
Page 30: Image Capacity Chart
STC-TGLX35IR Image Capacity Chart High High SD card Color B&W Color B&W Color B&W Based on Data 80MB 50MB 3.5MB 3.0MB 1.0MB 0.75MB Size of (30sec.) (30sec.) Built In 32MB SDRAM 1024 1344 2048 2688 1280 4096 5376 1824 2560... - Page 31 STC-TGLX35IR When SD card is NOT FULL, but camera's front counter already reaches 9999, the camera will create a new folder to save the next data. Camera's front counter will reset from 0000 again. On the other hand, when SD card is full, camera's counter will then change the display to "FULL".
-
Page 32: Moon Phase Chart
STC-TGLX35IR Moon Phase Symbol Chart www.wildviewcam.com Toll Free 888-304-6125... -
Page 33: Fcc Compliance
Connect the equipment into an outlet on a circuit different from that to which the receiver is connected. Consult the dealer or an experienced radio/TV technician for help. Product specifications are subject to change. Wildview is not responsible for any photographic or typographical errors. www.wildviewcam.com Toll Free 888-304-6125...
Need help?
Do you have a question about the InfraredXtreme STC-TGLX35IR and is the answer not in the manual?
Questions and answers