Table of Contents
Advertisement
Quick Links
T E C H N O L O G I E S
User Guide
NAS 4.0 Adapter
(NAS40ESU)
www.addonics.com
Technical Support
If you need any assistance to get your unit functioning properly, please have your
product information ready and contact Addonics Technical Support at:
Hours: 8:30 am - 6:00 pm PST
Phone: 408-453-6212
Email: http://www.addonics.com/support/query/
Advertisement
Table of Contents

Related Manuals for Addonics Technologies NAS40ESU


Summary of Contents for Addonics Technologies NAS40ESU
-
Page 1: User Guide
T E C H N O L O G I E S User Guide NAS 4.0 Adapter (NAS40ESU) www.addonics.com Technical Support If you need any assistance to get your unit functioning properly, please have your product information ready and contact Addonics Technical Support at:... -
Page 2: Storage Ports
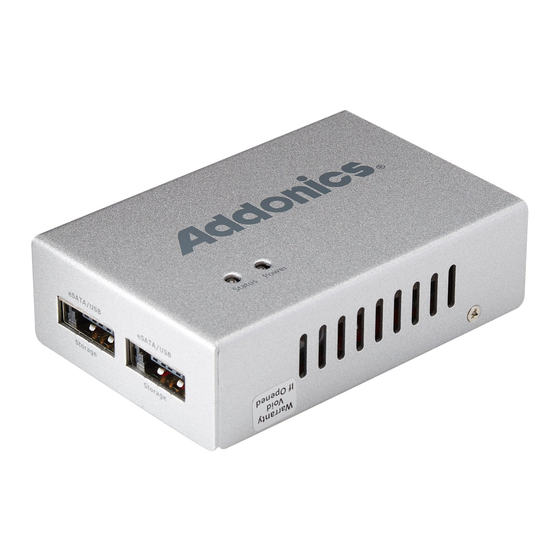
Overview Power LED Status LED Storage Ports Network port Reset button Storage Ports: eSATA (1.5Gbps) or USB (2.0). Each port supports one eSATA device and one or more USB based devices, up to 16 physical drives. Network Port: Supports 10/100/1000. Power LED: glows when unit is on. -
Page 3: Quick Install
Quick Install In order to start sharing storage as soon as possible, follow these steps: 1. Attach the NAS 4.0 unit to a network with a DHCP server present (most home routers provide this by default). 2. Follow the steps described in the Initial Setup section below. 3. - Page 4 The NAS 4.0 Unit Boot Process Upon powering up the unit, the status LED will blink at first between bright and dim, then remain dark for a few moments, then begin to blink between bright and dark for a while and finally settle down to glowing steadily. Once this pattern is complete the unit is ready to communicate.
- Page 5 Once you have connected to the Web Interface, the Initial Setup page will appear: Click Next, then set a custom password for the admin account. The admin account name may also be changed. Next, set up the Date and Time. Choose a city nearest you in the same Time Zone and be sure the Date and Time are correct.
- Page 6 Finally, review and confirm the settings: After clicking on the Update settings button, Initial Setup is complete. Sharing Files Using the NAS 4.0 SMB (Windows Sharing) Connecting to the NAS for direct file access through Windows Explorer is very similar to sharing files between Windows systems.
- Page 7 FTP Server The NAS 4.0 FTP server works by offering a private “home” folder to each user with exclusive access to the resources through FTP. FTP cannot be used to access shares defined under the Sharing tab in the web interface. Each user will also have access to their private FTP space using SMB.
-
Page 8: The Configuration Tab
Note: The MLDonkey admin account is not the same account as the NAS 4.0 unit's web interface admin account. It is recommended that the password matches for simplicity, but not necessary. MLDonkey will perform most of the remaining steps automatically and connect to some servers on the Donkey network. - Page 9 Update Admin Username and Password Changes the web interface management login. Configure User Home Directory Drive Determines which drive on the system carries the HOME directory for users. The user's home folder is used for FTP transfers and as a network share for private files. If a home directory is already defined it will be shown.
- Page 10 Configure the Network Settings Starts the network configuration wizard. Choosing Automatic will configure the NAS 4.0 unit as a DHCP client and the configuration wizard will skip to the end. Choosing Manual configuration will proceed to Step 2. Step 2 configures the NAS 4.0 unit's static IP address and subnet mask. To choose a working static IP address, make sure you meet these criteria: 1.
- Page 11 The next step is to configure network connections. The gateway is usually the internal IP address for the router the NAS 4.0 unit is connected to. DNS entries are usually the same as used by the router's external network configuration (determined by your ISP). Setting an NTP server will synchronize the NAS 4.0 unit to a time server, usually on the Internet.
- Page 12 View Drive Information Displays details of all connected drives. If network shares are configured for drives that have been disconnected, those drives will also appear in this list as unavailable. Device: The letter after “sd” is the drive's letter, in order of when the drive was first encountered by the NAS unit.
- Page 13 View User Samba and FTP Login Information Displays a list of open sessions for file sharing of Windows sharing and FTP. The login username, the computer's hostname and IP address are listed for each session. Format Drive Formats a specific drive using a choice of ext3 or XFS file systems. Caution: this function destroys data.
- Page 14 Upgrade the System Firmware In the case of a firmware update release, this utility applies the update. Update will not proceed unless only one volume (one partition on one drive) is present. Instructions on updating firmware are provided with the firmware update.
- Page 15 Step 1 is to define the name of the share. The share name will become the folder name on the drive. Note: The shared folder name will be written to disk using all capital letters. If an existing folder of the same name appears and is not all capital letters, the NAS 4.0 considers that not a match and writes the same folder name in all capital letters anyway.
- Page 16 Step 3 is to set the initial permissions for the new share. A permission setting for “Everyone” as well as each individual user is listed, with the default permission set to None. Once you have reviewed the permissions for all users and made any desired changes, clicking on “Create Share Folder”...
- Page 17 Remove a Shared Folder Deletes a share from the NAS 4.0 unit. As a precaution this screen requires the word “yes” is typed in as confirmation. Note: Removing a shared folder also deletes the associated directory and all of its contents from the drive.
- Page 18 CONTACT US www.addonics.com Phone: 408-573-8580 Fax: 408-573-8588 Email: http://www.addonics.com/sales/query/...
Need help?
Do you have a question about the NAS40ESU and is the answer not in the manual?
Questions and answers