Advertisement
Quick Links
For more detailed information on setting up the NAS2XU2 adapter,
refer to the User Manual located on the CD that came with the
device.
The NAS 2.0 adapter is a flexible, economical and powerful unit for your
Network. Follow the instructions to help you connect, setup, and
configure it.
Note:
Any external USB storage device that you connect to the NAS
2.0 adapter will initially be required to be formatted. This
means, if you are connecting an external USB drive with data
on it, the hard drive will be formatted erasing all the
information.
Network Environment
There are 3 different setup conditions you can choose:
A.
Setup NAS2XU2 as a DHCP Client:
If the NAS2XU2 is connected to a LAN network with an active DHCP
server, it will obtain an IP address from DHCP server automatically.
B.
Setup NAS2XU2 as DHCP Server:
If your LAN network does not have an active DHCP server, the
NAS2XU2 will immediately act as DHCP server and assign itself an
IP address for installation.
C.
Setup NAS2XU2 in Static IP environment:
You first need to configure the IP address for NAS2XU2 to operate
in the static IP environment. For Configuring details, please refer to
"LAN Config" setup page.
Illustration of a NAS2XU2 connected over the network
I.
NAS2XU2 Hardware Installation
1.
Connect external USB Storage device into USB port of the
NAS Adapter. Power on the USB Storage device.
USB Printer
USB mass
storage device
2.
Connect LAN cable via LAN switch and Router.
3.
Connect 5V power adapter to power up the NAS adapter
5V power jack
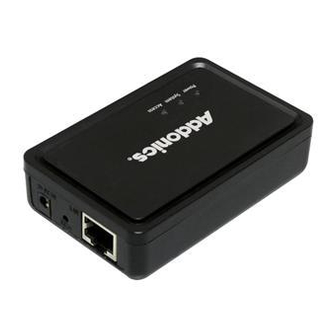
ADDONICS TECHNOLOGIES
Access LED
System LED
Power LED
RJ45 socket
Reset button
Model: NAS2XU2
NAS2XU2 connected directly to a computer's NIC card
If you connect the NAS2XU2 to a computer directly, the will act as a
DHCP server, assigning itself an IP address automatically and will also
assign an IP address to the computer's network card. This configuration
will not enable you to see the drive on the network.
NAS2XU2 connected to a Router or Switch
When the NAS2XU2 is connected to a LAN network with an active DHCP
server, it will obtain an IP address from DHCP server automatically. Or if
your LAN network does not have an active DHCP server, NAS2XU2 will
immediately act as DHCP server and assign itself an IP address for
installation
II.
Search NAS2XU2 using SDisk Utility
1.
Browse the CD enclosed in the product package. Copy and paste
"SDisk Utility" in to your computer then double click the icon to start
search.
Note:
"SDisk utility" was written with JAVA script, please make sure
your computer has installed JAVA before, if not please install
the JAVA JRE from the CD drive.
2.
When NAS2XU2 has been found, click "Connect" to enter web GUI
utility.
Open NAS2XU2 web GUI by using web browser.
1.
Open web browser and type default host name "storage"
in the search bar.
2.
Default login is "admin" for both User name and
password. Click "OK" to enter configurations.
Identification
You can change and modify your host, group name and password from
this page. Click "Apply" to save the setting.
Host name: This is used to identify your device on the network. If
you prefer a different name, type in the new name and click "Apply"
to save setting.
Group Name: This should be the same as your workgroup. In
general, the default "WORKGROUP" will be OK. But if your
workstation belongs to different workgroup, type in the correct group
name to modify.
For Window OS, right click on "My computer" and choose "Properties",
go to the computer name tab to see your current workgroup.
If using a Mac OS system, to join a Windows workgroup, open the
directory access utility (under Applications-> utilities). Select SMB and
click configure to modify the settings (administrator access required to
access this option.)
Note: We strongly suggest you to change the password as soon as you
logged in, to prevent unauthorized access.
Advertisement

Related Manuals for Addonics Technologies NAS2XU2


Summary of Contents for Addonics Technologies NAS2XU2
- Page 1 NAS2XU2 connected directly to a computer’s NIC card refer to the User Manual located on the CD that came with the If you connect the NAS2XU2 to a computer directly, the will act as a device. DHCP server, assigning itself an IP address automatically and will also assign an IP address to the computer’s network card.
- Page 2 LAN Configuration By default, “LAN Config” is set to “Automatic IP”. This will allow the NAS2XU2 to obtain its IP address automatically. If you prefer setting it manually, select the static IP option, enter your own value and click “Apply” to confirm the new setting.
Need help?
Do you have a question about the NAS2XU2 and is the answer not in the manual?
Questions and answers