Table of Contents
Advertisement
Use & Care Manual
Assembly Instructions Included
27" Stainless Steel
Outdoor Grill
with Electronic Ignition
Welcome/Product Registration ............ 2
General Safety Instructions .................. 3
Grill Features and Components ...... 4-12
Grill Assembly ................................ 13-14
Pre-Operation Leak Testing ........... 15-19
Lighting the Grill ............................. 20-21
................ 22-24
Care & Maintenance ............................ 25
Troubleshooting Your Grill ............. 26-27
Warranty ............................................... 28
Visit the Frigidaire Web Site at:
http://www.frigidaire.com
READ AND SAVE THESE INSTRUCTIONS
Advertisement
Table of Contents
Troubleshooting

Related Manuals for Frigidaire Grill with Electronic Ignition


Summary of Contents for Frigidaire Grill with Electronic Ignition
-
Page 1: Table Of Contents
Lighting the Grill ... 20-21 Using the Grill ... 22-24 Using the Rotisserie & Side Burners Care & Maintenance ... 25 Troubleshooting Your Grill ... 26-27 Warranty ... 28 Visit the Frigidaire Web Site at: http://www.frigidaire.com READ AND SAVE THESE INSTRUCTIONS... -
Page 2: Welcome & Congratulations
Registration Card included with your grill. Please retain this manual for future reference © 2004 Electrolux Home Products, Inc Questions? 1-800-Frigidaire Register Your Product The PRODUCT REGISTRATION CARD should be filled in completely, signed and returned to Electrolux Home Products North America. -
Page 3: General Safety Instructions
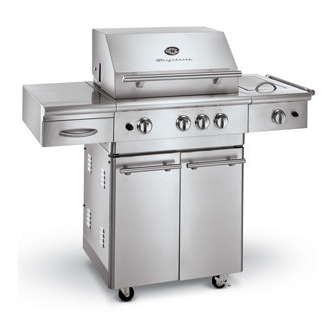
General Safety Instructions IMPORTANT SAFETY INFORMATION - Read this manual carefully before using your grill to reduce the risk of fire, burn hazard or other injury. - Extreme care should be used because of the high temperatures produced by this appliance. - Page 4 Grill Features: FD27 1. Control knob: Main burner 2. Control knob: Rear infrared burner 3. Control knob: Main burner 4. Electronic igniter: Main and rear infrared burner 5. Control panel 6. Control knob: Main burner 7. Hood handle 8. Warming shelf FD27LKEC 9.
-
Page 5: Grill Assembly
SIDE SHELF ATTACHMENT Remove the side burner together with the gas hose from the front door. Make sure the hose is in good condition before installing the side burner (See Fig. 1) The screws used to attach the side shelf and side burner are already screwed into the two side panels. Remove the screws from the side panels. -
Page 6: Grill Assembly
SIDE BURNER HANDLE ASSEMBLY To assemble the side burner lid handle, open the lid then cut off the plastic tie in the screw hole. Install the handle in the lid as shown. (See Fig. 3) Remove the two screws from the handle. Align with the holes in the side burner, then re-attach into the holes on the stand of the handle, and tighten up the screws. -
Page 7: General Information
Conversion kits are available separately for an additional cost which will enable you to convert your grill from L.P. to N.G. or to convert your grill from N.G. to L.P. Please see your Frigidaire dealer for more information. -
Page 8: Installation Of Natural Gas Regulator
INSTALLATION OF NATURAL GAS REGULATOR The Natural Gas regulator has been attached to the manifold. Attach the gas hose to the regulator as shown. (See Fig. 5) Put the gas hose through the hole on the back of the cart panel. (See Fig. 6) Link a quick-connect fitting to the hose by hand. -
Page 9: Gas Installation
L.P. GAS INSTALLATION Frigidaire Gas Grills that are set to operate with L.P. gas come with a high capacity hose and regulator assembly. (Note: Only use the pressure regulator and hose assembly supplied with the grill or a replacement pressure regulator and hose assemblies specified by Frigidaire). This assembly is designed to connect directly to a standard 20 lb. -
Page 10: Gas Flow Check
CONNECTION: Your grill is equipped with gas supply orifices for use only with liquid propane gas. It is also equipped with a high capacity hose/regulator assembly for connection to a standard 20 lb. L.P. cylinder (18-1/4" high, 12-1/4" diameter). To connect the L.P. gas supply cylinder: (See Fig.8). 1. -
Page 11: Before Testing
Pre-Operation Leak Testing GENERAL INFORMATION Although all gas connections on the grill are leak tested prior to shipment, a complete gas tightness check must be performed at the installation site due to possible shifting during shipment, installation or excessive pressure unknowingly being applied to the unit. -
Page 12: Before Lighting
BEFORE LIGHTING Important! Before Lighting... Check the gas supply line for cuts, wear or abrasion. Always keep your face and body as far away from the grill as possible when lighting. GRILL BURNER LIGHTING Lighting the Grill with the Electronic Igniter 1. -
Page 13: Match Lighting
MATCH LIGHTING 1. If the burner will not light after several attempts then the burner can be match lit. 2. If you have already attempted to light the burner with the igniter, allow 5 minutes for any accumulated gas to dissipate. -
Page 14: Grill Location
GRILL LOCATION Do not use the grill in garages, breezeways, sheds or any enclosed area or under overhead combustible construction. Never operate the grill in enclosed areas as this could lead to a carbon monoxide buildup, which could result in injury or death. Place the grill on a level surface. -
Page 15: Using The Rotisserie & Side Burners
Using the Rotisserie & Side Burners (Optional ROTISSERIE KIT to use with back infrared burner must be purchased separately) The grill rotisserie system is designed to cook items from the back using infrared heat. The rotisserie burner is an infrared type which provides intense searing radiant heat. Preferred by chefs over other cooking methods, this intense heat sears in the natural juices and nutrients found in quality cuts of meats. -
Page 16: Rotisserie Lighting
Using the Rotisserie & Side Burners ROTISSERIE LIGHTING Open the lid. Push and turn the control knob for the rotisserie counterclockwise to the “HIGH” position. Wait 5 seconds. Then press and hold the electronic igniter button. You should Hear a snapping sound. If the burner does not light in 4 seconds, turn the control knob to “OFF”... -
Page 17: Care & Maintenance
Care & Maintenance DRIP TRAY The drip tray located below the grill, inside the cart, should be cleaned periodically to prevent heavy buildup of debris. NOTE: Allow the drip tray to cool before attempting to clean. Important: Do not leave the grill outside during inclement weather unless it is covered (cover sold separately). -
Page 18: Troubleshooting Your Grill
Troubleshooting Your Grill GENERAL TROUBLE SHOOTING You should inspect the burners at least once a year or immediately if any of the following conditions occur: • The smell of gas. • Flames appearing mostly yellow. (Some yellow at the tips is OK) •... -
Page 19: Troubleshooting Your Grill
Troubleshooting Your Grill PROBLEM Grill will not light with a match or low heat with dial set to “High” position. Flame is erratic Flare-ups Burner flame is mostly yellow or orange, possibly in conjunction with smell of gas. Cart door does not align properly with cart SOLUTION •... -
Page 20: Limited Lifetime Warranty
LIMITED LIFETIME WARRANTY Frigidaire grills have a limited lifetime warranty on all stainless steel panels, a limited 3 year warranty on stainless steel burners, including labor within one year of the date of purchase; and a limited 1 year warranty on all other parts, labor included.
Need help?
Do you have a question about the Grill with Electronic Ignition and is the answer not in the manual?
Questions and answers