Table of Contents
Advertisement
Advertisement
Table of Contents

Subscribe to Our Youtube Channel
Related Manuals for Audio Technica AT-PL120


Summary of Contents for Audio Technica AT-PL120
- Page 1 Direct Drive Professional Stereo Turntable AT-PL120 Installation and Operation...
- Page 2 Introduction Warning: To prevent fire or shock hazard, do not expose this appliance to rain or moisture. Thank you for purchasing the AT-PL120. Audio-Technica has Attention: Pour prévenir feu ou choc been a leading manufacturer of innovative stereo phonograph électrique, ne pas exposé l’appareil à la pluie products for more than 40 years.
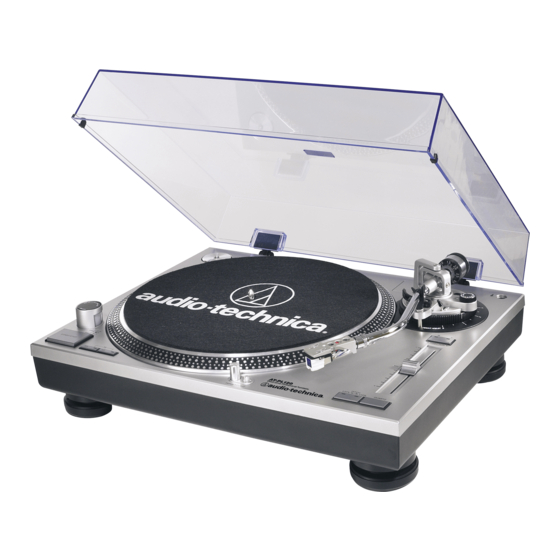
- Page 3 Main Features Figure 1 Main Features PHONO OUT LINE OUT POWER DIAL 11. DIRECTION BUTTON Controls power to the unit. Controls platter’s rotational direction: F – Forward (clockwise) START/STOP BUTTON R – Reverse (counter-clockwise) Engages and disengages the motor/platter. 12. PITCH ADJUST SLIDE CONTROL PLATTER SPEED BUTTONS Use in conjunction with pitch button (15) to vary the Select 33 or 45 RPM platter speed.
- Page 4 Tone Arm Assembly Diagram Figure 2 Tone Arm Assembly 19. HEADSHELL Standard, interchangeable stereo cartridge headshell. 20. HEADSHELL LOCKING RING Rotate counter-clockwise (to the left) to draw the inserted headshell firmly into its seated, locked position. Rotate the ring a full turn to the right to permit removal of the headshell.
-
Page 5: Initial Setup
Assembling the Tone Arm Assembling the Turntable (Note: The headshell and cartridge are supplied pre-assembled The AT-PL120 requires some assembly before first use. with the AT-PL120.) IMPORTANT: Do not connect the AC power cord until Remove the vinyl tie used to secure the tone arm during assembly is complete. - Page 6 Initial Setup (continued) Lock the tone arm back into the tone arm rest. Assembling the Turntable Platter and Slip Mat Carefully place the turntable platter on the center spindle, While holding the counterweight steady, and without any making certain the platter is fully seated on the spindle. rotation, carefully rotate only the black stylus force gauge [See Figure 6.] ring (which turns independently of the counterweight) until...
-
Page 7: Operation
Operation For best results, do not install or operate this unit near Checking and Adjusting Pitch conditions of heat, moisture, dust, or heavy vibrations. If desired, select a +/– 10% or +/– 20% pitch adjustment (Note: Bright fluorescent lights may affect the visibility of the range by pressing the pitch button. -
Page 8: Replacing The Stylus
Gently push the stylus onto the cartridge body, being Replacing the Stylus careful not to damage the stylus. The stylus assembly The AT-PL120 comes supplied with a high-quality should click into place. Audio-Technica ATP-2 cartridge. The stylus should be replaced with a genuine Audio-Technica ATP-N2 stylus. -
Page 9: Troubleshooting
Troubleshooting Record sounds too fast or too slow. Turntable operates but emits no sound or not enough sound. Turntable is set for wrong speed. Make proper speed selection for record type being played with platter speed The stylus guard is still in place. Remove the stylus guard. buttons. -
Page 10: Specifications
Specifications † Turntable Specifications Cartridge Specifications (ATP-2) Type 3-Speed, fully manual operation Frequency Response 15-22,000 Hz Motor DC motor Channel Separation 23/17 (dB at 1 kHz/10 kHz) Drive Method Direct drive Vertical Tracking Force 3.0 – 5.0 grams Speeds 33-1/3 RPM, 45 RPM, 78 RPM Stylus Construction Bonded round shank Pitch Variation... - Page 12 Visit our Web Site: www.audio-technica.com One-Year Limited Warranty Audio-Technica brand products purchased in the U.S.A. are warranted for one year from date of purchase by Audio-Technica U.S., Inc. ( A. T .U.S.) to be free of defects in materials and workmanship. In event of such defect, product will be repaired promptly without charge or, at our option, replaced with a new product of equal or superior value if delivered to A.
Need help?
Do you have a question about the AT-PL120 and is the answer not in the manual?
Questions and answers