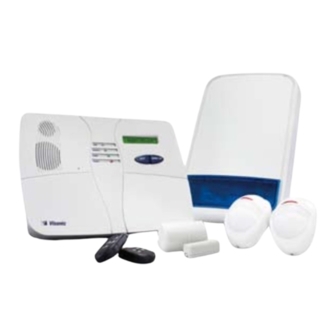
Visonic PowerMax+ Easy Start Manual
Quickfit kit
Hide thumbs
Also See for PowerMax+:
- User manual (38 pages) ,
- Installer's manual (32 pages) ,
- Programming manual (24 pages)
Advertisement
Quick Links
Download this manual
See also:
User Manual
Introduction
Welcome to PowerMax+, the wireless Home Security solution.
This guide provides some step by step information that will help
you get the system up and running.
Before you begin you should know that this kit is supplied with
the transmitters pre-enrolled and pre-programmed with the
most common settings. Additionally, each transmitter is labelled
with its zone or fob number on the rear plastic. Following this
guide will help you make basic configuration changes, for more
detailed information please refer to the full programming guide
included within the kit.
Finally....we have included a trouble shooting section to this
guide. BEFORE you ring the support line have a look through as
most common problems are listed here.
1)
To Access the installer mode via the user menu. Press
until the display shows "User settings", then press
enter the user code. Once in the user menu press
the display shows installer mode, then press
the installer code.
Default codes are :- User 1111 / Installer 9999.
L
PowerMax+
Q u i ck Fit K it E as y St a r t G u id e
Make a cup of tea, and spend the next
five minutes reading this information.
Whilst in any of the menus (user or installer) the following keys
will help you navigate the systems:-
– returns you to the start of the main menu.
– takes you back to the previous menu
– scrolls forward in the menu
– scrolls back in the menu
2)
Choose a location to mount your control panel
making sure it is at least 1m from any large metallic objects e.g.
Radiators, or RF equipment e.g. WiFi transmitters. Additionally
ensure there is access to a mains power supply and telephone
line if required.
Remove the bracket from the main control panel by undoing the
screw located at the bottom of the panel. Mark and fix as required
using three fixing points. Once done install the transformer,
remove the Euro plug and connect to the mains point via a 3pin
plug (not supplied) or for EN-50131 systems an unswitched fuse
spur (not supplied)
This is a professional product and is not suitable for DIY
L
installation
1
Keypad cover
(closed)
2
Control keys
3
Display
4
Luminous
indicators
Microphone
5
Built-in siren
6
and
Battery
7
twice until
compartment
followed by
cover (closed)
Bracket screw
8
STOP!
3
4
2
5
6
7
8
,
1
Advertisement

Subscribe to Our Youtube Channel
Related Manuals for Visonic PowerMax+


Summary of Contents for Visonic PowerMax+
- Page 1 PowerMax+ Q u i ck Fit K it E as y St a r t G u id e STOP! Make a cup of tea, and spend the next five minutes reading this information. Introduction Welcome to PowerMax+, the wireless Home Security solution. Whilst in any of the menus (user or installer) the following keys This guide provides some step by step information that will help will help you navigate the systems:-...
- Page 2 (Optional) Connect the Powermax to the telephone Wireless PIR’s have a two minute sleep timer to save line battery life – On initial power up the unit will go through a via terminals 2 & 5 on the BT socket, and the “Line” terminals self test (LED flashing) then enter a walk test mode.
- Page 3 Q u i ck Fit K it E a s y St a r t G u id e • The diagnostic testing feature Trigger a tamper on the sensor, trigger the input (for universal is a useful tool for or aux input on door contacts) or press button (for hand held determining the signal strength from the sensors deployed on devices) to initiate a transmission.
- Page 4 PowerMax and Next are registered trademarks of Visonic Ltd. Other names MCT-425 Optical Smoke Detector TOwer-20 MCw are the property of their owners. Visonic reserves the right to change information or LPCP approved Wireless External detector specifications without notice. D-302605 (Rev.00)
Need help?
Do you have a question about the PowerMax+ and is the answer not in the manual?
Questions and answers