Toa VM-3000 Series Operation Manual
Vm-3000 series integrated voice evacuation system
Hide thumbs
Also See for VM-3000 Series:
- Instruction manual (8 pages) ,
- Operating instructions manual (105 pages)
Table of Contents
Advertisement
Quick Links
INTEGRATED VOICE EVACUATION SYSTEM
(Does not apply to VM-3240VA SA, VM-3360VA SA, VM-3240E SA and VM-3360E SA)
Note: Refer to the Instruction Manual attached to the VX-2000DS for the installation of the the VX-
2000DS Emergency power supply, the VX-2000PF Power supply frame, and the VX-200PS Power
supply unit.
Thank you for purchasing TOA Integrated Voice Evacuation System VM-3000 Series.
Please carefully follow the instructions in this manual to ensure long, trouble-free use of your equipment.
VOICE ALARM SYSTEM AMPLIFIER
VOICE ALARM SYSTEM AMPLIFIER
VM EXTENSION AMPLIFIER
VM EXTENSION AMPLIFIER
FIREMAN'S MICROPHONE
FIREMAN'S MICROPHONE EXTENSION
REMOTE MICROPHONE EXTENSION
TOA Electronics Europe GmbH
Suederstrasse 282, 20537 Hamburg, Germany
1438/CPD/0180
EN 54-16: 2008
Voice alarm control and indicating equipment
for fire detection and fire alarm systems
Provided options:
7.3
Audible warning
7.6.2
Manual silencing of the voice alarm condition
7.7.2
Manual reset of the voice alarm condition
7.9
Voice alarm condition output
8.3
Indication of faults related to voice alarm zones
10
Voice alarm manual control
11
Interface to external control device(s)
12
Emergency microphone(s)
13.14
Redundant power amplifiers
Technical data: see document VM-3000 Instruction Manual
VM-3000 Series
REMOTE MICROPHONE
END OF LINE UNIT
1438
10
VM-3000
OPERATION MANUAL
VM-3240VA
VM-3360VA
VM-3240E
VM-3360E
RM-300MF
RM-320F
RM-200M
RM-210
VM-300SV
Advertisement
Table of Contents

Subscribe to Our Youtube Channel
Related Manuals for Toa VM-3000 Series


Summary of Contents for Toa VM-3000 Series
- Page 1 2000DS Emergency power supply, the VX-2000PF Power supply frame, and the VX-200PS Power supply unit. Thank you for purchasing TOA Integrated Voice Evacuation System VM-3000 Series. Please carefully follow the instructions in this manual to ensure long, trouble-free use of your equipment.
-
Page 2: Table Of Contents
TABLE OF CONTENTS 1. GENERAL DESCRIPTION ................6 2. FEATURES ......................6 3. SYSTEM CONFIGURATION 3.1. System Example 1 ..................... 7 3.2. System Example 2 ....................8 3.3. System Example 3 ....................9 4. NOMENCLATURE AND FUNCTIONS 4.1. VM-3240VA and VM-3360VA Voice Alarm System Amplifiers ...... - Page 3 7. EQUIPMENT STATUS AND RESPONSE WHEN EMERGENCY MODE IS ACTIVATED BY EXTERNAL EQUIPMENT 7.1. RM-300MF Status and Operation When Emergency-Activated by External Equipment ..................44 7.2. VM-3240VA or VM-3360VA Status and Operation When Emergency-Activated by External Equipment ........44 7.3. When Emergency-Activated by External Contact Input from Automatic Fire Alarm Systems, etc.
- Page 4 11.8. BGM Settings 11.8.1. BGM setting hierarchical chart............87 11.8.2. BGM setting items ................88 12. REMOTE MICROPHONE SETTINGS (RM-300MF, RM-200M) 12.1. DIP Switch Functions 12.1.1. RM-300MF ..................89 12.1.2. RM-200M ................... 89 12.2. Unit ID Number Settings (RM-300MF: Switch 5 operation or RM-200M: Switch 1 and 2 operation) ..
- Page 5 14.7. Status Output Terminal Connections ............126 14.8. Power Amplifier and Speaker Connections 14.8.1. Speaker connection ................. 127 14.8.2. External attenuator connection (3-wire system) ....... 127 14.8.3. External attenuator connection (4-wire system) ....... 128 14.9. Connections between VM and VP Amplifiers ..........
-
Page 6: General Description
1. GENERAL DESCRIPTION The VM-3000 Series Voice Alarm System is an integrated emergency/general announcement broadcast system. The Voice Alarm System Amplifier that plays the central role in the system is available in two models: VM-3240VA (240W) and VM-3360VA (360W). Using these amplifiers in conjunction with the VM-3240E (240W) and VM-3360E (360W) Extension Amplifiers allows larger systems to be built. -
Page 7: System Configuration
3. SYSTEM CONFIGURATION 3.1. System Example 1 This example is for one of the simplest systems, and is ideal for installation in restaurants and small stores. VM-3240VA RM-200M BGM unit [System outline] • A 240W 1-channel general broadcast system with 6 outputs. -
Page 8: System Example 2
3.2. System Example 2 A standby amplifier is connected to this system, which is ideal for installation in factories and schools. VM-3240VA RM LINK 1 RM LINK 2 RM-200M RM-300MF RM-320F EXT. AMP INPUT VM LINK EXT. PA LINK VP-2241 PA OUT DC POWER PA OUT... -
Page 9: System Example 3
3.3. System Example 3 This example is a system suited to shopping centers. VM-3240VA RM LINK 1 RM LINK 2 RM-200M RM-300MF RM-320F EXT. AMP INPUT VM LINK EXT. PA LINK VP-2241 PA OUT DC POWER RM-300MF RM-200M RM-210 VM-3240E VM LINK EXT. -
Page 10: Nomenclature And Functions
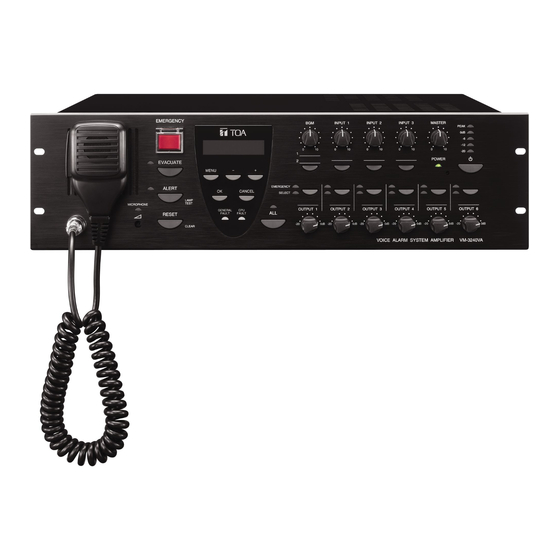
4. NOMENCLATURE AND FUNCTIONS 4.1. VM-3240VA and VM-3360VA Voice Alarm System Amplifiers These amplifiers function as the central units in the VM-3000 system and their power outputs are rated at 240 W for the VM-3240VA and 360 W for the VM-3360VA. Only one unit can be connected in the system. The front panel-mounted LCD displays setting and operation status. - Page 11 1. Power Switch 7. OK Key [OK] Unit is switched between operating and standby During failure indication: modes each time this switch is pressed. Power is Stops the buzzer when a failure is detected by always supplied regardless of the switch setting. the surveillance function (functioning as a failure acknowledgment key).* 2.
- Page 12 17. VM Reset Key 26. Failure Indicator (yellow) [GENERAL FAULT] (VM-3240VA and VM-3360VA only) For the VM-3240VA and VM-3360VA: Resets the entire system. Flashes when a failure occurs while sounding the For the VM-3240E and VM-3360E: internal buzzer. Pressing the [OK] key (7) stops Resets only VM-3240E or VM-3360E Extension the buzzer and switches the indicator from amplifiers.
- Page 13 [Rear] VM-3240VA and VM-3360VA 40 41 51 52 53 54 55 59 60 VM-3240E and VM-3360E 35 36 44 45 51 52 53 54 55 59 60 Common to both Voice Alarm System and Extension amplifiers. Differing between Voice Alarm System and Extension amplifiers. Not used.
- Page 14 VM amplifier. the VM-3000VA and a PC" in the separate For the module installation, refer to the separate software manual.) Installation Guide for VM-3000 Series. 41. BGM/Paging Recording Output Terminals 49. AC Input [REC OUT BGM/PAGING] Connects to an AC outlet using the supplied AC (VM-3240VA and VM-3360VA only) power cord.
- Page 15 54. Control Output Terminals 1 – 8 [CTRL OUT 1 DIP Switches 1 & 2 [LOCAL INPUT] – 8, G] Not used. Default setting: OFF DIP Switches 3 – 6 [EXTENSION UNIT NO.] Control output terminals for general broadcasts. Used for unit ID settings for the VM-3240E and Operations assigned to each contact output are VM-3360E.
-
Page 16: Rm-300Mf Fireman's Microphone
4.3. RM-300MF Fireman’s Microphone This microphone is designed to be used exclusively for emergency broadcasts made by firemen or other persons when instructing building occupants to evacuate in emergency situations. It can activate the emergency mode, start and stop automatic broadcasts of emergency announcements, reset emergency signals, and make live microphone announcements in emergency situations. - Page 17 1. Power Indicator (green) 10. CPU OFF Indicator (red) Lights when power is supplied to the unit. Lights when the unit is placed in CPU OFF mode using the CPU OFF switch. 2. Emergency Activation Switch/Emergency Indicator (red) 11. RM Reset Key Places the system in emergency mode while Resets the unit.
- Page 18 20. Emergency Microphone 23. Relay Connector After the emergency mode is activated, press the Connects to the relay connector (24) of the wall Talk key located on the side of the microphone to mount bracket unit (accessory). make an all-zone call or emergency broadcast over the selected zones (the RM-320F is 24.
-
Page 19: Rm-320F Fireman's Microphone Extension
4.4. RM-320F Fireman's Microphone Extension The RM-320F is an expansion unit for the RM-300MF Fireman’s Microphone. Up to 3 Expansion Units can be added, expanding the available function keys to up to 20 per unit. Zone selection (1 – 20) and failure indication/acknowledgement functions can be assigned to each function key using the dedicated software. -
Page 20: Rm-200M Remote Microphone
4.5. RM-200M Remote Microphone The RM-200M Remote Microphone connects to the VM-3360VA or VM-3240VA for the purpose of making general broadcast announcements. It communicates with the VM-3360VA or VM-3240VA through its RS-485 interface. Zone selection or automatic announcement start can be assigned to the function key using the dedicated software. - Page 21 1. Indication Label Holder 10. Not used. Write the name, purpose, etc. of the indicator and key on a label and insert the label into the holder from the 11. Microphone top. Labels can be printed using the setting software. Used for making announcements.
-
Page 22: Remote Microphone Extension
4.6. RM-210 Remote Microphone Extension The RM-210 is an expansion unit for the RM-200M Remote Microphone. Up to 4 Expansion Units can be added, expanding the available function keys to up to 10 per unit. Zone selection or automatic announcement start functions can be assigned to each function key using the dedicated software. -
Page 23: Vp-2241/2421 Power Amplifiers
4.7. VP-2241/2421 Power Amplifiers Two different configurations of power amplifiers can be used in the VM-3000 system: 240 W x 1 channel, and 420 W x 1 channel versions. Mount a VP-200VX Power Amplifier Input module to the module slot on the rear. [Front] [Rear] 1. -
Page 24: Vp-200Vx Power Amplifier Input Module
4.8. VP-200VX Power Amplifier Input Module Insert this module into the Power Amplifier's Input module slot when in use. [Front] 1. Input connector [PA LINK] This RJ45 connector connects to the VM-3240VA's or VM-3360VA's EXT. PA LINK connector. Output audio signals are transmitted to the power amplifier, and the power amplifier's audio monitor PA LINK VP-200VX... -
Page 25: Making General Broadcasts
5. MAKING GENERAL BROADCASTS 5.1. Making Broadcasts from the VM-3240VA or VM-3360VA 5.1.1. BGM broadcasts Broadcast musical programs from the BGM sound source connected to BGM input terminals 1 or 2 located on the rear panel of the VM-3360VA or VM-3240VA. Adjust the BGM volume control and the volume control of the designated speakers to an appropriate sound level in advance. -
Page 26: Microphone Announcements
5.1.2. Microphone announcements Make voice broadcasts using the microphone connected to any of audio input terminals 1 – 4 located on the rear panel of the VM-3360VA or VM-3240VA. Perform input sensitivity settings (Line/Mic selection) while viewing the LCD. (Refer to "... - Page 27 [Making microphone announcements by activating control inputs] Perform the following settings in advance using the setting software: • Set the priority level of the audio input terminal to which the microphone is connected to any of "1" – "6". (Refer to "General Broadcast Priorities"...
-
Page 28: Broadcasting From The Rm-200M
5.2. Broadcasting from the RM-200M 5.2.1. Microphone announcements Use the RM-200M’s microphone to make announcements. Perform the following settings in advance using the setting software: Assign a broadcast zone selection function to the key. (Refer to "RM Function Key Settings" in "Event Settings" in the separate software instruction manual.) Step 1. -
Page 29: Automatic Announcement Broadcasts
5.2.2. Automatic announcement broadcasts This function makes general broadcasts by activating and playing back automatic announcements recorded and stored in the VM-3360VA or VM-3240VA. Perform the following settings in advance using the setting software: • Assign a broadcast zone selection to the key. (Refer to "RM Function Key Settings"... -
Page 30: Making Automatic Announcements Using Control Signal Inputs
5.3. Making Automatic Announcements Using Control Signal Inputs This function makes general broadcasts by playing back internal automatic announcements activated when the control input terminals located on the rear panel of the VM-3240VA, VM-3360VA, VM-3240E or VM-3360E receive a broadcast control signal. Perform the following settings in advance using the setting software: Make settings so that the automatic general announcement is broadcast over the designated zone(s) when the control input terminals of the VM-3240VA, VM-3360VA, VM-3240E or VM-3360E are activated. -
Page 31: Summary Of General Broadcast Procedures
5.4. Summary of General Broadcast Procedures 5.4.1. Making general broadcasts from the VM-3240VA or VM-3360VA Normal status BGM broadcast Microphone announcement (by key operation) Microphone announcement (by control input) Connect a BGM device to the BGM Connect the microphone to the audio input terminal. input terminal. -
Page 32: Making Emergency Broadcasts
6. MAKING EMERGENCY BROADCASTS The following 3 methods are mainly used for making emergency broadcasts: • Press the Emergency Activation switch on the front panel of the VM-3360VA or VM-3240VA to initiate emergency broadcasts. • Press the RM-300MF Fireman’s Microphone’s front panel-mounted Emergency Activation switch to initiate emergency broadcasts. -
Page 33: Making Emergency Broadcasts From The Vm-3240Va Or Vm-3360Va
6.1. Making Emergency Broadcasts from the VM-3240VA or VM-3360VA 6.1.1. Microphone announcements Use the emergency microphone located on the front panel of the VM-3360VA or VM-3240VA. Emergency Activation switch/Emergency indicator LCD screen [VM-3240VA/3360VA] Emergency Output indicator Output Selector key All-zone Call indicator Emergency Output indicator All-zone Call Selector key... - Page 34 Step 3. Make announcement while pressing the emergency microphone’s Talk key. Talk key During emergency microphone announcements, the Emergency Microphone Operation indicator and Output indicator both light red. At the same time, the "EMERGENCY VA MICROPHONE" indication is displayed on the LCD. E M E R G E N C Y V A M I C R O P H O N E Step 4.
-
Page 35: Automatic Emergency Announcement Broadcasts
6.1.2. Automatic emergency announcement broadcasts This function makes emergency broadcasts with the key on the VM-3360VA’s or VM-3240VA’s front panel by playing back the Alert or Evacuation announcements recorded and stored in the VM-3360VA or VM-3240VA. Emergency Activation switch/Emergency indicator Evacuation LCD screen Announcement... - Page 36 Step 4. To terminate the emergency broadcast, reset the emergency mode using one of the following methods: [VM-3240VA/3360VA] • Press the Reset key on the front panel of the VM-3360VA or VM-3240VA. Reset key [RM-300MF] • Press the RM-300MF Fireman’s Microphone Emergency Reset key.
-
Page 37: Making Rm-300Mf Emergency Broadcasts
6.2. Making RM-300MF Emergency Broadcasts 6.2.1. Microphone announcements Make emergency broadcasts through the emergency microphone of the RM-300MF Fireman’s Microphone. Emergency Activation switch/Emergency indicator [RM-300MF] [RM-320F] Emergency Broadcast Zone indicator Zone Selector key Zone indicator Emergency Emergency Microphone In-Use indicator microphone Step 1. - Page 38 Step 1. To terminate the emergency broadcast, reset the emergency mode using one of the following methods: [VM-3240VA/3360VA] • Press the Reset key on the front panel of the VM-3360VA or VM-3240VA. Reset key [RM-300MF] • Press the RM-300MF Fireman’s Microphone Emergency Reset key.
-
Page 39: Automatic Emergency Announcement Broadcasts
6.2.2. Automatic emergency announcement broadcasts This function makes emergency broadcasts from the RM-300MF Fireman’s Microphone by playing back the Alert or Evacuation announcements stored in the VM-3360VA or VM-3240VA. Emergency Activation switch/Emergency indicator [RM-300MF] [RM-320F] Emergency Broadcast Zone indicator Zone Selector key Evacuation Announcement Evacuation Announcement Zone indicator... - Page 40 Step 4. To terminate the emergency broadcast, reset the emergency mode using one of the following methods: [VM-3240VA/3360VA] • Press the Reset key on the front panel of the VM-3360VA or VM-3240VA. Reset key [RM-300MF] • Press the RM-300MF Fireman’s Microphone Emergency Reset key.
-
Page 41: Making Automatic Emergency Announcements Using Control Signal Inputs (Automatic Fire Alarm Systems, Etc.)
6.3. Making Automatic Emergency Announcements Using Control Signal Inputs (Automatic Fire Alarm Systems, etc.) This function makes emergency broadcasts by playing back internal Alert or Evacuation announcements when the emergency control input terminals located on the rear panel of the VM-3240VA, VM-3360VA, VM- 3240E, or VM-3360E receive an emergency control signal from a connected automatic fire alarm system or external equipment. - Page 42 Step 3. To terminate the emergency broadcast, reset the emergency mode using one of the following methods: [VM-3240VA/3360VA] • Press the Reset key on the front panel of the VM-3360VA or VM-3240VA. Reset key [RM-300MF] • Press the RM-300MF Fireman’s Microphone Emergency Reset key.
-
Page 43: Summary Of Emergency Broadcast Procedures
6.4. Summary of Emergency Broadcast Procedures 6.4.1. Making emergency broadcasts from the VM-3240VA or VM-3360VA Normal status Microphone announcement Automatic emergency announcement Press the Emergency Activation switch. Press either the All-Zone Call key or Output key to select the output zone. (If the zone is not selected, emergency broadcasts are made over all zones.) Make emergency broadcasts by holding down the Press the Alert or Evacuation Announcement Start key... -
Page 44: Equipment Status And Response When Emergency Mode Is Activated By External Equipment
7. EQUIPMENT STATUS AND RESPONSE WHEN EMERGENCY MODE IS ACTIVATED BY EXTERNAL EQUIPMENT Note Enable the function for Emergency Activation switch in advance when all the versions of VM-3000VA firmware, VM-3000E firmware, and VM-3000 Setting Software are 2.00 or later. (For details, refer to "Emergency Control Input Settings"... -
Page 45: Priority Settings
Priorities 1 – 6 are assigned to paging calls made by the VP series standby amplifiers, while Priorities 7 (MIX) and 8 (BGM) are for BGM broadcasts made by the VM-3000 series Amplifiers. When another broadcast with priority 1 – 6 is made during a broadcast with priority 7 or 8, if broadcast areas for the two are different, the original... -
Page 46: Emergency Broadcast Priorities
8.2. Emergency Broadcast Priorities Priorities for emergency broadcasts are assigned to the following announcements: microphone announcements from VM-3240VA or VM-3360VA, microphone announcements from the RM-300MF, and Alert/Evacuation announcements. (Priorities are fixed.) The lower the number, the higher the priority. Sound Source Priorities (fixed) Microphone announcement by RM-300MF/ID1 (RM-300MF assigned to ID1 using the setting software) -
Page 47: Cpu Off Function
9. CPU OFF FUNCTION 9.1. What Is the CPU OFF Function? The CPU OFF function bypasses the CPU*, which the VM-3000 system uses in ordinary broadcasts, and allows all-zone calls to be made from the VM-3360VA or VM-3240VA or RM-300MF. Use this function when ordinary broadcasts cannot be made due to system failures, etc. -
Page 48: Priorities When All-Zone Calls Are Made Using The Cpu Off Function
9.3. Priorities When All-Zone Calls Are Made Using the CPU OFF Function Priorities of all-zone calls using the CPU OFF function differ depending on the input terminal to which the RM-300MF is [VM-3240VA/3360VA] connected. Connect the RM-300MF to the VM-3360VA or VM- 3240VA’s RM1 LINK or RM2 LINK connector. -
Page 49: Surveillance
10. SURVEILLANCE 10.1. What Is the Surveillance Function? The surveillance function continually monitors operating conditions for each piece of equipment in the system, operations between equipment components, connections and communications between equipment components, power supply conditions and other important component parts and points extending from input to output. -
Page 50: Equipment Operation Upon Failure Detection And Recovery Procedure
10.4. Equipment Operation upon Failure Detection and Recovery Procedure If any malfunction is detected within the system, the buzzer sounds, the failure indicator flashes and failure information* is displayed on the VM-3360VA or VM-3240VA’s LCD screen. The operations of other system equipment differ when a communications error or other failures occur. -
Page 51: Equipment Operation Upon Failure Detection
10.4.1. Equipment operation upon failure detection [VM-3240VA and VM-3360VA] Equipment operation upon failure detection The buzzer sounds, the failure indicator flashes yellow and failure information is displayed on the LCD screen. GENERAL FAULT F A U L T Failure indicator >... - Page 52 [RM-300MF and RM-320F] Equipment operation upon failure detection (1) The buzzer sounds and the Failure indicator flashes yellow. RM-300MF RM-320F Failure indicator Failure Acknowledgment In this event, a failure not related to communications has occurred within the system. If the failure is acknowledged by any system component, the buzzer stops and the yellow Failure indicator light switches from flashing to steady on mode.
- Page 53 [RM-200M] Equipment Operation Upon Failure Detection The Communications Failure indicator flashes yellow. Communications Failure indicator A failure has occurred in communications between the RM-200M and the VM-3240VA or VM-3360VA. The previous status is automatically restored if communications return to normal.
-
Page 54: Failure Acknowledgment
10.4.2. Failure acknowledgment Perform failure acknowledgment at the VM-3360VA, VM-3240VA, or RM-320F, or by use of the control input. Acknowledging a failure causes all currently sounding buzzers to stop. At the same time, the flashing yellow Failure indicator light on the VM-3360VA or VM-3240VA or RM-320F will switch to steady on mode. Note Only the Failure indicator is switched from flashing to steady on mode when failures are acknowledged. -
Page 55: Failure Reset Operation
[Acknowledging failures by the control input] Failure acknowledgment can also be performed by using the control inputs of the VM-3240VA, VM-3360VA, VM-3240E, and VM-3360E. (Refer to "Event Settings" "General Control Input Settings" in the separate software instruction manual.) VM-3240VA/3360VA/3240E/3360E Control input Failure Failure acknowledgement... - Page 56 [Resetting failures at the RM-320F] Press the Failure Reset key. The Failure Reset indicator remains lit while the key is held down. Failure Reset key Failure Reset indicator Notes • The RM-320MF's Failure Reset function is valid only when all the versions of VM-3000VA firmware, VM- 3000E firmware, and VM-3000 Setting Software are 2.00 or later.
-
Page 57: Examples Of Failures And Their Counter-Operations
10.5. Examples of Failures and Their Counter-Operations Procedures for acknowledging and resetting failures are explained here. 10.5.1. Failure example 1: Communications failure Assuming that the RM-300MF’s connection is disconnected within the VM-3000 system, when the failure is detected, the equipment operates as follows: VM-3360VA or VM-3240VA The buzzer sounds, the Failure indicator flashes yellow and failure information is displayed on the LCD screen. -
Page 58: Failure Example 2: Short Circuit Of Speaker Line 6
10.5.2. Failure example 2: Short circuit of speaker line 6 Assuming that Speaker Line 6 connected to the VM-3360VA or VM-3240VA is shorted, when the failure is detected, the equipment operates as follows. VM-3360VA or VM-3240VA The buzzer sounds, the Failure indicator flashes yellow and failure information is displayed on the LCD screen. - Page 59 Step 2. Determine and remedy the cause. If the cause cannot be determined from the VM-3360VA or VM-3240VA’s on-screen display, connect a PC and load the log data using the setting software. (For log data loading, refer to "Log Display" in the separate software instruction manual.) Step 3.
-
Page 60: Lcd Failure Display
10.6. LCD Failure Display If a failure occurs, its information, including the failure point, is displayed on the VM-3360VA or VM-3240VA’s front panel-mounted LCD screen. In this event, the display alternates between "Failure information" and "BGM status." Pressing the OK key sets the display to "Failure status."... - Page 61 Failure Location: Automatic Emergency Announcement F A U L T Failure detected in the VM-3360VA or VM-3240VA’s internal > automatic emergency announcement device. E M E R G E N C Y Failure Location: VM Extension Amplifier (VM-3240E or VM-3360E) F A U L T The VM-3240E or VM-3360E has overheated or its fuse has >...
- Page 62 Failure Location: Battery F A U L T Failure detected in the battery. > B A T T E R Y Failure Location: Speaker Line (Open or Short Circuit) F A U L T Open circuit caused in speaker Line 3 of the VM-3360VA or >...
- Page 63 Failure Location: Emergency Control Input Terminal F A U L T Failure detected in the VM-3240E’s or VM-3360E’s emergency > control input Terminal 4. E M G C T R L Failure Location: General-Use Remote Microphone (RM-200M) F A U L T Failure detected in communications between the RM-200M and <...
-
Page 64: Settings
11. SETTINGS Perform settings using the VM-3360VA or VM-3240VA’s LCD screen. To set, select the desired item after entering the setting mode, then advance to the corresponding screen. Even if the setting menu screen is selected by pressing the Menu key during normal operating status, current broadcasts are not interrupted. -
Page 65: Setting Hierarchical Chart
11.2. Setting Hierarchical Chart... -
Page 66: Configuration Settings
11.3. Configuration Settings 11.3.1. Configuration settings hierarchical chart If a password has been set, the password input screen is displayed before entering the Configuration Setting screen. N o r m a l s t a t u s Password entry (page 67) P A S S W O R D ? CANCEL... -
Page 67: Password Entry
11.3.2. Password entry If a password has been set, the password entry screen is displayed before entering the Configuration Setting screen. (For password settings, refer to page 68.) Step 1. When a password has been set, pressing the OK Setting menu screen key on the setting menu screen displays the S E L E C T M E N U... -
Page 68: Configuration Setting Items
11.3.3. Configuration setting items The screens shown here are only examples and may differ from the actual displays. The sections in are the setting items or contents that vary with the operation of the [+] or [–] key. [Password settings] Passwords can be set. - Page 69 [Date/time settings] Set the date and time. Default setting: "2008 JAN 01, 00:00" Date/time settings Step 1. Press the OK key on the Clock Setting screen. The setting screen for date and time is displayed. 2 : C L O C K S E T T I N G Note Pressing the Cancel key returns the display to the original...
- Page 70 [Network settings] Set the IP address and subnet mask. Network settings 3 : N E T W O R K S E T T I N G 1, 7 MENU IP address settings Subnet mask settings 3 1 : I P 3 2 : S U B N E T A D D R E S S M A S K...
- Page 71 Step 5. Press the OK key when the underline is at the rightmost digit to register the IP address. Step 6. Press the Cancel key after setting is complete. The display reverts to the Network Settings screen. <Subnet mask settings> Step 7.
- Page 72 [Log transmission] Transmit logs from the VM-3360VA or VM-3240VA to a PC. Log transmission Step 1. Press the OK key on the Log Transmission screen. 4 : L O G D A T A The indication "TRANSMITTING" is displayed on the screen. V M –...
- Page 73 [Transmission of PC-set data] Transmit data set by a PC to the VM-3360VA or VM-3240VA from the PC or conversely from the VM-3360VA or VM-3240VA to the PC. Set data transmission Step 1. Press the OK key on the Set Data 5 : S E T T I N G D A T A Transmission screen.
- Page 74 Transmission in Transmission in progress progress R E C E I V I N G T R A N S M I T T I N G Step 5. Press the OK key. C O M P L E T E C O M P L E T E The display reverts to the source and destination selection screen.
- Page 75 [Transmission of EV sound source data] Transmit EV sound source data from a PC to the VM-3360VA or VM-3240VA or conversely from the VM- 3360VA or VM-3240VA to the PC. EV sound source data transmission Step 1. Press the OK key on the EV sound 6 : E V D A T A source transmission screen.
- Page 76 The EV message sound source file registration screen is displayed. Press the [PC->VM-3000VA] button to transmit sound source data from the PC to the VM-3360VA or VM-3240VA after reading the sound source data into the above screen. Press the [VM-3000VA->PC] button to transmit sound source data from the VM-3360VA or VM- 3240VA to the PC.
-
Page 77: Information Settings
11.4. Information Settings 11.4.1. Information setting hierarchical chart N o r m a l s t a t u s CANCEL MENU Information setting screen Setting menu screen Usage language selection S E L E C T M E N U I N F O R M A T I O N S E L E C T L A N G U A G E... - Page 78 [Version information display] Version information is displayed on the VM-3240VA's or VM-3360VA's front panel-mounted LCD screen. Indicates the model number in short form. VA: VM-3240VA or VM-3360VA, both having a LCD screen E1: VM-3240E or VM-3260E connected to the VM-3240VA or V E R S I VM-3360VA The number represents the unit ID number.
-
Page 79: Audio Settings
11.5. Audio Settings This function is used to adjust the audio setting parameters. Tone settings can be adjusted for Input 4 and volume adjusted for BGM 1 and 2 as well as for the chime interlocked with the microphone, Alert/Evacuation message announcements, and automatic general announcements. -
Page 80: Audio Setting Items
11.5.2. Audio setting items The screens shown here are only examples and may differ from the actual displays. The sections in are the setting items or contents that vary with the operation of the [+] or [–] key. [Input 4 tone settings] Set the tone (bass and treble) for Input 4. - Page 81 [BGM 1 and BGM 2 volume adjustment] Adjust the volume of BGM1 and BGM2. Setting range +10 dB to –10 dB (default: 00) (Example. When adjusting BGM 1 volume:) Step 1. Using the [+] and [–] keys, adjust the volume on the BGM 1 volume adjustment BGM 1 or BGM 2 Volume Settings screen.
- Page 82 [Evacuation message announcement volume adjustment] Adjust the volume of Evacuation message announcement internally pre-recorded on the VM-3240VA or VM- 3360VA. Note This function can be used only when the VM-3240VA or VM-3360VA firmware version is 2.00 or later. Setting range +10 dB to –10 dB (default: 00) Evacuation message announcement volume adjustment...
- Page 83 [Automatic general message announcement volume control] Adjust the volume of Automatic general message announcements (EV1 – 6). Note This function can be used only when the VM-3240VA or VM-3360VA firmware version is 2.00 or later. Setting range +10 dB to –10 dB (Default: 00) EV1 - 6 represent the Automatic general message announcement numbers.
-
Page 84: Surveillance Settings
11.6. Surveillance Settings Notes • When using the Surveillance function (refer to "What Is the Surveillance Function?" on page 49), be sure to perform this setting after system installation and connections have been completed. Also, be sure to perform this setting when the number of connected speakers has been changed. If this setting is not performed, the surveillance function will not operate correctly. -
Page 85: Inputs 1 - 3 Settings
11.7. Inputs 1 – 3 Settings LINE/MIC input can be selected, phantom power turned ON/OFF, and treble and bass set for Inputs 1 – 3 during actual sound output. Perform this setting after system installation and connections have been completed. The screens shown here are only examples and may differ from the actual displays. -
Page 86: Inputs 1 - 3 Setting Items
11.7.2. Inputs 1 – 3 setting items [LINE/MIC selection settings] Select either LINE or MIC input. Setting range Line and Mic (Default: LINE) [Phantom ON/OFF settings] This setting item will not appear when "LINE" is selected at the LINE/MIC selection setting item. Set whether to enable or disable the phantom power. -
Page 87: Bgm Settings
11.8. BGM Settings Bass and treble of BGM can all be set during actual sound output. Perform this setting after system installation and connections have been completed. The screens shown on the previous page are only examples and may differ from the actual displays. The sections in are the setting items or contents that vary with the operation of the [+] or [–] keys. -
Page 88: Bgm Setting Items
11.8.2. BGM setting items [BGM selection] Select BGM 1 or 2. Press the OK key to confirm the selected BGM output and commence BGM broadcasting. (For details, refer to "BGM Broadcasts" in "Making General Broadcasts" on page 25.) Setting range BGM 1, BGM 2 and OFF (default) [Treble settings] Perform treble settings. -
Page 89: Remote Microphone Settings (Rm-300Mf, Rm-200M)
12. REMOTE MICROPHONE SETTINGS (RM-300MF, RM-200M) 12.1. DIP Switch Functions 12.1.1. RM-300MF RM-300MF bottom Switch Function Factory-preset Maintenance mode – Unit ID No. setting Compression ON/OFF RM terminate ON/OFF CPU OFF function Note Always set the DIP switch 1 to the OFF position. The unit will not operate if it is set to the ON position. -
Page 90: Unit Id Number Settings (Rm-300Mf: Switch 5 Operation Or Rm-200M: Switch 1 And 2 Operation)
12.2. Unit ID Number Settings (RM-300MF: Switch 5 operation or RM-200M: Switch 1 and 2 operation) To set the unit ID number, use the DIP switch 5 for the RM-300MF and DIP switches 1 and 2 for the RM- 200M. Note The DIP switch is located on the bottom surface for the RM-300MF and on the side surface for the RM-200M. -
Page 91: Setting The Terminating Rm-300Mf Unit (Rm-300Mf: Switch 7 Operation)
12.4. Setting the Terminating RM-300MF Unit (RM-300MF: Switch 7 operation) Set the DIP switch 7 located on the RM-200M's bottom surface to ON when connecting a single RM-300MF to the VM-3240VA or VM-3360VA (no bridge connection to the RM-200M is made). (Default: OFF) 12.5. -
Page 92: Installation
13. INSTALLATION 13.1. Installing the RM-300MF on a Wall To mount the RM-300MF on the wall, the following parts are required. Wall mount bracket unit for the RM-300MF ......... 1 (supplied with the RM-300MF) Tapping screw 4 x 25 (for wooden wall mounting) ...... 2 (supplied with the RM-300MF) [Installation] Step 1. - Page 93 Step 2. Connect the link cable to the screw terminal block. For cable connection, refer to "RM-300MF connection" on page 112. Bracket A Note Link cable Put the link cable inside the Bracket A after connection completion. Do not allow the link cable to protrude. The cable may be damaged if it protrudes when Bracket B the bracket unit is installed onto the wall.
- Page 94 [When the RM-300MF is installed in a wall box] When the RM-300MF is installed in a wall box (prepare separately), the box should measure at least 300 mm wide x 315 mm high as illustrated below. Effective depth: 100 min. 300 min.
-
Page 95: Installing The Rm-320F On A Wall
13.2. Installing the RM-320F on a Wall To mount the RM-320F on the wall, the following parts are required. Wall mount bracket for the RM-320F ........... 1 (supplied with the RM-320F) Tapping screw 4 x 25 (for direct wall mounting) ......2 (supplied with the RM-320F) Step 1. - Page 96 Step 3. Attach the RM-300MF to its wall mount bracket unit. (Refer to page 93, Steps 3 and Step 4. Connect the RM-320F’s cable to the extension connector on the RM-300MF’s side. Step 5. Install the RM-320F to its wall mount bracket sliding it in close contact with the RM-300MF as shown below.
-
Page 97: Installing The Rm-200M On A Wall
13.3. Installing the RM-200M on a Wall To mount the RM-200M on the wall, the following parts are required. WB-RM200 Wall Mounting Bracket for the RM-210 ....1 (option) Machine screw M3.5 x 20 (for an electrical box mounting) ..2 (supplied with the WB-RM200) Tapping screw 4 x 25 (for direct wall mounting) ...... -
Page 98: Installing The Rm-210 On A Wall
13.4. Installing the RM-210 on a Wall Step 1. Install the RM-200M on the wall. (Refer to "Installing the RM-200M on a Wall" on page 97.) Step 2. Install the WB-RM200 used for the RM-210 mounting on the wall. Step 3. Connect the extension cable supplied with the RM-210 between both extension connectors on the RM-200M’s side and the RM-210’s side. -
Page 99: Linking The Rm-200M With The Rm-210 (For Desktop Mounting)
13.5. Linking the RM-200M with the RM-210 (For Desktop Mounting) To expand the RM-200M by adding the RM-210 Remote Microphone Extension unit, use the parts supplied with the RM-210 shown below to link the 2 units. Complete the DIP switch settings in advance, then follow the procedure below to link both units. Linkage Bracket A ............ -
Page 100: Creating Remote Microphone Name Labels
13.6. Creating Remote Microphone Name Labels Using the VM-3000 Setting Software function, assigned names of preset RM-300MF, RM-320F, RM-200M, and RM-210 Function keys can be printed out. Once printed, cut out the printed names with scissors to use them as corresponding name labels. The paper used for the name label must be under 0.2 mm in thickness. Note For creating and printing name labels using the VM-3000 Setting Software, see the separate Setting Software Instructions, "Labels for Remote Microphones."... -
Page 101: If The Name Label Is Not Printed Correctly
13.6.2. If the name label is not printed correctly The name label created using the VM-3000 Setting Software may not be printed in correct size depending on the configuration environment of your PC. In such cases, try one of the methods described below. (1) Preparation by hand Copy the "Pattern paper for hand writing"... -
Page 102: Pattern Paper For Hand Writing
13.6.4. Pattern paper for hand writing Name label A Name label B Name label C Cutting guideline Shown in actual size... - Page 103 Name label B Name label B Name label B Name label B Shown in actual size Cutting guideline...
-
Page 104: Installing The Vp-200Vx Power Amplifier Input Module In The Vp-2241/2421 Power Amplifiers
13.7. Installing the VP-200VX Power Amplifier Input Module in the VP-2241/2421 Power Amplifiers Step 1. Remove the VP-2241/2421 power amplifier's top panel. Step 2. Unscrew the VP-200VX's panel to detach it. Step 3. Mount the VP-200VX module. Attach the VP-200VX's panel to the mounting location and the VP-200VX unit to the back of the mounting location, then secure them to the amplifier using the screws removed in Step. - Page 105 Step 4. Plug the VP-200VX's connector into the CN106 connector on the circuit board inside the amplifier. [VP-2241/2421 Connector position] DRIVE PCB Rear panel Step 5. After mounting is completed for all required channels, replace the top panel.
-
Page 106: Rack Mounting
• The rack-mounting screws supplied with the units other than the VM amplifiers are dedicated for the TOA racks. Never use them for any other rack. Notes • Because the VM-3240VA/3360VA, VM-3240E/3360E, VP-2241/2421, VX-2000DS, and VX-2000PF are heavy, use guide rails (separately prepared) in the rack to safely mount and securely support the units. -
Page 107: Desktop Mounting Of The Vm Amplifiers
13.9. Desktop Mounting of the VM Amplifiers Attach the supplied 4 plastic feet to the unit's bottom surface using the supplied screws. Keep the unit at least 10 cm away from any object as shown below to prevent excessive temperature rise inside the unit. -
Page 108: Connections
14. CONNECTIONS 14.1. Removable Terminal Plug Connection Notes • Do not use a micro screwdriver. Sufficient torque is not given to the screws when tightening them, and connections may not be secured. • Avoid soldering stranded or shielded cable, as contact resistance may increase when the cable is tightened and the solder is crushed, possibly resulting in an excessive rise in joint temperatures. -
Page 109: Audio And Control Connection Example
14.2. Audio and Control Connection Example Remote unit RU-2002 Paging microphones CD Player BGM sources Cassette Player VM-3240VA/3360VA rear Talk switch or other make contact Fire Alarm Control Audio RM-300MF RM-200M CAT. 5 CAT. 5 AC adapter 24 V DC from VX-2000DS* RM-300MF RM-200M... -
Page 110: Remote Microphone Connections
14.3. Remote Microphone Connections 14.3.1. Power supply and limit on the number of remote microphones The number of remote microphones connectable in a system is as follows. • Up to 2 RM-300MFs can be connected to the VM-3240VA/3360VA. Besides, up to 4 RM-200Ms and RM- 300MFs in total can be connected. - Page 111 • By supplying power to the RM-300MF/320F from the VX-2000DS, the RM-300MF/320F can be operated on the backup power even in case of AC power failure. RM-300MF VM-3240VA/3360VA RM-300MF RM-320F VX-2000DS [Limit on the number of remote microphones determined by system configurations] Note Red lines are DC power lines.
-
Page 112: Rm-300Mf Connection
14.3.2. RM-300MF connection Connect the RM-300MF to either of the RM1 LINK IN or RM2 LINK IN connector of the VM-3240VA or VM- 3360VA. [When power is supplied from the VM-3240VA/3360VA] Terminal block Wall mount bracket unit To VM-3240VA/3360VA’s RM-300MF bottom (supplied with the RM-300MF) RM1 LINK IN or RM2 LINK IN connector... - Page 113 [When power is supplied from the VX-2000DS or AC adapter] To VM-3240VA/3360VA’s RM1 LINK IN or RM2 LINK IN connector Terminal block Wall mount bracket unit RM-300MF bottom (supplied with the RM-300MF) Connection cable (with RJ45 connectors) Cut off the DC plug of the AD-246 AC Adapter, and treat the tip of cable as follows.
-
Page 114: Rm-200M Connection
14.3.3. RM-200M connection • The RM-200M is equipped with 2 link connectors, either of which can be used for connection. • To connect an additional RM-200M, use either link connector. • When connecting only RM-200Ms to the VM-3240VA/3360VA, a total of 4 RM-200Ms can be connected to the VM-3240VA/3360VA’s RM1 LINK IN and RM2 LINK IN connectors. - Page 115 [When power is supplied from the AC adapter] RM-200M Rear DC POWER IN EXTERNAL LINK MIC IN To VM-3240VA, VM-3360VA, RM-300MF, RM-200M AD-246 AC Adapter or equivalent unit Maximum cable distance in a system when a STP Category 5 straight cable is used: 800 m in total To AC power * Usable AC adapter 24 V DC/over 200 mA (Operation range: 14 –...
-
Page 116: Connections Between Rm-300Mf And Rm-200M
14.3.4. Connections between RM-300MF and RM-200M Wall mount bracket unit RM-300MF bottom Terminal block (supplied with the RM-300MF) To VM-3240VA/3360VA’s RM1 LINK IN or RM2 LINK IN connector Connection cable (with RJ45 connectors) Note For cable colors vs. functions of the cable numbers 1 to 8, refer to page 112. -
Page 117: General Control Input Terminal Connections
14.4. General Control Input Terminal Connections 14.4.1. Controlling functions assigned to the General Control Input terminals from the external equipment Following are assignable functions to the General Control Input terminals. (For the function assignments, refer to "General control input settings" in "Event Settings" in the separate software instruction manual.) VA-INPUT 1 –... -
Page 118: Using The Local Input
[Setting example] Shown below is a general control input setting screen in the setting software. The figure shows an example when performing a general broadcast by way of the contact activation. Control input No. 1 Sound source VA-INPUT 1 input Broadcast zone Zone 1 Interlocked control... -
Page 119: Example Of Connection To External Equipment
14.4.3. Example of connection to external equipment RU-2002 Remote unit DC IN OUTPUT REMOTE 12 / 24 V DC IN 12 V AWG 28 – 22 VM-3240VA/3360VA rear Press-to-talk switch box* E C H (Remote switch) AWG 28 – 22 * Prepare the switch assembly locally at your end. -
Page 120: Emergency Control Input Terminal Connections
14.5. Emergency Control Input Terminal Connections Following are assignable functions to the Emergency Control Input terminals. (For the function assignments, refer to "Emergency control input settings" in "Event settings" in the separate software instruction manual. Evacuation EV broadcast: Broadcasts the evacuation message internally pre-recorded on the VM-3240VA and VM-3360VA to the designated output (zone). -
Page 121: External Emergency Control Equipment Connection
14.5.1. External emergency control equipment connection An emergency broadcast (Evacuation EV or Alert EV) can be activated by external controls such as an automatic fire alarm activation signal. To reset the emergency status, press the Emergency Reset switch. VM-3240VA/3360VA rear Emergency control Emergency control Fire Alarm... -
Page 122: Using The Amplifier Cut Off Function
14.5.2. Using the Amplifier cut off function This connection allows broadcast from an external broadcast system to override the broadcast currently in progress within the VM-3000 system by cutting off the VM-3000 system's built-in amplifier. Connect the amplifier output and announcement start contact output of the external broadcast system to the EXT. -
Page 123: Connections To Detect Failures On The Emergency Control Input Lines
14.5.3. Connections to detect failures on the emergency control input lines Two types of control methods are available for the Emergency control input in the VM-3000 system: Contact control input (Emergency control input terminals 1 – 5) and Voltage control input (Emergency control input terminal 6). - Page 124 [Voltage control input terminal (EMERGENCY CONTROL 6)] 24 V DC is kept applied to the COM terminal under normal condition. Reversing this applied voltage polarity activates an emergency broadcast. The surveillance function judges the line normal when 24 V DC is detected at the COM terminal under normal condition and when 24 V DC is detected at the emergency control input terminal 6 under emergency condition.
-
Page 125: Vm-300Sv Connection
14.6. VM-300SV Connection Speaker line failure can be detected with greater accuracy when the VM-300SV units are connected to the VM-3000VA's or VM-3000E's Emergency control inputs 1 – 5. Notes • This function can be used only when all the versions of VM-3000VA firmware, VM-3000E firmware, and VM-3000 Setting Software are 2.00 or later. -
Page 126: Status Output Terminal Connections
14.7. Status Output Terminal Connections These terminals provide control outputs of relay contact type. VM-3240VA/3360VA rear Control signals (make contact) are output in synchronization with unit operation. Status Output Terminal The RJ45’s pin arrangement and pin functions are shown below. Pin 1 Pin 2 Pin 3... -
Page 127: Power Amplifier And Speaker Connections
14.8. Power Amplifier and Speaker Connections 14.8.1. Speaker connection VM-3240VA/3360VA/3240E/3360E Speaker 14.8.2. External attenuator connection (3-wire system) VM-3240VA/3360VA/3240E/3360E Speaker Attenuator: AT-603P, etc. Note When initializing the surveillance settings, the total speaker wattage per line should be 20 W (500 Ω) or more. Lighter speaker load may cause false detection. -
Page 128: External Attenuator Connection (4-Wire System)
14.8.3. External attenuator connection (4-wire system) Two types of attenuators are connectable to this unit, one to be bypassed when 24 V DC is applied to the attenuator, and the other to be bypassed when the 24 V DC being normally applied to is cut off (in no voltage mode). Connections of the unit's attenuator control output and 24 V DC output terminals differ depending on the attenuator types as shown below. -
Page 129: Connections Between Vm And Vp Amplifiers
14.9. Connections between VM and VP Amplifiers [Connection example: System including a standby amplifier] VM-3240VA/3360VA Speaker AWG 20 – 16 Cat. 5 STP VP-2421 DC POWER IN 28 V 4.8 A PA OUT (SP LINE) PA LINK VP-200VX AWG 20 – 16 VM-3240E/3360E Speaker AWG 20 –... - Page 130 [Connection example: BGM/Paging system] VM-3240VA/3360VA Speaker AWG 20 – 16 Cat. 5 STP VP-2421 DC POWER IN 28 V 4.8 A PA OUT (SP LINE) PA LINK VP-200VX VM-3240E/3360E Speaker AWG 20 – 16 VP-2421 DC POWER IN 28 V 4.8 A PA OUT (SP LINE) PA LINK...
-
Page 131: Connections Between Vm Amplifiers
14.10. Connections between VM Amplifiers VM-3240VA/3360VA Cat. 5 STP Unit ID No. 1 3 4 5 6 VM-3240E/3360E Cat. 5 STP Unit ID No. 2 3 4 5 6 VM-3240E/3360E RJ45 male connector Notes • When connecting 2 VM-3240E/3360E units or more in a system, set the Unit ID with the DIP switch located on each unit’s rear panel. -
Page 132: Connecting Power Supply Equipment
14.11. Connecting Power Supply Equipment (–)(–)(+)(+) From VX-2000DS Note VM-3240VA/3360VA Remove the short bar attached at the factory. 230 V AC 50/60 Hz VP-2241 DC POWER IN 28 V 4.8 A PA OUT (SP LINE) PA LINK VP-200VX From VX-2000DS (–) (–)(–)(+)(+) From VX-2000DS... - Page 133 [Required number of VX-200PS and VX-2000DS units] The required number of VX-2000DS Emergency Power Supply units and VX-200PS Power Supply Units are determined depending on the application of the system configured with the VM-3240VA, AM-3360VA, VM- 3240E, and VM-3360E (hereinafter called "VM amplifier") , and/or the VP-2241 and VP-2421 (hereinafter called "VP amplifier").
- Page 134 System including one VP amplifier connected as a standby amplifier One VX-2000DS is required every 3 VM amplifiers. Number of VM amplifiers Number of VX-2000DS' Number of VX-200PS' Below is an example showing that 2 VX-2000DSs and 1 VX-200PS are required in a system including 4 VM amplifiers.
- Page 135 • Required number in a BGM/Paging system One each of VX-2000DS and VX-200PS is required every 2 VM amplifiers. Number of VM amplifiers Number of VX-2000DS’ Number of VX-200PS’ Below is an example showing that 2 each of VX-2000DSs and VX-200PSs are required in a system including 3 VM amplifiers.
-
Page 136: Vm-3000 Cable Usage Table
15. VM-3000 CABLE USAGE TABLE This table shows the cables to be used in the VM-3000 and their connection locations. [VM-3240VA/3360VA] Terminal to Connect Cable Type Equipment to be Connected to Terminal Equipment Equipment Terminal Plug Cable Type Plug Equipment Name Receptacle Receptacle... - Page 137 [VP-2241/2421] Terminal to Connect Cable Type Equipment to be Connected to Terminal Equipment Equipment Terminal Plug Cable Type Plug Equipment Name Receptacle Receptacle Name VM-3240VA PA OUT EXT. PA 2P screw terminal Round or Y terminal 20 – 16 AWG Round or Y terminal Screw terminal /3360VA/3240E...
-
Page 138: Specifications
16. SPECIFICATIONS 16.1. VM-3240VA Voice Alarm System Amplifier Power Source 230 V AC, 50/60 Hz Power Consumption 600 W (at rated output), 260 W (according to EN60065) Rated Output 240 W Frequency Response 50 Hz – 20 kHz, ±3 dB (at 1/3 rated output) Distortion 0.7% or less (at rated output, 1 kHz) S/N Ratio... - Page 139 Ds Link Connecting the VX-2000DS, RJ45 female connector Maximum distance: 5 m Link cable: Category 5 Shielded Twisted-Pair straight cable (CAT5-STP) –5°C to +45°C Operating Temperature 5% to 95% RH (no condensation) Operating Humidity Panel: Aluminum, hair-line, black Finish Case: Surface-treated steel plate, black, paint 482 (w) x 132.6 (h) x 431.2 (d) mm Dimensions 16.5 kg...
-
Page 140: Vm-3360Va Voice Alarm System Amplifier
16.2. VM-3360VA Voice Alarm System Amplifier Power Source 230 V AC, 50/60 Hz Power Consumption 850 W (at rated output), 380 W (according to EN60065) Rated Output 360 W Frequency Response 50 Hz – 20 kHz, ±3 dB (at 1/3 rated output) Distortion 0.7% or less (at rated output, 1 kHz) S/N Ratio... - Page 141 Operating Temperature –5°C to +45°C Operating Humidity 5% to 95% RH (no condensation) Finish Panel: Aluminum, hair-line, black Case: Surface-treated steel plate, black, paint Dimensions 482 (w) x 132.6 (h) x 431.2 (d) mm Weight 19 kg * 0 dB = 1 V Note: The design and specifications are subject to change without notice for improvement.
-
Page 142: Vm-3240E Vm Extension Amplifier
16.3. VM-3240E VM Extension Amplifier Power Source 230 V AC, 50/60 Hz Power Consumption 600 W (at rated output), 260 W (according to EN60065) Rated Output 240 W Frequency Response 50 Hz – 20 kHz, ±3 dB (at 1/3 rated output) Distortion 0.7% or less (at rated output, 1 kHz) S/N Ratio... -
Page 143: Vm-3360E Vm Extension Amplifier
16.4. VM-3360E VM Extension Amplifier Power Source 230 V AC, 50/60 Hz Power Consumption 850 W (at rated output), 380 W (according to EN60065) Rated Output 360 W Frequency Response 50 Hz – 20 kHz, ±3 dB (at 1/3 rated output) Distortion 0.7% or less (at rated output, 1 kHz) S/N Ratio... -
Page 144: Rm-300Mf Fireman's Microphone
16.5. RM-300MF Fireman's Microphone Power Source 24 V DC (operating range: 15 – 40 V DC, supplied from the VM-3000 system) Current Consumption 120 mA (RM-300MF), 660 mA (with 3 RM-320Fs connected) Frequency Response 200 Hz – 15 kHz Distortion 1% or less S/N Ratio 55 dB or more... -
Page 145: Rm-200M Remote Microphone
16.7. RM-200M Remote Microphone Power Source 24 V DC (operating range: 14 – 28 V DC) Power input jack: Non-polarity type Usable power input plug* : Outer diameter ø5.5 mm, inner diameter ø2.1 mm, length 9.5 mm Current Consumption 100 mA or less Audio Output 0 dB* , 600 Ω, balanced... -
Page 146: Vp-2241 Power Amplifier 1 X 240W
16.9. VP-2241 Power Amplifier 1 x 240W 28 V DC (operating range: 20 – 40 V DC) Power Source M4 screw terminal, distance between barriers: 12 mm 4.8 A Current Consumption (EN60065) 240 W (at min. resistive and max. capacitive load) Rated Output Power 180 W (at min. -
Page 147: Vp-2421 Power Amplifier 1 X 420W
16.10. VP-2421 Power Amplifier 1 x 420W Power Source 28 V DC (operating range: 20 – 40 V DC) M4 screw terminal, distance between barriers: 12 mm Current Consumption (EN60065) 7.6 A Rated Output Power 420 W (at min. resistive and max. capacitive load) Output Power 320 W (at min. -
Page 148: Vp-200Vx Power Amplifier Input Module
16.11. VP-200VX Power Amplifier Input Module Power Source Supplied from VP-2241 or VP-2421 Current Consumption 30 mA or less Power Amplifier Link RJ45 female connector for connecting the VX-200SP Twisted-pair straight cable (TIA/EIA-568A standard) Finish Panel: Surface-treated steel plate Dimensions 88 (w) x 25.8 (h) x 53.2 (d) mm Weight 50 g... - Page 149 URL: http://www.toa.jp/ 201103...
Need help?
Do you have a question about the VM-3000 Series and is the answer not in the manual?
Questions and answers
Tengo problemas al intentar ingresar por contraseña, sigo los pasos del manual pero no me funciona
The manual does not provide specific instructions for resetting the password for the TOA VM-3000 Series. However, it mentions that password settings can be accessed in the Configuration Setting screen under "1: PASSWORD CONFIGURATION SETTING." If a password has been set, the password input screen appears before entering the settings. If further details are needed, refer to the separate software instruction manual.
This answer is automatically generated