Table of Contents
Advertisement
Available languages
Available languages
Quick Links
Advertisement
Table of Contents

Related Manuals for Zibro Clima PX150


Summary of Contents for Zibro Clima PX150
- Page 1 CLIMATE CONTROL PX150 GEBRAUCHSANWEISUNG BRUGSANVISNING INSTRUCCIONES DE USO MANUEL D'UTILISATION OPERATING MANUAL ISTRUZIONI D’USO > GEBRUIKSAANWIJZING INSTRUKCJA OBSŁUGI...
-
Page 2: Sikkerhed Generelt
ALGEMEINE SICHERHEIT Zur Sicherheit, Gebrauchsanweisung vor Inbetriebnahme sorgfältig lesen! Personen, die mit der Betriebsanleitung nicht vertraut sind dürfen das Gerät nicht bedienen. Wir empfehlen Ihnen, diese Anleitung an einem sicheren Ort aufzubewahren. A. Kein beschädigtes Kabel verwenden. G. Nicht in Wasser untertauchen. B. -
Page 3: General Safety
GENERAL SAFETY For safety reasons, please read this manual carefully before operating. Persons who are not familiar with this manual must not use this air conditioner. We strongly recommend keeping this manual in a safe place for future reference. A. Do not use a damaged cable. G. -
Page 4: Important Components
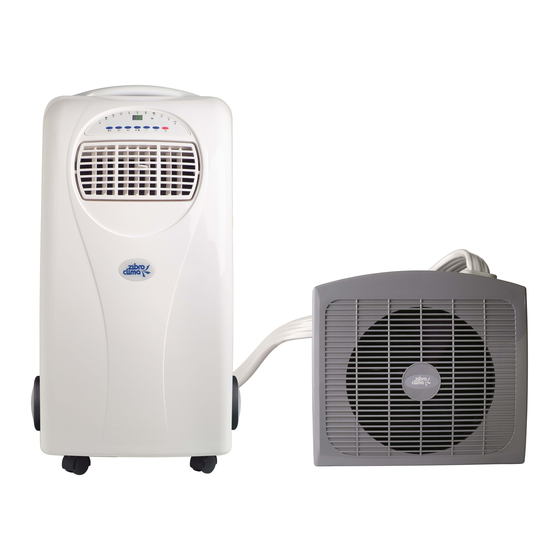
IMPORTANT COMPONENTS Control panel Cool air outlet Handle Casters Connection tube Handle of outdoor unit Exhaust air outlet Air inlet Power cable compartment Power cord Cord hanger Connection box Active carbon filter Bracket fro moun- ting outdoor unit Spanners Spacer, screws, protection caps Remote controller 1. - Page 5 You have acquired a high quality product that will provide you with many years of pleasure, on condition that you use it responsibly. Reading these instructions for use before operating your Zibro Clima will optimise its life span. We wish you coolness and comfort with your Zibro Clima.
-
Page 6: Safety Instructions
SAFETY INSTRUCTIONS IMPORTANT The unit is designed for indoor operation. Rating: This unit must be connected to a 230 V / 50 Hz earthed outlet. The installation must be in accordance with regulations of the country where the unit is used. If you are in any doubt about the electrical installation, have it checked and if necessary modified by a qualified electrician. - Page 7 POSITIONING YOUR AIR CONDITIONER WARNING Before using the air conditioner it should be left in an upright position for at least 2 hours. The air conditioner consists of an indoor mobile unit and an outdoor unit. The units are connected to each other by a 3 metre flexible tube. The outdoor unit can be placed on the floor (of a balcony) or hung on a wall.
- Page 8 OPERATING THE AIR CONDITIONER ON/OFF Press to switch the unit on or off. The unit selects the mode depending on the room temperature: higher than 23°C, cooling mode; between 20°C and 23°C, fan mode. Time switch to set a working time between 1 and 12 hours. The unit switches off when this time has run down.
- Page 9 NOTICES! The compressor has been set so that it starts functioning three minutes after the (re)start of the air conditioner. The cooling will switch off when the room temperature is lower than the set one. Ventilation will however continue to work on the set level. When the room temperature rises above the selected value, the cooling will work again.
- Page 10 DISCONNECTING THE INDOOR AND OUTDOOR UNIT (FOR QUALIFIED PERSONNEL) If the indoor unit needs to be disconnected from the outdoor unit, to place it in a more suitable position, follow these steps: Disconnecting Open the tube connection box (12) situated at the back of the indoor unit. Disconnect the drain tube (C).
- Page 11 CLEANING First of all switch off the unit and pull the plug. Clean the housing with a soft, damp cloth. Never use aggressive chemicals, petrol, detergents or other cleansing solutions. Clean the filter regularly with a vacuum cleaner or under streaming water. Let the filter dry out completely. NOTICE! Never use the air conditioner without filter.
-
Page 12: Troubleshooting
TROUBLE SHOOTING Problem Cause Solution Connect to a functioning outlet and switch on The unit does not function Room temperature outside operating temperature range In direct sunlight Close curtains Windows or doors open, many people or heat source in room The unit does not seem to Dirty filter... -
Page 13: Technical Data
To prevent unnecessary expense, we recommend that you always first carefully consult the instructions for use. Take the air conditioner to your dealer for repairs if these instructions do not provide a solution. TECHNICAL DATA To be used as indication, subject to modifications Model PX150 Cooling capacity *... -
Page 14: Elenco Parti
ELENCO PARTI Pannello di controllo Bocchetta d’aria Impugnatura Rotelle girevoli Adattatore tubo Impugnatura Uscita d’aria di scarico Presa d’aria Pulsante di chiusura?? Cavo d’alimentazione Avvolgicavo Scatola di collegamento Filtro d’aria Guida per la sospensione Chiavi a corredo per la manutenzione Distanziatore, viti e cappucci di protezione... - Page 15 Lei ha acquistato un prodotto di qualità, che Le offrirà molti anni di comfort, a condizione che venga usato in modo responsabile. Per una durata ottimale dello Zibro Clima La invitiamo a leggere le istruzioni d’uso. Le auguriamo molta freschezza e comfort con il Suo Zibro Clima.
-
Page 16: Istruzioni Per La Sicurezza
ISTRUZIONI PER LA SICUREZZA IMPORTANTE L’apparecchio è stato realizzato per funzionare in ambiente chiuso. Classificazione: questo apparecchio deve essere collegato ad una presa con messa a terra da 230 V/50 Hz. L’installazione deve essere conforme ai requisiti elettrici locali. Se vi sono dei dubbi in merito all’installazione, farla controllare ed eventualmente modificare da un tecnico qualificato. - Page 17 INSTALLAZIONE DEL CLIMATIZZATORE AVVERTENZA Prima di usare il climatizzatore, lasciarlo in posizione verticale per almeno due ore. Il condizionatore è composto da una unità interna ed una esterna collegate tra loro da un cavo flessibile lungo 3 metri. L’unità interna viene situata nel locale. A tale proposito fare attenzione ai seguenti punti: •...
- Page 18 FUNZIONAMENTO DEL CLIMATIZZATORE ON/OFF Premere questo tasto per accendere o spegnere il climatizzatore. L’apparecchio seleziona la modalità in base alla temperatura ambiente: oltre i 23°C, modalità raffreddamento; tra i 20°C e i 23°C, modalità ventola. Interruttore timer Usarlo per impostare un periodo di funzionamento tra 1 e 12 ore.
- Page 19 Telecomando Il climatizzatore può essere attivato con il telecomando. Inserire 2 batterie tipo AAA per far funzionare il telecomando. OSSERVAZIONI! Il compressore è stato impostato in modo tale da entrare in funzione solo tre minuti dopo che il condizionatore è stato riacceso. In questo modo si prolun ga la durata del compressore.
- Page 20 SMONTAGGIO DELLE PARTI (UNICAMENTE PER IL TECNICO QUALIFICATO) Smontaggio Aprire la scatola dei collegamenti (12) sul retro dell’unità interna. Smontare il tubo di scarico dell'acqua (C). Staccare il cavo di alimentazione (A). Con la chiave (15) smontare i tubi del refrigerante (B, D). Le valvole automatiche nei collegamenti prevengono eventuali perdite.
- Page 21 PULIZIA Come prima operazione spegnere l’apparecchio ed estrarre la spina dalla presa. Pulire la superficie esterna del climatizzatore con un panno morbido ed umido. Non usare agenti chimici aggressivi, benzina, detergenti o alter soluzioni per la pulizia. Pulire regolarmente il filtro con un aspirapolvere o mettendolo sotto il getto d’acqua del rubinetto.
-
Page 22: Guida Alla Ricerca Guasti
GUIDA ALLA RICERCA GUASTI Guasto Causa Solutione Collegarlo ad una presa funzionante ed accenderlo L’apparecchio non funziona La temperatura ambiente non rientra nell’intervallo specificato Collocazione alla luce diretta del Chiudere le tende sole Collocazione a finestre o porte L’apparecchio aperte, in presenza di molte non sembra in persone o di una fonte di calore grado di... -
Page 23: Dati Tecnici
La garanzia non è valida in caso di danno sorto in seguito ad operazioni che non sono descritte in questo manuale o in seguito a negligenza. Le spese di spedizione ed i rischi che la spedizione del apparecchio o delle parti comporta sono sempre a carico dell'acquirente. -
Page 24: Belangrijke Onderdelen
BELANGRIJKE ONDERDELEN Bedieningspaneel Uitblaasrooster Handgreep Wielen Verbindingsleiding Handgreep Luchtafvoer Luchtinlaatrooster Afsluitknop Netsnoer Snoerhouder Aansluitkastje Luchtfilter Ophangrail Steeksleutels Afstandhouder, schroeven en afdekkapjes Afstandsbediening 1. LEES EERST DE GEBRUIKSAANWIJZING. 2. RAADPLEEG BIJ TWIJFEL UW DEALER. - Page 25 Geachte mevrouw, meneer, Van harte gefeliciteerd met de aankoop van uw Zibro Clima airconditioner. Naast het koelen van lucht heeft deze airconditioner nog een tweetal functies, namelijk luchtontvochtiging en -circulatie. De verrijdbare Zibro Clima airconditioner is uiterst gemakkelijk te bedienen en te verplaatsen. U heeft een kwaliteitsproduct aangeschaft waar u nog vele jaren plezier van zult hebben, mits u de airconditioner verantwoord gebruikt.
- Page 26 Zibro Clima leverancier, anders kan dit leiden tot het vervallen van de garantie. • De Zibro Clima airconditioner is een veilig apparaat. Het is volgens de veiligheidsnormen gefabriceerd. Toch dient u, zoals bij ieder elektrisch apparaat, voorzichtig te zijn.
- Page 27 DE INSTALLATIE LET OP! Vóór de ingebruikname van uw airconditioner moet deze minimaal 2 uur recht- op hebben gestaan. De airconditioner bestaat uit een binnendeel en een buitendeel die door een ca. 3 meter lange flexibele slang met elkaar zijn verbonden. Het binnendeel wordt in het vertrek geplaatst.
- Page 28 BEDIENING Aan/Uit Druk op om het apparaat aan- (controlelampje zal branden) of uit te zetten. Als de kamertemperatuur hoger is dan 23°C, dan koelt het apparaat; tussen 20°C en 23°C ligt, dan gaat de ventilator aan. Tijdklok Met de knop kan een werkingstijd worden ingesteld tussen 1 en 12 uur.
- Page 29 Afstandsbediening Het apparaat kan worden ingesteld met de afstandsbediening (voor de werking ervan zijn 2 AAA-batterijen nodig). OPMERKINGEN Om de levensduur van de compressor te verlengen is deze zo ingesteld, dat deze pas drie minuten na het (weer) aanzetten van het apparaat begint te werken. Het koelsysteem wordt uitgezet zodra de omgevingstemperatuur lager is dan de ingestelde waarde.
- Page 30 DE DELEN LOSMAKEN (UITLSUITEND BESTEMD VOOR DE VAKMAN) Losmaken Het aansluitkastje (12) achter op het binnendeel openen. De waterafvoerleiding (C) losmaken. Het netsnoer (A) losmaken. Met de steeksleutel (15) de koelmiddelleidingen (B, D) losmaken. De automatische ventielen in de aansluitingen voorkomen lekkage. Voorzichtigheid is geboden om de koelmiddelleidingen niet te beschadigen.
- Page 31 ONDERHOUD Haal altijd eerst de stekker uit het stopcontact voor u het apparaat of filter gaat schoonmaken of het filter gaat vervangen. Gebruik voor het regelmatig schoonmaken van de buitenkant van het apparaat uitsluitend een zachte, vochtige doek. Het filter moet regelmatig worden schoongemaakt. Gebruik daarvoor een stofzuiger of houdt het onder stromend water.
- Page 32 STORINGEN Storing Oorzaak Oplossing Het apparaat in een stopcontact Geen stroomvoorziening steken waarop spanning staat Het apparaat werkt niet Kamertemperatuur buiten werkingstemperatuur Apparaat uit het zonlicht Staat in zonlicht plaatsen Ramen of deuren staan open, er zijn veel mensen of warmtebronnen in de ruimte Het apparaat werkt...
-
Page 33: Technische Specificaties
De garantie geldt niet bij schade ontstaan door handelingen die afwijken van die in de gebruiksaanwijzing of door verwaarlozing. De verzendkosten en het risico van het opsturen van de airconditioner of onderdelen daarvan, komen altijd voor rekening van de koper. Om onnodige kosten te voorkomen, raden wij u aan eerst altijd zorgvuldig de gebruiksaanwijzing te raadplegen. - Page 34 ISTOTNE CZE ˛ŚCI Panel sterowania (przyciski i regulatory) Wywietrznik Uchwyt Kółka Giętka rura łącząca Uchwyt Odpływ powietrza Dopływ powietrza Zatyczka Przewód zasilający Uchwyty do zawies- zania przewodu Skrzynka przyłączowa Filtr powietrza Szyna do podwies- zania Klucz nasadowy Element odległościowy, śrubki i nakładki Pilot 1.
- Page 35 Serdecznie gratulujemy Państwu zakupu klimatyzatora Zibro Clima. Oprócz chłodzenia powietrza, klimatyzator ten ma jeszcze dwie inne funkcje, mianowicie odwilżanie i wentylacje. Przenośny klimatyzator Zibro Clima jest wyjątkowo prosty w obsłudze i można go łatwo przemieszczać. Nabyli Państwo produkt wysokiej jakości, który - przy prawidłowej eksploatacji - będzie Państwu wiernie służył...
-
Page 36: Przepisy Bezpieczeństwa
• Ewentualne naprawy poza regularną konserwacją urządzenia należy zlecić fachowcowi z autoryzowanego serwisu naprawczego lub serwisu firmy Zibro Clima, gdyż w przeciwnym razie może spowodować to przepadek gwarancji. • Klimatyzator marki Zibro Clima jest w pełni bezpiecznym urządzeniem, wykonanym zgodnie z obowiązującymi normami bezpieczeństwa. Mimo to jak w przypadku wszelkich innych urządzeń... - Page 37 UWAGA! Nie wolno używać klimatyzatora, jeżeli przewód zasilający lub wtyczka przewodu są uszkodzone. Nie wolno też uciskać przewodu ani przeciągać go wzdłuż przedmi- otów o ostrych krawędziach. Nie wolno dopuścić do kontaktu urządzenia z wodą z uwagi na niebezpieczeństwo zwarcia! Jeśli zaistnieje potrzeba wymiany wtyczki przewodu zasilającego na nową, należy pamiętać...
- Page 38 OBSŁUGA Włącznik/wyłącznik W celu włączenia lub wyłączenia klimatyzatora nacisnąć przycisk (dioda kontrolna zapala się). Jeżeli temperatura pomieszczenia jest wyższa niż 23˚C, urządzenie chłodzi; leży w przedziale pomiędzy 20˚C a 23˚C, włącza się wentylator. Dawkownik czasu Za pomocą przycisku można ustawić czas pracy klimatyzatora wynoszący od 1 do 12 godzin.
- Page 39 Pilot Pracę klimatyzatora można regulować za pomocą pilota (do którego niezbędne są 2 baterie typu AAA). UWAGA! Aby przedłużyć czas użytkowania kompresora został on tak nastawiony, że rozpoczyna on swą pracę dopiero po upływie trzech minut od (ponownego) włączenia urządzenia. Układ chłodzenia wyłącza się...
- Page 40 ROZŁĄCZENIE CZ ŚCI SKŁADOWYCH (INSTRUKCJA PRZEZNACZONA WYŁĄCZNIE DLA FACHOWCA) Rozłączenie Otworzyć skrzynkę przyłączową (12) znajdującą się na tylnej stronie urządzenia zewnętrznego. Rozłączyć przewód odprowadzenia wody (C) Rozłączyć przewód zasilający (A) Za pomocą klucza nasadowego (15) rozłączyć przewody obiegu chłodziwa (B, D).
-
Page 41: Czyszczenie I Konserwacja
CZYSZCZENIE I KONSERWACJA Zanim przystąpisz do czyszczenia klimatyzatora lub filtra powietrza bądź też jego wymiany, wyjmij najpierw wtyczkę przewodu z gniazdka sieciowego. Do regularnego czyszczenia obudowy klimatyzatora należy używać wyłącznie miękkiej, lekko wilgotnej ściereczki. Filtr powietrza należy regularnie czyścić, posługując się przy tym odkurzaczem lub spłukując filtr pod bieżącą... -
Page 42: Usuwanie Zakłóceń
USUWANIE ZAKŁÓCEŃ Awaria Przyczyna Sposób usunięcia Przyłączyć klimatyzator do gniazdka posiadającego napięcie Urządzenie nie sieciowe działa Temperatura pomieszczenia wykracza poza zakres działania Stoi w pełnym słońcu Zasunąć zasłony okienn Okna lub drzwi są otwarte, w pomieszczeniu jest dużo osób lub wiele źródeł... -
Page 43: Dane Techniczne
Koszty i ryzyko związane z przesyłką grzejnika lub części zamiennych ponosi klient. Aby uniknąć niepotrzebnych kosztów, radzimy Państwu zawsze najpierw uważnie przeczytać instrukcję obsługi. Jeżeli ujęte w niej wskazówki nie dadzą zadowalającego rezultatu, klimatyzator należy oddać do naprawy w punkcie dealerskim. - Page 44 +33 2 32 96 07 47 Tel.: +44 121 506 1818 fax: +33 2 32 96 07 77 Fax: +44 121 505 1744 email: pvgfrance@zibro.com email: gases@lister.co.uk i ÖSTERREICH > ITALIA PVG Austria VertriebsgmbH PVG Italy SRL Salaberg 49 Via Niccolò Copernico 5...
Need help?
Do you have a question about the Clima PX150 and is the answer not in the manual?
Questions and answers