Table of Contents
Advertisement
Quick Links
Advertisement
Table of Contents

Related Manuals for Sirius Satellite Radio SiriusConnect SCC1


Summary of Contents for Sirius Satellite Radio SiriusConnect SCC1
- Page 1 User Guide SiriUS ConneCt ™ Vehicle Tuner...
- Page 2 Congratulations on the Purchase of your new SIRIUS SCC1 SiriusConnect Vehicle Tuner. The SCC1 SiriusConnect Vehicle Tuner is designed to work with any Sirius-Ready or SAT Radio Ready headunit. Some headunits will require the use of a SiriusConnect Interface Translator. Please consult your headunit manufacturer for more details concerning compatibility and interface availability.
-
Page 3: Table Of Contents
Table of Contents Table of ConTenTS ......3 WaRnIng and SafeTy InfoRmaTIon ....4 Safety Precautions . -
Page 4: Warning And Safety Information
Warning and Safety Information Safety Precautions Be sure to observe the following warnings. Failure to follow these safety instructions and warnings may result in a serious accident and/or personal injury. • Install the cables and wiring so that it is not crimped or pinched by screws or sharp metal edges. -
Page 5: Fcc Warning
• Do not install the unit to high levels of humidity, moisture or dust. Doing so can result in electric shock or product failure. FCC Warning This equipment may generate or use radio frequency energy. Changes or modifica- tions to this equipment may cause harmful interference unless the modifications are expressly approved in this User Guide. -
Page 6: Copyrights & Trademarks
Copyrights & Trademarks © 2007 Sirius Satellite Radio Inc. All Rights Reserved. ® “SIRIUS”, the SIRIUS dog logo, “SiriusConnect”, channel names and logos are trademarks of Sirius Satellite Radio Inc. All Rights Reserved. Hardware, subscription, and activation fee required. For full Terms & Conditions, visit http://www.sirius.com. -
Page 7: Package Contents
Package Contents The following items are included with your purchase of the SIRIUS SCC1 SiriusCon- nect Vehicle Tuner. Unpack the kit carefully and make sure that everything shown is present. If anything is missing or damaged, or if the unit fails to operate properly, notify your dealer immediately. -
Page 8: Connections
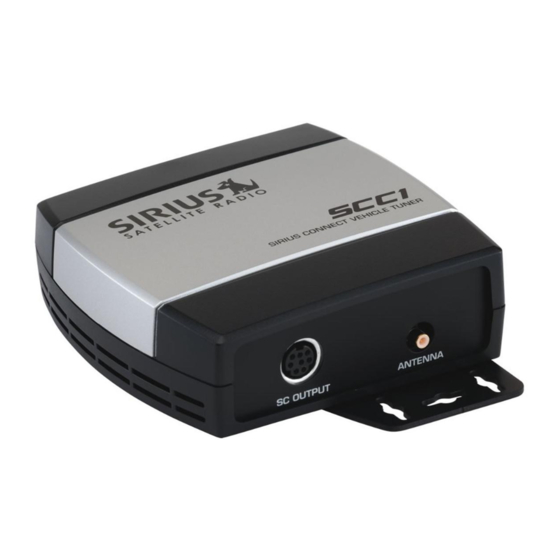
Connections Connector Information Figure 1 identifies and describes the connectors on the SCC1 Vehicle Tuner. Figure 2 identifies the 8-pin pin-out configuration. • SC OUTPUT: Connection for the SC Interface Cable. • ANTENNA: Connection for the satellite antenna. Connect to Sirius-Ready Headunit or SiriusConnect Interface Translator figure 1... -
Page 9: Basic System Wiring Options
Basic system wiring options The SCC1 SiriusConnect Vehicle Tuner is designed to work with any Sirius-Ready or SAT Radio Ready headunit. Some headunits will require the use of a SiriusCon- nect Interface Translator. Please consult your headunit manufacturer for more details concerning compatibility and interface availability. -
Page 10: Installation
Installation Installing the SCC1 Vehicle Tuner It is recommended that prior to starting the installation, you thoroughly read this manual and follow the guidelines listed below. Consider the mounting location carefully. You should make sure that you avoid the following: •... -
Page 11: Alternate Mounting Methods
Alternate Mounting Methods The mounting plate can be removed allowing the SCC1 to be mounted directly to a surface using either double-sided stick tape, hook and loop, or other adhesive material. Simply remove the 2 screws on the bottom of the SCC1 tuner to remove the bracket, as shown in Figure 3 (right). -
Page 12: Mounting The Magnetic Antenna
Mounting the Magnetic Antenna The installation of the magnetic antenna consists of two installation steps: • Mounting the magnetic antenna and cover/tail on the vehicle • Routing the antenna cable through the vehicle to the tuner The magnetic mount antenna has a strong magnetic mount designed to hold the antenna in place during normal driving conditions (highway/city). - Page 13 Sedan/Coupe Sedan/Coupe Pickup Truck Pickup Truck SUV/mini-Van SUV/mini-Van Convertible Convertible figure 6 figure 6 mounting the antenna on the Vehicle Follow this procedure to mount the antenna: Select an appropriate mounting position for your type of vehicle that has an unobstructed area of 3 inches by 3 inches around the antenna.
- Page 14 Protective Material Strain Relief Adhesive Strips Rubber Cover/Tail Antenna Cable figure 7 figure 7 Double check that the location of the antenna and rubber cover/tail are correct, and continue to press firmly down on rubber cover/tail for another 30 seconds. At room temperature (68 degrees), maximum adhesion usually occurs within 72 hours.
- Page 15 antenna Cable Routing When you have successfully mounted the antenna on the vehicle, you can begin the cable routing portion of the installation. Separate antenna cable routing procedures are provided for each type of vehicle: • Sedan/Coupe on page 15 •...
- Page 16 Pickup Truck antenna Cable Routing Procedure Figure 10 shows how the antenna cable should be routed from the antenna to the tuner in a pickup truck. The exact routing of the antenna cable may vary depending upon where you have installed the dock in your vehicle. Avoid side airbag locations on back pillars and above the doors.
- Page 17 SUV/mini-Van antenna Cable Routing Procedure Figure 11 shows how the antenna cable should be routed from the antenna to the tun- er in an SUV or a Mini-Van. The exact routing of the antenna cable may vary depending upon where you have installed the dock in your vehicle. Avoid side airbag locations on back pillars and above the doors.
- Page 18 Convertible antenna Cable Routing Procedure Figure 12 shows how the antenna cable should be routed from the antenna to the tuner in a convertible. The exact routing of the antenna cable may vary depending upon where you have installed the dock in your vehicle. Avoid side airbag locations on back pillars and above the doors.
-
Page 19: Operation
You can also call SIRIUS toll-free at: 1-888-539-SIRIUS (1-888-539-7474) Once the tuner is activated, you will be able to begin enjoying SIRIUS Satellite Radio’s digital entertainment, and can tune to other channels. -
Page 20: Specifications
Specifications Operation Frequencies ........... Satellite . -
Page 21: Sirius Id
SIRIUS ID Write down the SIRIUS ID (SID) of your SCC1 Tuner in the space provided below. SID: SIRIUS ID... - Page 24 SiriUS Satellite radio inc. 1221 Avenue of the Americas new York, nY 10020 800.869.5590 SCC1 (SCC1092407b) oo.ABCD1.001...
Need help?
Do you have a question about the SiriusConnect SCC1 and is the answer not in the manual?
Questions and answers