Table of Contents
Advertisement
Advertisement
Table of Contents

Related Manuals for Aastra 9120


Summary of Contents for Aastra 9120
- Page 1 9120 USER GUIDE...
-
Page 2: Table Of Contents
Emergency service Feature ... 1 Unpacking your phone ... 1 Key Descriptions ... 2 Basic Installation... 4 Pre-installation information for the 9120 telephone... 4 Special information... 5 Making and Answering Calls ... 8 Making a call ... 8 Answering a Call ... 8 Using the Hold Key... - Page 3 Saving numbers and names into shift memory keys ... 22 Labeling the memory keys ... 22 Making calls from memory keys ... 23 Editing memory keys ... 23 Deleting memory keys ... 23 Saving features in memory keys ... 23 Using feature keys ...
-
Page 4: Introduction
The Model 9120 will provide basic telephone service during a power failure. How- ever, only the dial pad and handset will function. If on a handset call when a power failure occurs, the Model 9120 will keep the call. Handsfree calls will not be re-estab- lished during a power interruption. -
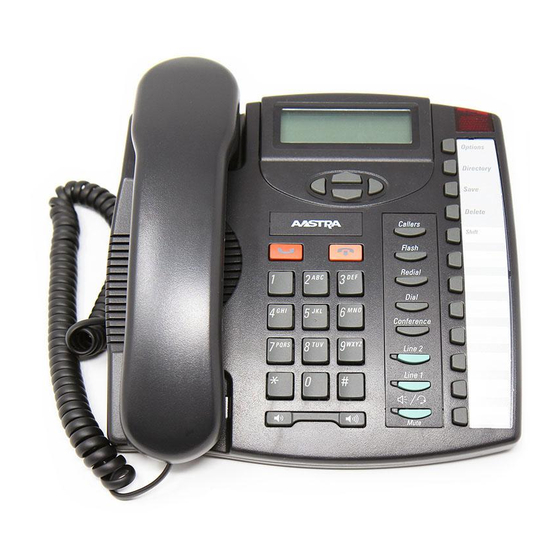
Page 5: Key Descriptions
Key Descriptions Set Indicator Light Options Key Backlit Display Navigational Keys Handset Volume Bar Dial Pad Line1 & Line2 Keys 14 Memory Keys Headset Jack Keys Set Indicator Flashes when the telephone rings, or when a call is on hold; lights up when a message is waiting or when a feature or extension is in use. - Page 6 Keys Access a list of 11 basic options to customize the features of your tele- phone. Stores up to 100 names and phone numbers (stored in alphabetical order). See Directory on page 15 for more information. Use to store numbers and names in Directory, in memory keys and to save Option feature settings.
-
Page 7: Basic Installation
Basic Installation Pre-installation information for the 9120 telephone The 9120 telephone is a two-line telephone. Before you begin installing it, you need to know how the telephone lines are connected to the phone jacks at your home or ofÞce. When two telephone lines are installed on the same phone jack, one tele- phone cord is required to connect both lines to your 9120 telephone. -
Page 8: Special Information
You must conÞrm if the two telephone lines are installed on the same phone jack, or on two separate phone jacks. Read your 9120 telephone display. If it prompts you to select a language, follow the directions on the telephone display to choose your language of choice. - Page 9 6. Attach the cords to the telephone stand Route the cords along the groove on the telephone stand as shown in the illustra- tion. 8. Insert the number card on your telephone Write your telephone number on the number card. Place the number card into the slot underneath the handset cra- dle on the on the telephone.
- Page 10 To avoid potential electrical shock hazard to personnel or damage to the telephone, use only the manufacturer-supplied equipment and installation procedures. SpeciÞcally, use only 4 conductor modular teledapt plug/cords with this product, and an AC trans- former that is CSA/UL or CSA-NRTL/C approved Class 2 level C, rated as follows: For North American Markets AC voltage 110-120V, Input: 120VAC, 60Hz, 10W and Output: 16V AC, 250mA.
-
Page 11: Making And Answering Calls
A headset attachment can also be used with your tele- phone, refer to page 28 . You can use the 9120 to simply make a regular call, or you can predial a telephone number to ensure it is correct before it is dialed out. Follow the procedures below to make a regular or predialed call. -
Page 12: Switching Between Two Lines
another extension, the call is taken off hold but remains connected to your tele- phone. If this happens, any background noise from your area will be heard by the caller and the person at the other extension. Switching between two lines To put a call on hold and make or answer a second call: Make or answer a call on one line. -
Page 13: Muting A Handsfree Call
To dial without picking up the handset: Muting a Handsfree call You can turn off the microphone so that the caller can’t hear you but you can still hear the caller. Muting a call only works when you are in Handsfree mode. To mute a handsfree call: Press P. -
Page 14: Call Waiting Id
† Call Waiting ID The 9120 is capable of displaying Caller ID information of a second incoming call while you have a call in progress. When you are on a call and you hear the Call Wait- ing tone, the Call Waiting information is displayed as shown below. -
Page 15: Turning The Display Of Call Waiting Id On Or Off
Turning the display of Call Waiting ID on or off You can choose whether or not Call Waiting ID is displayed on your telephone for Line 1 and Line 2 . To turn Call Waiting on or off: Press I. Press 11 or use V or W to scroll to Setup Option 11. -
Page 16: Setting The Date And Time
To resume the automatic date and time setting (if the date and time has been set man- ually), disconnect the power supply, then re-connect it. After your Þrst incoming call, the date and time are automatically set if you subscribe to the Caller ID service from your telephone company. -
Page 17: Changing The Prime Line
Changing the Prime Line The prime line is the line that is automatically selected when you lift the handset or press or P or D. The default setting for prime line is Line 1. You can select either line as your prime line. To change the prime line: Press I. -
Page 18: Directory
Directory The 9120 telephone directory can store the names and telephone numbers of your business associates, clients, contacts, friends and relatives. Directory names There is a maximum of 100 entries in your Directory. Names are sorted alphabetically starting with their Þrst character. If you want your Directory sorted by the last name, enter the last name Þrst. -
Page 19: Saving An Active Call Into The Directory
Saving an active call into the Directory To save an active call: Answer or make a call. Press K. Press J. If the name was displayed with the number, both are now saved in the Directory. If no name is displayed, you are prompted to enter one. If you do not want to enter a name, go to step 5. -
Page 20: Finding Items In The Directory
Finding items in the Directory To find items in the Directory: To see the Directory List heading, press J. Use the W and V to look at each individual directory entry one at a time. To leave the Directory at any time, press J or N. Editing in the Directory To edit a number and/or name in the Directory: Press J. -
Page 21: Callers List
Callers List Using the Callers List The 9120 telephone stores up to 100 calls in the Callers List. Your telephone logs the number (and name if available) of the caller, when they last called, and the number of times they tried to reach you. When the Callers List is full, the oldest call records are deleted to accommodate the information of new callers. -
Page 22: Finding An Item In The Callers List
Finding an item in the Callers List To find items in the Callers List: To see the Callers List heading, press A. Press Y . Press V to view other caller records one at a time starting from the second most recent caller. -
Page 23: Saving Callers List Numbers To The Directory Or A Memory Key
To have the Callers List show local numbers without the area code and internal num- Entering area codes bers as extensions, see To dial back a long distance number in the Callers List: Press A Select a Line key. Use V or W to Þnd the item you want to edit. Using the dial pad, press To dial the edited number, lift the handset or press either P, D or If you want to save the number to the directory, press K. -
Page 24: Memory Keys
Saving numbers and names into memory keys You can save up to 14 speed dial numbers and names of your customers, business associates, or anyone you call frequently in 9120’s seven memory keys. You can store more numbers and names in the Directory. See the information. -
Page 25: Saving An Active Call Into A Memory Key
Saving numbers and names into shift memory keys Use to access the seven memory position. To save a number and name to a shift memory key: Press K. Press the memory key, in this case press shift then the memory key . Enter the number using the dial pad. -
Page 26: Making Calls From Memory Keys
Making calls from memory keys To call from a memory key: Lift the handset or press P or Y or D. Press the memory key with the num- ber you want to dial out. Note: If the Live dial pad option is turned on, you do not have to lift the handset or press any other button. -
Page 27: Using Feature Keys
To save a Feature On code: Enter the telephone company fea- ture code for turning the feature on. Read the display to conÞrm the number. Press K. Enter the feature name using the dial pad. (See Entering Names page 16.) Press K. -
Page 28: Using Feature Light Keys
To save a FeatureLight On key: Enter the telephone company fea- ture code for turning the feature on. Read the display to conÞrm the number. Press K. Label the memory key. † Note: Contact your telephone company for the appropriate feature codes. Using Feature Light keys To turn a feature and light on or off: Press the memory key where you stored the FeatureLight. -
Page 29: Advanced Options
Press N. Entering area codes When you enter an area code or preÞx using this feature, your 9120 telephone will remove that code or preÞx from incoming numbers. For example, if you enter your area code into this option, all calls in your area code will appear in the Callers List with the area code stripped off (the area code will appear in brackets after the num- ber). -
Page 30: The Secure Numbers Feature
Press N. The Secure Numbers Feature The 9120 telephone is equipped with a Secure Numbers feature to keep selected num- bers private when you dial. When you have entered a secure number using this option, your telephone does not display or store the digits that you dial after that secure number. -
Page 31: Using A Headset With Your Telephone
Note: When the headset mode is enabled, the handset must remain in the cradle. Extension in use When you lift the handset or press P, the 9120 telephone automatically selects the prime line. If your prime line is Line 2 and the peripheral device (e.g. fax machine) -
Page 32: Display Icons And Messages
The call was answered Knowing when you have a message 9120 set indicator light lets you know that your Voice Mail system has a message for you. The set indicator light ßashes slowly and the display shows after your Voice Mail has received a call. Contact your local telephone company to Þnd out how you can subscribe to Voice Mail services. -
Page 33: General Display Messages
General display messages Message What it means If there is no dial tone, make sure the line cord and hand- set cord are attached securely. The Directory remains empty until you add numbers and names to it. The Directory has a 100 entry limit. If you want to add an item, delete an item you no longer use. -
Page 34: Callers List Display Messages
Callers List display messages Message Learning about the lights The set indicator light also alerts you when another extension is on the same line you’re using, the telephone rings, or a feature is on. There are also indicator lights beside the line keys and P to show you the status of the lines and of Handsfree and Mute. -
Page 35: Set Indicator Light Messages
Line and Handsfree indicator light messages Feature Extension in use Call is ringing on a line Call is on hold Call is on Handsfree Line is in use Microphone is muted Viewing multiple display and light messages When you aren’t using the telephone, there are several messages that can be active at any time, such as date and time, . -
Page 36: Troubleshooting
The power is out and the display is blank. The 9120 still operates as a regular telephone during a power failure. You can dial using the dial pad and you can receive calls, but the other keys and the display do not operate until the power is restored. - Page 37 The light is stuck on, and the message is displaying. A Feature Light On code has been entered, and you need to program a Feature Light Off key. Follow the steps that appear in on page 25. Using Feature Light keys Live dialpad has stopped working.
- Page 38 Answering a call 26, 27 Area codes Call Waiting Identification Callers List deleting in editing finding items making a call saving to the Directory or a memory key set up Calling from a memory key from the Callers List from the Directory from the Redial List Date and time automatic...
- Page 39 Lights set indicator lights Memory keys deleting editing labeling making calls from saving features saving numbers and names 3, 10 Mute Names entering 3, 12, 27 Options Prime line answering changing 26, 28 selecting Redial Saving feature codes to memory keys from Callers List to Directo- ry or memory key...
- Page 40 ENERAL INQUIRIES If you have read the guide and you still have questions, call 1-800-574-1611 in Canada and the USA. In other areas, contact your telephone company. © Aastra Telecom Inc., 2003 41-0052-00 Rev 02...
Need help?
Do you have a question about the 9120 and is the answer not in the manual?
Questions and answers