Table of Contents
Advertisement
Available languages
Available languages
PRO SESSION DRUMS
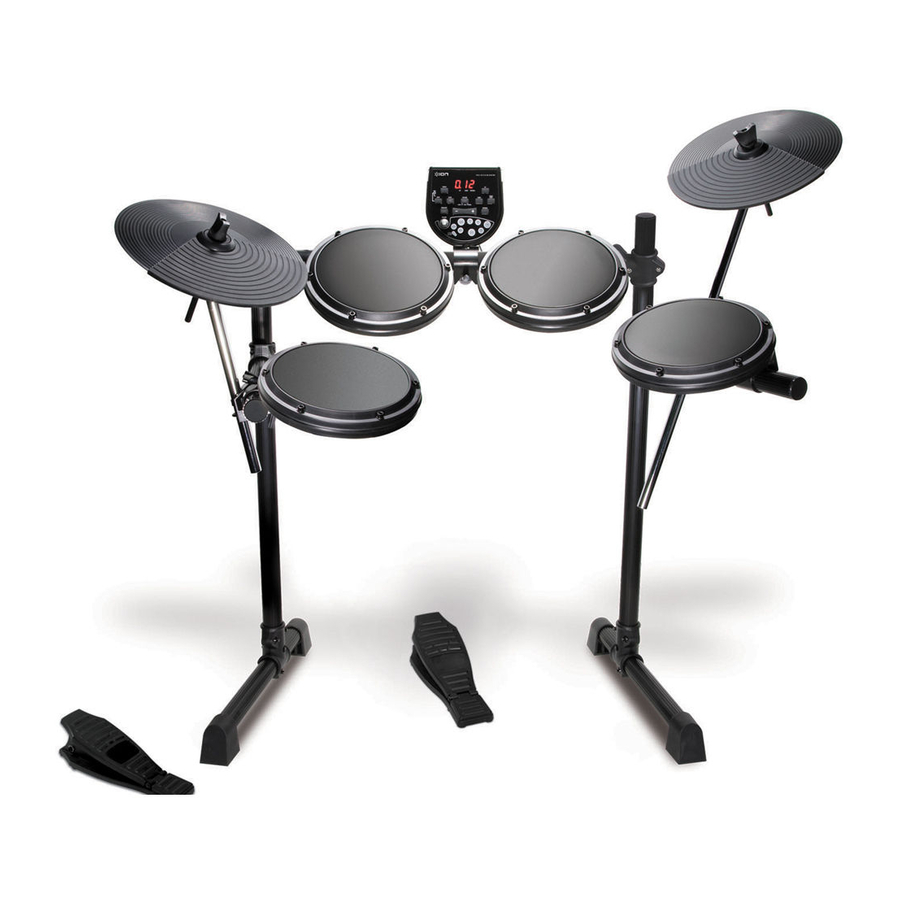
HIGH QUALITY ELECTRONIC DRUM SET
MODULE OVERVIEW
::: ENGLISH ( 1-5 ) :::
VISTA DEL MÓDULO
::: ESPAÑOL ( 6-10 ) :::
CARACTERISTIQUES DU MODULE
::: FRANÇAIS ( 11 - 15 ) :::
OBERSEITE DER MODUL
::: DEUTSCH ( 16 - 20 ) :::
PANORAMICA DI MODULO
::: ITALIANO ( 21 - 25 ) :::
MODULE OVERZICHT
::: NEDERLANDS ( 26 - 30 ) :::
Advertisement
Table of Contents

Related Manuals for ION PRO SESSION


Summary of Contents for ION PRO SESSION
- Page 1 PRO SESSION DRUMS HIGH QUALITY ELECTRONIC DRUM SET MODULE OVERVIEW ::: ENGLISH ( 1-5 ) ::: VISTA DEL MÓDULO ::: ESPAÑOL ( 6-10 ) ::: CARACTERISTIQUES DU MODULE ::: FRANÇAIS ( 11 - 15 ) ::: OBERSEITE DER MODUL ::: DEUTSCH ( 16 - 20 ) :::...
-
Page 2: Front Panel Features
INTRODUCTION To get started using your ION PRO SESSION DRUMS, assemble the drum kit and connect your drums to the module, as explained in the included Assembly Poster. Connect a speaker system to the STEREO OUTPUT jack on the rear panel (or headphones to the HEADPHONE jack). -
Page 3: Rear Panel Features
REAR PANEL FEATURES POWER IN – Connect the power adapter here, then connect the adapter to wall power before turning on the module. POWER SWITCH – Turns the module on or off. HEADPHONES – To practice quietly, you can connect a set of headphones with 1/8”... -
Page 4: Saving Kits
CREATING CUSTOM KITS There are 108 built-in Sounds that you can choose from to customize the sound of the pads. To assign a drum sound to a pad: Press SOUND to enter Sound Select Mode. The LCD will display the current Sound number and the Sound Indicator will light up. -
Page 5: Adjusting The Metronome Volume
SELECTING THE TIME SIGNATURE A time signature defines how many beats there are to a bar. In other words, this describes how a drummer keeps time and rhythm. The most common time signature is 4/4 (ONE, two, three, four, ONE, two, three four). Another common signature is 3/4 (ONE, two, three, ONE, two, three). -
Page 6: Factory Reset
To adjust the Pattern's tempo, press TEMPO to enter Tempo Adjustment Mode. The LCD will display the current tempo value for that Pattern (30–280 BPM or "beats per minute"). Use VALUE +/- to adjust the tempo of that Pattern. Press + and – simultaneously to return to the Pattern's default tempo. When you are finished, press PATTERN to re-enter Pattern Select Mode or press another button. -
Page 7: Descripción General
INTRODUCCIÓN Para comenzar a usar su ION PRO SESSION DRUMS, arme la batería y conéctela al módulo, como se explica en el póster de armado incluido. Conecte un sistema de altavoces al conector STEREO OUTPUT del panel trasero (o los auriculares al conector HEADPHONE). - Page 8 CARACTERÍSTICAS DEL PANEL TRASERO ENTRADA DE ALIMENTACIÓN – Conecte aquí el adaptador de alimentación y luego conecte dicho adaptador al tomacorriente de pared antes de encender el módulo. INTERRUPTOR DE ENCENDIDO – Enciende y apaga el módulo. AURICULARES – Para practicar silenciosamente, puede conectar a esta salida un juego de auriculares de 1/8".
- Page 9 CÓMO GUARDAR LOS KITS Si modificó un kit predeterminado o creó uno propio personalizado, es necesario que lo guarde en una de las cinco ranuras de kits del usuario (11 – 15) si desea usarlo más adelante. Para guardar un kit: Pulse SAVE para entrar al modo de guardar kits.
- Page 10 CÓMO AJUSTAR EL VOLUMEN DEL METRÓNOMO Para ajustar el volumen del metrónomo: Pulse CLICK para activar el metrónomo. Pulse VOLUME. La pantalla LCD muestra el volumen de ese momento. Use VALUE +/- para ajustar el volumen del metrónomo. Pulse CLICK cuando termine. PATRONES El patrón es la combinación de un beat de batería y la música de fondo.
-
Page 11: Cómo Grabar
CÓMO GRABAR Además de reproducir patrones predeterminados, usted puede grabar su interpretación en la ranura de patrón del usuario (Nº 41). Para grabar el patrón del usuario: Pulse y retenga SAVE / REC más de dos segundos para entra al modo de grabación lista. El LED REC comienza a parpadear para hacerle saber que está... -
Page 12: Vue D'ensemble
INTRODUCTION Afin de commencer à utiliser les ION PRO SESSION DRUMS, assemblez la batterie et branchez-la ensuite au module tel qu’illustré dans le guide d’assemblage. Branchez le système de sonorisation à la sortie stéréo du panneau arrière (ou le casque d’écoute à la sortie casque). -
Page 13: Caractéristiques Du Panneau Arrière
CARACTÉRISTIQUES DU PANNEAU ARRIÈRE ALIMENTATION – Branchez le câble d'alimentation, puis à une prise de courant avant de mettre le module sous tension. INTERRUPTEUR POWER ON/OFF – Touche permettant de mettre le module sous et hors tension. PHONES – Sortie permettant de brancher un casque d’écoute 1/8 po afin de pratiquer silencieusement. -
Page 14: Réglage Du Tempo
SAUVEGARDER LES ENSEMBLES DE SONS DE BATTERIE Si vous avez modifié un ensemble de sons préréglé ou créé un ensemble de sons, vous devrez le sauvegarder à l’un des emplacements prévus pour les ensembles personnalisés (11 – 15) si vous désirez le conserver. Pour sauvegarder un ensemble de sons de batterie : Appuyez sur la touche SAVE pour activer le mode de sauvegarde des ensembles de sons de... - Page 15 SÉLECTION D’UN SON DE MÉTRONOME Pour sélectionner le son ( le clic) du métronome : Maintenez la touche CLICK enfoncée. Tout en maintenant la touche CLICK enfoncée, utilisez les touches VALUE +/- pour sélectionner un son (CL1, CL2, CL3 ou CL4). Vous pouvez choisir parmi un clic standard, un bip, une cloche ou une voix.
-
Page 16: Mise En Sourdine
ENREGISTREMENT En plus de faire jouer des enchaînements préréglés, vous pouvez enregistrer vos prestations à l'emplacement prévu pour enchaînement personnalisé (no 41). Pour enregistrer un enchaînement personnalisé : Maintenez la touche SAVE / REC enfoncée pendant plus de deux secondes afin de passer en mode d'enregistrement. -
Page 17: Bedienelemente Vorderseite
EINLEITUNG Damit Sie Ihr neues Produkt einsetzen können, bauen Sie das Schlagzeug zusammen und schließen Sie die Trommeln, wie auf der beiliegenden Bauanleitung erklärt, an das Modul an. Schließen Sie ein Lautsprechersystem an die Buchse STEREO OUTPUT an der Rückseite des Moduls (oder Kopfhörer an die HEADPHONE-Buchse) an. - Page 18 BEDIENELEMENTE RÜCKSEITE NETZ EIN – Hier den Netzadapter anschließen und diesen dann vor Einschalten des Moduls an die Steckdose anschließen. NETZSCHALTER – Ein- und Ausschalten des Moduls. KOPFHÖRER – Zum leisen Üben kann hier ein Kopfhörer über eine 3,18 mm Buchse angeschlossen werden. STEREOAUSGANG –...
- Page 19 Mit der Taste VALUE +/- können Sie eine Sound wählen. Um die Lautstärke des Drum-Tons einzustellen, drücken Sie auf VOLUME, um in den Lautstärkeeinstellmodus zu gelangen. Schlagen Sie nun das Pad, dessen Lautstärke Sie einstellen möchten, an und stellen Sie diese mit der Taste VALUE ein.
- Page 20 AUSWAHL DES METRONOMTONS Um den "Click"-Ton des Metronoms auszuwählen, müssen Sie: CLICK drücken und festhalten. Während CLICK gehalten wird, mit der Taste VALUE +/- den Klickton (“CL1”, “CL2”, “CL3” oder “CL4”) wählen. Sie können zwischen einem gewöhnlichen Metronom- Klicken, einem Piepton, einer Cowbell oder einer Stimme wählen.
- Page 21 AUFNAHME Neben der Wiedergabe ab Werk eingestellter Patterns können Sie auch Ihr eigenes Spiel aufnehmen und auf dem Speicherplatz für Anwender-Patterns (#41) ablegen. Um ein Anwender-Pattern aufzunehmen, müssen Sie: Die Taste SAVE / REC mehr als zwei Sekunden lang drücken, um in den Aufnahmebereitschaftsmodus zu gelangen.
- Page 22 INTRODUZIONE Per iniziare a utilizzare il vostro ION PRO SESSION DRUMS, montate la batteria e collegatela al modulo, come spiegato nel Poster di montaggio incluso. Collegate un sistema di casse al jack USCITA STEREO sul pannello posteriore (o le cufie all’apposito jack CUFFIE).
- Page 23 CARATTERISTICHE DEL PANNELLO POSTERIORE INGRESSO di ALIMENTAZIONE – Collegare l’adattatore di alimentazione a questo livello, quindi collegare l’adattatore alla presa elettrica a muro prima di accendere il modulo. INTERRUTTORE di ALIMENTAZIONE – Accende e spegne il modulo (ON/OFF). CUFFIE – Per esercitarsi in silenzio, collegare un set di cuffie dal jack da 1/8”...
- Page 24 SALVATAGGIO DEI KIT Se avete modificato un kit predefinito, oppure creato un kit personalizzato, sarà necessario salvarlo in uno dei posti riservati ai 5 kit utente (User Kit) (11 – 15) se si desidera riutilizzarlo in un secondo momento. Per salvare un Kit: Premere SAVE per entrare in modalità...
- Page 25 REGOLAZIONE DEL VOLUME DEL METRONOMO Per regolare il volume del metronomo: Premere CLICK per attivare il metronomo. Premere VOLUME. Sul display LCD appare il livello di volume attuale. Servirsi di VALUE +/- per regolare il volume del metronomo. Premere CLICK una volta terminato. PATTERN Un Pattern descrive una combinazione di battiti di batteria e di musica di sottofondo.
- Page 26 REGISTRAZIONE Oltre a riprodurre i Pattern predefiniti, è possibile registrare la propria esibizione nello slot del pattern utente (#41). Per registrare il Pattern utente: Tenere premuto SAVE / REC per più di due secondi per entrare in modalità di registrazione (Record Ready Mode).
- Page 27 INLEIDING Om te beginnen met uw ION PRO SESSION DRUMS monteert u de drum en sluit u de drums aan op de module, zoals wordt uitgelegd in de meegeleverde Montageposter. Sluit een speakersysteem aan op de uitgang voor STEREO OUTPUT op het achterpaneel (of een koptelefoon op aansluiting HEADPHONE).
- Page 28 FUNCTIES ACHTERPANEEL POWER IN – Sluit de stroomadapter hier aan; sluit de adapter daarna aan op een wandcontactdoos voordat de module wordt ingeschakeld. POWER SWITCH – Schakelt de module in of uit. HEADPHONES – Om in stilte te oefenen kan een koptelefoon met een stekker van 1/8"...
- Page 29 CREËREN VAN AANGEPASTE KITS Er zijn 108 ingebouwde geluiden (Sounds genoemd) meegeleverd, waaruit gekozen kan worden om het geluid van de drumkussens aan te passen. Om een drumgeluid aan een drumkussen toe te wijzen: Druk op SOUND om te schakelen naar modus Sound Select (stem selecteren).
- Page 30 SELECTEREN VAN MAATTEKEN EN AANPASSEN VAN VOLUME Een maatteken definieert het aantal beats in een 'maat'. Hier wordt, in andere woorden, aangegeven hoe een drummer tijd en ritme bijhoudt. Het meest gebruikte maatteken is 4/4 (EEn, twee, drie, vier, EEN, twee, drie, vier).
- Page 31 Om het tempo van het patroon aan te passen, wordt op TEMPO gedrukt om te schakelen naar modus Tempo Adjustment. De LCD zal de huidige tempowaarde aangeven voor het betreffende patroon (30–280 BPM of "beats per minute"). Gebruik VALUE +/- om het tempo van dit patroon aan te passen. Druk tegelijk op + en - om terug te keren naar het standaard tempo van het patroon.
-
Page 32: Specifications
SPECIFICATIONS Triggers: 4 drum pads, 2 cymbals, 2 footswitch pedals Sounds: 108 sounds Drum Kits: 10 preset kits, 5 user kits Patterns: 40 preset patterns, 1 user pattern Display: Connections: Headphones, Stereo Output, Mix Input, Power, Trigger Input connection for cable snake (included) Power Supply: AC adapter (9V), included...
Need help?
Do you have a question about the PRO SESSION and is the answer not in the manual?
Questions and answers