Table of Contents
Advertisement
Available languages
Available languages
Quick Links
perator s
nual
PROFESSIONAL
33-inch
Wide Cut Mower
Model No. 247.88998
CAUTION:
Before
using this
product,
read this manual
and
follow
all safety
rules and operating
instructions.
,
SAFETY
,
ASSEMBLY
,
OPERATION
,
MAINTENANCE
,
PARTS LIST
,
ESPANOL R 51
Sears Brands
Management
Corporation,
Hoffman
Estates,
IL 60179, U.S.A.
Visit our
website:
www.craftsman.com
FormNo.769-06544A
(December 1 6,2010)
Advertisement
Table of Contents

Related Manuals for Craftsman Professional 247.88998


Summary of Contents for Craftsman Professional 247.88998
- Page 1 ASSEMBLY OPERATION CAUTION: Before using this MAINTENANCE product, read this manual PARTS LIST follow all safety rules and operating ESPANOL R 51 instructions. Sears Brands Management Corporation, Hoffman Estates, IL 60179, U.S.A. Visit our website: www.craftsman.com FormNo.769-06544A (December 1 6,2010)
- Page 2 This warrantyappliesfor onlyone yearfromthe dateof purchaseif this productis everusedwhileprovidingcommercialservicesor if rentedto anotherperson. Forwarranty coveragedetails to obtain repairor replacement, v isit the website: www.craftsman.com. ThiswarrantycoversONLYdefects in materialand workmanship. Warranty coverage does NOT include: • Expendableitemsthat becomewornduringnormaluse, including b utnot limitedto blades,spark plugs,air cleaners,belts,and oil filters.
-
Page 3: California Proposition
This machinewas builtto be operatedaccordingto the safeopera- This symbolpointsout importantsafetyinstructionswhich,if not tion practicesin this manual.As with anytype of powerequipment, followed,couldendangerthepersonalsafetyand/orpropertyof carelessnessor error on the partof the operatorcan resultin serious yourselfand others. Readand followall instructionsin this manual injury.This machineis capableof amputatingfingers,hands,toes beforeattemptingto operatethis machine.Failureto complywith and feet and throwingdebris.Failureto observethe followingsafety these instructionsmay resultin personalinjury.Whenyou seethis... -
Page 4: Slope Operation
• The bladecontrolhandleis a safetydevice.Neverattemptto bypassits operation.Doingso makesthe safetydevice inopera- Mowacrossthefaced slopes;neverup and down.Exercise tive and may resultin personalinjurythroughcontactwith the extremecautionwhenchangingdirectionon slopes. rotatingblade.The bladecontrol handlemustoperateeasily • Watchfor holes,ruts, rocks,hiddenobjects,or bumpswhich can in bothdirectionsand automaticallyreturnto the disengaged causeyou to slip or trip. Tallgrass can hideobstacles. positionwhenreleased. -
Page 5: Spark Arrestor
• Extinguishall cigarettes,cigars,pipesand othersources Donot changethe engine'sgovernorsettingor over-speed the of ignition. engine.Thegovernorcontrolsthe maximumsafe operatingspeed of the engine. • Neverfuelmachineindoorsbecauseflammablevaporswill accumulatein the area. Checkfuel line,tank,cap, and fittings frequentlyfor cracksor leaks.Replaceifnecessary. • Neverremovegas cap or add fuel whileengineis hotor running. Allowengineto coolat leasttwo minutesbeforerefueling. Donot crankenginewith sparkplug removed. -
Page 6: Safety Symbols
SAFETY SYMBOLS This pagedepictsand describessafetysymbolsthat mayappear on this product. Read,understand,and followall instructionson the machine beforeattemptingto assembleand operate. READ THE OPERATOR'S MANUAL(S) Read, understand, and follow all instructions in the manual(s) before attempting to assemble operate DANGER -- ROTATING BLADES To reduce the risk of injury, keep hands and feet away. Do not operate unless discharge cover or grass catcher is in its proper place. - Page 7 or a corner of a building... 15 ° Use this page as a guide to determine slopes where you may not operate safely. Do notoperateyour lawnmoweron such slopes.Donot mowon inclineswith a slopein excessof 15degrees(a riseof approximately 2-1/2feet every 10feet). Operatewalk- behindmowersacrossthe face of slopes,neverup and downslopes.
- Page 9 This page left intentionally blank.
-
Page 10: Tools Needed For Assembly
IMPORTANT:This unitis shippedwith oil in the engine.After Attaching the Battery Cables assembly,see page 15for fuel andoil details. NOTE: The positivebatteryterminalis markedPos. (+).The negative IMPORTANT:Referenceto rightor left side of the moweris observed batteryterminalis markedNeg. (-). fromthe operatingposition. The positivecable (heavyred wire)is securedto the positivebattery terminal(+)with a hex boltand hex nutat thefactory. - Page 11 Unfolding the Handle Attaching the Shift Lever Removethe screwandthe lock nutthat securesthe shift leverto Removethestar knobsand carriagescrewsfrom thelower handle.See Figure3. the shift leverplate.See Figure5. Figure3 Figure5 Pivotthe upper handleintooperatingposition.Be careful notto Removethe remainingscrewand nut from the lowershiftlever crimpcables.See Figure4. plate.See Figure5. Positionthe uppershift leverintoa verticalpositionaligningthe holesin the leverwith the holesin the shift plate.See Figure6.
-
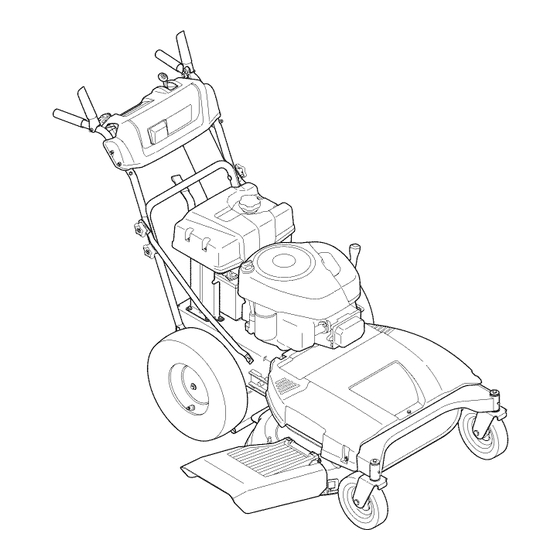
Page 12: Engine Controls
Fuel Tank Ca Deck Height ignition Switch Lever ===='_ Systems indicator Monitor Drive Control Gear Shift Lever Figure7 Spark Plug Referto the Maintenance sectionfor instructions on spark plug replacement. Cleaner Oil Cap/Dipstick Handle Dipstick Referto the Maintenance sectionfor instructions on checkingthe oil. MOWER CONTROLS Referto Figure7 for locationsof the mowercontrols. - Page 13 Drive Control Deck Height Lever Use this leverto adjustthe mowingdeck'scuttingheight.To use,move The drivecontrolis usedto engageand the leverto the left, then placetheleverin the notchbest suitedfor disengagedriveto the wheels.Toengage yourapplication. this control,squeezethe drivecontrol againstthe handlebargrip.To stopthe drive, releasethedrive control. ignition Switch Neverleavea runningmachineunattended.Alwaysdisengage blades,stopengine and removekey to preventunintendedstarting.
-
Page 14: Gear Shift Lever
GEAR SHIFT LEVER SYSTEMS INDICATOR MONITOR/HOUR METER BATTERY j j/ Use this leverto selectanyof four forwardgroundspeeds,neutral,or 42.0 reverse. Forward HOURS 1/10 \\\ Fourforwardspeedsare available.Positionone (1) is the slowestand positionfour(4) is thefastest. Reverse Toselectreverse,putthe leverin the Reverse(R) position. Figure10 Lookbehindthe mowerbeforeand during reverseoperation.Stopthe Whenthe ignition key is rotatedout of the STOPpositionbut not mowerbladesbeforeoperatingin reverse. -
Page 15: Gas And Oil Fill-Up
AND OiL FILL-UP IMPORTANT:This unitis shippedwithoutgasolinebutwith oil in the engine.Becertain to serviceenginewith gasolineand checkthe oil as instructedin this sectionbeforestartingor runningyour machine. Use 4-strokemotoroil that meetsor exceedsthe requirements for API servicecategorySF,SG,SH, SJ or later.Alwayscheckthe APIservice label on the oil containerto be sure it includesthe lettersSF,SG,SH, SJ or later. -
Page 16: Starting The Engine
STARTING THE ENGINE Totravel in REVERSE, Checkthat the area behindis clear. Disengageall controlson the mower. Placethe gear shift leverin Reverse(R). Movethe gear shiftleverinto the neutral(N) position. Slowlysqueeze the DriveControl a gainsttheleft handlegrip Insertthe key intothe ignitionswitch. and themowerwill move.Releaseitand drivemotionwillstop. If startinga cold engine,placethe throttle/chokecontrolall the wayforward,intothe CHOKE1_.1 position.If restartinga warm engine,placethe throttle/chokecontrolintothe Fast_... -
Page 17: Belts
USING THE DECK HEIGHT LEVER INSTALLING/REMOVING MULCH BAFFLE Toraiseor lowerthecuttingdeck, movethe deck heightleverto the left,then placeit in the notch best suitedforyour application. Beforeinstallingor removingthe mulchbaffle,disengageblades,sto MOWING the engineand removekeyto preventunintendedstarting. Thefollowinginformationwill be helpfulwhenoperatingyour mower. Stoptheengineand wait for all parts to stop moving. Installing the Mulch Baffle Planyour mowingpatternto avoiddischargeof materialstoward... -
Page 18: Maintenance
MAINTENANCE SCHEDULE 1st5 hours Engineoil Change Mowerblades Every8 hoursor Daily As required Looseor missinghardware Tightenor replace Belts Check Check Engineoil level Controls Checkfor properoperation Mulchplug (if fitted) Checkfor properplug installation 25 hours Clean* Air filter/pre-cleanerf Mowerblades Sharpenand balance Controllinkagesand pivots Lubewith lightoil 50 hours EngineOil... -
Page 19: General Recommendations
MAINTENANCE Togain accessto theoil drain valveon the engine,pivotthe right handlebracetube forward. Removethe upperstar knoband carriagescrewon the right Beforeperformingany maintenance or repairs,disengageblades, sideof the handle,Figure13. stopengine and removekey to preventunintendedstarting. Pivotthe bracetube towardsthe frontof the mowerto allow roomto connectthe oil drain hoseto the oil drain valve, GENERAL RECOMMENDATIONS Figure13. - Page 20 Releasethe valve bypressingthe two tabs inwardwhilepulling Servicing the Air Filter thevalve out, Theoil will beginto drain out of the engine, Afterthe oil has finisheddraining,pressthe two tabs inwardand If filters,or coversare notinstalledcorrectlyseriousinjuryor death pushthe oil drain valveback in to lock the valveclosed,Remove could resultfrom backfire.Do notattemptto startthe enginewith the hose,and re-capthe end of the oil drain valveto keepdebris them removed.
-
Page 21: Tire Pressure
BATTERY Positionthe moweron a level,clear spoton yourlawn,near enoughfor yourgardenhoseto reach. Batteryposts,terminals,and relatedaccessoriescontainlead and Makecertain the mower'sdischargechuteis directedAWAYfrom leadcompounds,chemicalsknownto the State of Californiato cause yourhouse,garage,parkedcars,etc. cancer and reproductiveharm.Washhandsafter handling. Thebatteryis sealedand is maintenance-free. Acid levelscannotbe Threadthe hosecoupler(packagedwith your mower'sOperator's checkedand fluidcan not be added. Manual)onto the end of yourgardenhose. - Page 22 BLADE TIMING BELT Pivot Points & Linkage Lubricateall thepivot pointson the drivesystemand lift linkageat The cuttingdeck spindlesare drivenby a timing(cogged)belt, leastonce a seasonwith lightoil. assuringthat the deck bladesare alwaysperpendicular t o eachother. At leastoncea season,or after strikingany foreignobject,checkthe Rear Wheels timing beltas follows: The rearwheelsshouldbe removed from the axles oncea season.
-
Page 23: Cutting Deck Removal
CUTTING DECK REMOVAL If thearrowson the surfaceof each spindlepulleyare not perpendicular(ata 90°angle) to eachother,seeyour Searsor otherqualifiedservicedealerto havethe timingbelt reset. Beforeperforminganymaintenanceor repairs,disengageblades, stop engineand removekey to preventunintendedstarting. Do notoperatethe machinewithoutthe deck'stimingbelt properly To removethe cuttingdeck,proceedas follows: set. Failureto followthis instructioncould resultin personalinjuryor propertydamage. - Page 24 Removethe screwand flangenut whichsecuresthe belt keeper 10. Carefullyunhookthe mower'slift assemblyfrom the reardeck rod to the left sideof the mower'sframe.See Figure23. supports. 11. Usethe deck heightleverto raisethe lift assemblyto its highest position. 12. Removethe woodenblocksfrom underthe deck and gentlyslide the cuttingdeck towardthe rearof the machine. 13.
-
Page 25: Cutting Blades
CUTTING BLADES To properlysharpenthe cuttingblades,removeequalamounts of metalfrom bothendsof the bladesalongthe cuttingedges, parallelto the trailingedge,at a 250.to 300angle.Alwaysgrind eachcutting bladeedge equallyto maintainproperblade balance. Shutthe engineoff and removeignitionkey beforeremovingthe See Figure27. cutting blade(s)for sharpeningor replacement. P rotectyourhandsb usingheavygloveswhengraspingthe blade. If the cuttingedgeof the blade has previouslybeen sharpened, o r if any metalseparationis present,replacethe bladeswith newones. -
Page 26: Trail Shield
TRAIL SHIELD Jump Starting Neverjumpstart a damagedor frozenbattery.Be certainthe vehicles Neveroperatethe mowerwithoutthe trailshieldin placeand working. do nottouch,and ignitionsare off. Do notallowcableclampsto Failureto do socan result inpersonalinjury. touch. Toreplacethe trail shield,proceedas follows: Connectpositive(+) cableto positivepost(+) of yourmower's Removethe screwwhich securesthetrail shieldto the right side dischargedbattery. -
Page 27: Changing The Transmission
CHANGING THE DECK ENGAGEMENT BELT CHANGING THE DECK TIMING BELT Several c omponentsmustbe removed and specialtools usedin order to changethe mowerdeck'stimingbelt. See yourSearsor Shutthe engineoff and removeignitionkey beforeremovingthe otherqualifiedservicedealer to havethe deck timing belt replaced. cutting blade(s)for sharpeningor replacement. P rotectyourhandsb CHANGING THE TRANSMISSION DRIVE BELT... -
Page 28: Preparing The Engine
Neverstorelawnmowerwith fuel in tank indoorsor in poorly ventilatedareaswherefuel fumesmay reachan openflame,spark, or pilot lightas on a furnace,water heater,clothesdryer,or gas appliance. PREPARING THE ENGINE PREPARING THE LAWN MOWER Forenginesstoredover30 days: • Whenstoringthe mowerin an unventilated or metalstorageshed, careshouldbe taken to rustproofthe non-paintedsurfaces.Using Topreventgum from formingin fuel systemor on carburetor a lightoil or silicone,coatthe equipment,especiallyany springs, parts,run engine untilit stopsfrom lack of fuel or add a gasoline... -
Page 29: Need More Help
Beforeperforming anytyped maintenance/service, disengage all controlsandstoptheengine.Waituntilall movingpartshavecometo a complete stop.Disconnect sparkplugwireandgroundit against t he engineto prevent u nintended starting. A lwayswearsafetyglassesduring operation or whileperforming anyadjustments or repairs. Chokenotactivated Enginefails to start Placethrottle/chokecontrol leverinto chokeposition. Throttle/chokecontrolnot in correctposition Placethrottle/chokeleverintofast position. Sparkplugwire disconnected Connectwires to sparkplug. - Page 30 Craftsman 33-inch Wide Cut Mower B Model No. 247.88998...
- Page 31 Craftsman 33-inch Wide Cut Mower B Model No. 247.88998 687-02427 738-04216A Bolt, Shoulder, .625 x 2.515 x 3/8-16 Lever Assembly- 687-02426 741-0660A Flange Bearing, .760 x .941 x 1.0 Lever Assembly- 710-0572 787-01496-4028 Height Adjustment Bracket Screw, Carriage, 5/16-18 x 2.25...
- Page 32 Craftsman 33=inch Wide Cut Mower B Model No. 247.88998 _/37...
- Page 33 Craftsman 33-inch Wide Cut Mower B Model No. 247.88998 17840-0637 Transaxle Bracket Mount 918-04438C Drive Spindle Assembly 918-04639 Transmission 4-Speed 918-04439C Spacer Spindle Assembly 710-0176 Screw, HH Cap, 5/16-18 x 2.75" 631-04252 Mulch Plug 710-0376 Screw, NN Cap, 5/16-18 × 1.00"...
- Page 34 Craftsman 33=inch Wide Cut Mower m Model No. 247.88998 20,,_/22 34 / MODELand SERIAL NUMBERS HERE...
- Page 35 Craftsman 33=inch Wide Cut Mower B Model No. 247.88998 TC-772147 TransaxleCover TC-790075 BrakeDisk TC-790007 BrakePad Plate TC-780086A NeedleBearing(1/,,long) TC-770128A TransaxleCase TC-799021A BrakePad (pkg.of 2) TC-776395 Countershaft TC-786026 DowelPin .3125"x .750" 736-3078 Washer.312"ID .059" TC-776409 OutputShaft TC-790104 BrakeLever T0-778364 Spur Gear(38T-PM/SER) TC-792177 Screw1/4-20x 1-3/8"...
- Page 36 Craftsman Engine Model No. 219807=3712=G1 For Craftsman Mower Model No. 247.88998 48 SHORT BLOCK 11058OPERATOR'S MANUAq [1329 REPLACEMENT ENGINE ] 1330 REPAIR MANUAL 684 _j 584 -_ 1264 1263 _-_--, 404 0 o14 i l 562: 27 <> 307 _)
- Page 37 Craftsman Engine Model No. 219807=3712=G1 For Craftsman Mower Model No. 247.88998 1022 1034 1O29 870_ $1 _i_'_; 914 _ 1022 634_ 217_ 108_j 633 c_ 13o _ t_i:i 654,:_ 987 _ 1026 _ 1091 1270 I '_< '% _ 1266...
- Page 38 Craftsman Engine Model No. 219807-3712-G1 For Craftsman Mower Model No. 247.88998 U: j I <_--Z' 677 _ ji_.- "y \./J 1119...
- Page 39 Craftsman Engine Model No. 219807-3712-G1 For Craftsman Mower Model No. 247.88998 1036 EMISSIONS LABEL 305A 305B 305C .., 8Ol ___._- ; / 729_ 697_ 1044...
- Page 40 Craftsman Engine Model No. 219807=3712=G1 For Craftsman Mower Model No. 247.88998 121 CARBURETOR OVERHAUL 104_ 217(_ 617 _f_ 633 _ 987 c'_ 1266 _,_ 127 _ 358 ENGINE GASKET SET 1O22 524 0 842 F-, 617 O 1266 l_ 691 _'...
- Page 41 Craftsman Engine Model No. 219807=3712=G1 For Craftsman Mower Model No. 247.88998 CylinderAssembly Guard-Flywheel 399265 Kit-Bushing/Seal ( MagnetoSide) 499586 Keeper-Valve 391086s SeaI-Oil(MagnetoSide) 691968 Slinger-Governor/Oil 697106 Sump-Engine 690564 Tappet-Valve 793880 Camshaft 796183 Head-Cylinder 697740 ShortBlock 273280s Gasket-Cylinder H ead 697109 Gasket-Breather 796188...
- Page 42 Craftsman Engine Model No. 219807=3712=G1 For Craftsman Mower Model No. 247.88998 Kit-ChokeShaft 795315 Armature-Magneto 691639 Key-Timing 691061 Screw(MagnetoArmature) 794873 Connector-Hose (IntakeManifold) 491055s Plug-Spark 791805 Line-Fuel ( Formed)(Cutto RequiredLength) 796181 GasketSet-Engine 691693 Screw (ControlBracket) 691691 Washer(GovernorCrank) 691986 Adjuster-Rocker A rm 794129...
- Page 43 Craftsman Engine Model No. 219807=3712=G1 For Craftsman Mower Model No. 247.88998 Seal-Throttle Shaft Spring/SealAssembly(ChokeShaft) 691909 Boot-Spark Plug 1005 796082 Fan-Flywheel 1022 272475s Gasket-Rocker C over 690958 Nut(Carburetor) 795036 Deflector-Muffler 1023 797421 Cover-Rocker 690661 Screw (MufflerDeflector) 1026 794573 Rod-Push(Exhaust) 692407 Seal-Governor S haft...
- Page 44 777S30145 777D15546 777122793 777122808 777D15613 777S30117 777D15612 777122759 777122760 777122814 777122815 777122809 777X43688 ;; 1. Insert Mulch Plug's front into slot on outside of deck. :: 2. Pivot Mulch Plug inboard into discharge opening, 3. Slide rearward until slot bottoms against edge of discharge...
- Page 46 FEDERAL and/or CALIFORNIA EMISSION CONTROL WARRANTY STATEMENT YOUR WARRANTY RIGHTS AND OBLIGATIONS MTDConsumerGroupInc,the United StatesEnvironmental P rotectionAgency (EPA),and, forthose productscertifiedfor sale in the stateof California,the CaliforniaAir ResourcesBoard(CARB)are pleasedto explainthe emission(evaporativeand/or exhaust)controlsystem(ECS) warrantyon youroutdoor 2006 andlater smalloff-roadspark-ignitedengine andequipment(outdoorequipmentengine)In California,new outdoorequipmentengines mustbe designed,built and equippedto meetthe State'sstringentanti-smog standards(in otherstates, 1997andlater modelyear equipmentmustbe designed,built, and equippedto meet the U.S.
-
Page 47: Warranted Parts
WARRANTED PARTS: The repairor replacementof any warrantedpart otherwiseeligiblefor warrantycoveragemay be excludedfrom such warrantycoverageif MTDConsumerGroup Inc demonstratesthatthe outdoor equipmentengine has beenabused,neglected,or improperlymaintained,and thatsuch abuse, neglect,or impropermainte- nancewasthe direct causeof the needfor repairor replacementof the part. That notwithstanding, a ny adjustmentof a component t hat hasa factory installed, andproperlyoperating,adjustmentlimitingdevice is still eligible for warrantycoverage. - Page 48 (Thispage applicablein the U.S.A.and Canadaonly.) Sears Brands Management Corporation (Sears), the California Air Resources Board (CARD) and the United States Environmental Protection Agency (U.S. EPA) Emission Control System Warranty Statement (Owner's Defect Warranty Rights and Obligations) EMISSIONCONTROL WARRANTY COVERAGEISAPPLICABLE TO CERTI- YEAR 1997AND LATERENGINES WHICHARE PURCHASED AND USED FIEDENGINESPURCHASEDIN CALIFORNIAIN 1995ANDTHEREAF- ELSEWHERE IN THE UNITEDSTATES (ANDAFTERJANUARY1,2001 IN...
- Page 49 Look For Relevant Emissions Durability Period and Air index information On Your Engine Emissions Label Engines that are certified to meet the California Air Resources Board (CARB) Tier 2 Emission Standards must display information regarding the Emissions Durability Period and the Air Index. Sears Brands Management Corporation makes this information available to the consumer on our emission...
- Page 50 Congratulations on makinga smartpurchase.YournewCraftsman@ Onceyou purchasethe Agreement,a simplephonecall is all that it productis designedand manufactured for yearsof dependableopera- takesfor youto scheduleservice.Youcan call anytimedayor night,or tion. But likeall products,it may requirerepairfrom time to time.That's schedulea serviceappointmentonline. whenhavinga RepairProtectionAgreementcansave youmoneyand The RepairProtectionAgreementis a risk-freepurchase.If youcancel aggravation.
- Page 51 Cubierta posterior GARANTiA COMPLETA Y PROFESIONAL DE CRAFTSMAN POR DOS AMOS PORDOSAMOSa partir de la fechade lacompra,este productoest_ garantizadopor defectosen losmaterialesy la manode obra. Los productosdefectuososser_nreparadossin costoo reemplazados sin costosi la reparaci6nno est_ disponible. La garanfias61o ser_v_lidaduranteun a_o a partirde la fecha de comprasi este productose usaen cualquiermomentopara fines comerciales o de alquiler.
- Page 52 Esta rn_.quina rueconstruidapara seroperadade acuerdocon La presenciade este sirnboloindicaque setrata de instrucciones las reglasde seguridadcontenidasen este manual.AI igualque irnportantes de seguridadque se deben respetarpara evitar concualquiertipo de equipo rnotorizado, u n descuidoo error por poneren peligrosu seguridadpersonaly/o materialy la de otras partedel operadorpuedeproducirlesionesgraves.Estarn_.quina personas.Lea y sigatodas lasinstruccionesde este manualantes es capazde arnputarrnanosy piesy de arrojarobjetoscon gran...
- Page 53 • Unacubiertade descargafaltanteo da_adapuede provocarel Nuncaopere la cortadorasin las guardasapropiadas,cubiertade contactocon la cuchillao lesionesporobjetosarrojados. descarga,guardapara recorte,rnanijade control de la cuchilla y otrosdispositivosde seguridady protecci6nen su lugary Muchaslesionesocurrencornoresultadode pasarla cortadora funcionando.Nuncaopere la cortadorasi los dispositivosde sobrelos piesduranteuna caida provocadapor derrapeso seguridadest_.nda_ados.Si no Io hace,esto puedetenet corno tropiezos.No se sostengade la podadorasi se est,.
- Page 54 N QOS Nuncasaquela tapadel gasni agreguecombustible rnientrasel motorest,. calienteo en rnarcha.Dejeque el motorse enfriepor Puedenocurriraccidentestr_.gicos si el operadorno est,. atentoa la Io rnenosdos rninutosantesde volvera cargarcombustible. presenciade ni_os.Por Iogenerala los ni_osles atraenlas podadoras • Nuncarecargueel tanquede combustible.Lleneel tanqueno y la actividadde podarel c_sped.Noentiendenlos riesgosni los rn_.s de 1 pulgadapor debajode la basedel cuellode Ilenado peligros.Nuncad_ por sentadoque los ni_osperrnanecer_.n en el para dejar espacioparala expansi6ndel combustible.
- Page 55 NO MODIFIQUE EL MOTOR • Despu_sde golpearcon algOn objetoextrafio,detengael motor, desconecteel cablede la bujfay conecteel motora rnasa. Paraevitarlesionesgraveso la rnuerte,no rnodifiqueel motorbajo Inspeccionerninuciosarnente l a rn_.quina paradeterrninarsi est,. ningunacircunstancia. S i carnbiala configuraci6n del reguladordel da_ada.Repareel da_o antesde encenderlay operarla. motorel motor puededescontrolarse y operara velocidadesinsegu- •...
- Page 56 SilVIBOLOS DE SEGURIDAD Esta p&ginarepresenta y describela seguridadlos simbolosque puedenpareceren este producto.Lea,comprenda,y sigatodas instrucciones en la m_quinaantesprocurarpara reuniry operar. LEA EL MANUAL(S) DEL OPERADOR Lea, comprenda,y siga todas instrucciones en el manual (manuales) antes procurar para reunir y operar. PELIGRO-- GIRANDO HOJAS Para reducir el riesgo de herida, guarde manos y pies lejos.
- Page 57 Mirey mantenc3a estenive[ c onun_rbo[ v ertical o[aesquina deunedificio... oelposte deunaempaiizada Doble PorlaI," -- . '_s_ePreSenta un ._ _ apendie Use esta pagina como guia para determinar en qu6 pendientes no puede operar el tractor de manera segura. Noopere la cortadorade c6speden dichaspendientes.No corte en inclinacionesmayoresde 15grados(elevaci6naproximada de 2 1/2 piesper cada 10 pies).Opere las podadorasQUESE EMPUJAN de maneraque crucenel frentede las pendientes,nuncahaciaarribay haciaabajo.
- Page 58 IMPORTANTE: Esta unidad seenvfa s inaceite enelmotor. Despu_s del r nontaje, consulte lap_.gina 62para l osdetalles del c ombustible elaceite. La trabade seguridadse usa Qnicarnente parael ernbalaje.Retirey IMPORTANTE: Las referencias a los lados d erecho o izquierdo desechela traba antesde operar la cortadorade cesped. lacortadora dec_sped sehacen observando larn_.quina...
- Page 59 NOTA: Silabaterfa sepone e nfuncionarniento despu_s delafecha de carnbiosa la placade la palancade carnbios.Vea la Figura5. indicada enlaparte s uperior oalcostado delarnisrna, c_.rguela siguiendo lasinstrucciones delasecci6n Mantenirniento deeste manual antes dehacer funcionar lacortadora. Despliegue de la manija Extraigalas perillasen estrellay los tornillosdel carrode la rnanijainferior.Veala Figura3.
- Page 60 Throttle/Choke Control Blade Control Fuel Tank Deck Height ignition Switch Lever Systems indicator Monitor Drive Control Gear Shift Lever Figure7 CONTROLES DEL MOTOR Tap6n de aceite/varilla de medici6n del nivel de aceite Consultela Figura8 para verla ubicaci6nde los controlesdel motor. Consultela secci6nde Mantenirniento para obtenerinstrucciones !_TaP6n d e aceite/ sobrec6rnoverificarel aceite.
- Page 61 PALANCA DE ALTURA DE LA PLATAFORIVlA CONTROL DE LA TRANSMISI6N Use esta palancapara ajustarla alturade corte.Para utilizarla,mueva la palancahaciala izquierda, luegocobquela en la muescaque mejor El controlde la transmisi6nse usapara se adaptea la aplicacbn deseada. engranary desengranarla transmisi6nde las ruedas.Paraenganchareste control, aprieteel controlde la transmisi6n contra la empu_adurade la barrade control.Para detenerla transmisi6n,suelteel controlde la...
-
Page 62: Interruptor De Encendido
INTERRUPTOR DE ENCENDIDO MONITOR INDICADOR DE SISTEMAS/MEDI- DOR HORARIO Nuncadeje la rn&quina en funcionarniento s in vigilancia.Siernpre desenganche lascuchillas, a pagueel motory retirela Ilave,paraevitar ©© el encendidoaccidental d el motor. BATTERY El interruptorde cautro posicionesse usa para encendery apagarel motorde los rnodeloscon arranqueel_ctrico.Paraencenderel motor, j f J"... - Page 63 LLENADO DE GASOUNA Y ACEITE IMPORTANTE: E sta unidadse enviasin gasolina,pero con aceiteen el motor.Aseg@ese de que el motor congasolinay revJsar e l aceite como se indicaen esta secci6nantesde comenzaro el funciona- mientode su m_.quina, Aceite Useaceite para motor de 4 tiempos que cumpla o sobrepase los requisitos para la clasificaci6n de servicio API SF,SG, SH, SJ o equivalente.
-
Page 64: Encendido Del Motor
ENCENDIDO DEL ParaconducirhaciaADELANTE: MOTOR Coloquela palancade carnbiosen cualquierade lascuatro Sueltetodos los controlesde la cortadora. velocidadesde avance.Seleccioneuna velocidadadecuada Muevala palancade carnbiosa la posici6nneutral(N). alas condicionesy con la cual se sientac6rnodo. Insertela Ilaveen el interruptor de encendido. Si el motorest,. fib, rnuevael controldel regulador/cebador Oprirnael controlde la transrnisi6n. - Page 65 • Siernpreest_ segurode su equilibrio.Si tropiezay cae puede despedidoshaciaatr_.sparaque se depositenen el cespedy actQen lesionarsegravernente. S i sienteque pierdeel equilibrio,suelte cornofertilizantenatural.Observelos siguientespuntosparaobtener inrnediatarnente la rnanijade controlde la cuchillay la cuchilla losrnejoresresultadosal realizarel abono. dejar_, d e giraren tres (3) segundos. •...
-
Page 66: Mantenimiento
PROGRAMA DE MANTENIMIENTO 1r as 5 horas Aceitedel motor Carnbiar Cuchillasdelacortadora Cada8 horaso por dias SegQnnecesidad Piezassueltasofaltantes Ajustaro reernplazar Correas Verificar Nivelde aceitedel motor Verificar Controles Verificarel funcionarniento correcto Verificarla correctainstalaci6nde Clavijade abono (siest,. instalada) la clavija 25 horas Filtrode aire/pre-filtrot- Lirnpia* Cuchillasdelacortadora Afilary balancear... - Page 67 Varilla/tap6n del aceite No IoNeneen exceso.El Nenado excesivode aceitepuede hacer que el motorno arranqueo Io haga condificultad.Si se superala rnarcaFULL(Neno)de la variNa de rnedici6n,dreneaceite para reducirel nivelhastaque quedeen la rnarcaFULL. Carnbio de aceite del motor Si el motorse ha puestoen funcionarniento recienternente, el motor, silenciador y las superficiesrnet_.licas c ircundantesestar_.n calientes y puedencausarquernaduras a la piel.Tengaprecauci6npara evitar quernaduras.
- Page 68 IVlantenimiento del filtro de aire. • Siempremantenga limpiosy libresde acumulaci6nde elementos corrosivosloscablesy los bornesde la bateria. • Despu_sde limpiarla bateriay los bornes,apliqueuna capa Si se instalan incorrectamente losfiltroso lascubiertas,se pueden delgadade vaselinao grasaa ambosbornes. producirlesionesgraveso la muertede lasexplosionesdel carburador. N o intentearrancarel motorcuandono est&npuestos. Si extraela bateriaparalimpiarla,desconecte primeroel cable NEGATIVO (negro)de su borney a continuaci6nel cablePOSITIVO No useaire presurizadoni solventespara limpiarel cartuchodel...
- Page 69 LUBRICACI6N Unael acoplede la rnanguera al puertode agua que se encuen- tra en la superficiede la plataforrna.Veala Figura17. Antesde lubricar,repararo inspeccionar, d esconectela potenciade arranque(PTO),coloqueel frenode rnano,apagueel motory retire la Nave, p ara evitarel encendidoaccidentaldel motor. Puntos de pivote y varillaje Lubriquetodoslos puntosde pivotedel sisternade transrnisi6ny el variNaje de elevaci6nconaceite Ngero por Io rnenosuna vez por ternporada.
- Page 70 Parasacar la cubierta de la correasaquelos tres tornillosy Si las flechasen la superficiede cada poleade husillono est_.n arandelasque la sujetanal basfidor,Vea la Figura19, perpendiculares (a un _.ngulo de 900grados)entresi. consultea su distribuidorSearsu otto distribuidorpara volvera colocarla correade sincronizaci6n de la plataforma. No hagafuncionarla unidadsin tenerla cubiertade la correa instalada.Si no seobservanestasinstruccionesse puedenproducir lesionespersonaleso da_osmateriales.
- Page 71 EXTRACCI6N DE LA PLATAFORiVlA CORTE Antes de realizarcualquiermantenimiento o reparaci6n, d esconecte lascuchiNas, a pagueel motory retirela Nave para evitarel encen- dido accidentaldel motor. Paraextraerla plataformade corte,procedade la siguientemanera: Para sacarla cubiertade la correasaquelos tres torniNos y arandelasque la sujetanal bastidor.Vea la Figura22. No hagafuncionarla unidad sintenet la cubiertade la correa instalada.Si no seobservanestasinstruccionesse puedenproducir lesionespersonales o daSosmateriales.
-
Page 72: Cuchillas De Corte
13. Desenganche el cableresortede la transrnisi6ndel rnontajedel brazosecundariolibre.Veala Figura25. Figure26 Paraafilarlascuchillasde corte de forrnaadecuada, e xtraiga cantidadesigualesde metalde arnbosextrernos de lascuchillasa Figure25 Io largode los hordescortantes,paraleloal hordede caiday a un 14. Deslicelentarnente la plataforrna haciala derecha,sac_.ndola de _.ngulo de 250a 30°.Afilesiernpre cadahordede las cuchillasde debajode la cortadora. - Page 73 BATERIA Pruebeel equilibriode la cuchillausandoun cornpensador d e cuchillas.Afileel metal del lado pesadohastaque quedebien equilibrada. Losbornesde labateriay losaccesorios afinescontienen plornoy cornpuestos de plorno,sustancias quirnicas que seg_nIoestablecido NOTA:CuandoreernpJace l a cuchilla,aseg@ese de instalarlacon el por el Estadode California causanc&ncery daSosen el sisterna lado rnarcado"Bottom"(inferior)(o con el ladoque poseeun nQrnero reproductivo.
- Page 74 Carga de la bateria Afloje, perono saque,la tuercay el pernoque fijancada polea Ioca de la plataforrna.Veala Figura29. AIcargarse,las bateriasernitenun gas que puedecausarexplo- siones.Carguela bateriaen un _.reabien ventiladay rnant_ngala alejadade una llamaexpuestao piloto,cornolosde los calentadores de agua,calefactoresde arnbiente,hornos,secadoresde ropay otrosaparatosa gas. Polea Ioca de la Cuandocarguela baterfade la cortadora,utilice Qnicarnente un...
- Page 75 Nuncaalmacenela cortadorade cespedcon combustibleen el tanqueen un espaciocerradoo en _reascon pocaventilaci6n,dondelosgasesdel combustiblepuedanalcanzarel fuego,chispaso unaluz piloto comola que tienen algunos hornos,calentadoresde agua,secadoresde ropa o algQn otro dispositivoa gas. PREPARACI6N DEL MOTOR PREPARACI6N DE LA CORTADORA CO'SPED Pararnotoresalrnacenados durantern&sde 30 dfas: Paraevitar que se forrnegornaen el sisternade combustibleo en •...
- Page 76 de la bujiay p6ngalohaciendomasacontrael motorparaevitarqueseenciendaaccidentalmente. Utilicesiempreanteojosde uridad durante l aoperaci6n o mientras realiza a '_araciones. El motorno arranca No se ha activadoel cebador Coloquela palancade controldel regulador/cebador en la posici6ncebador. El controldel regulador/cebador n o est,. en Coloquela palancade controldel regulador/cebador la posici6ncorrecta.
- Page 78 DECLARACION FEDERAL y/o DE CALIFORNIA SOBRE GARANTJAS EN EL CONTROL DE EIVIISIONES SUS DERECHOS Y OBLIGACIONES EN CUANTO A LA GARANTJA MTDConsumerGroupInc, laAgencia de Protecci6nMedioambiental d e los EstadosUnidos(EPA),y para aquellosproductoscertificadosparasu ventaen el es- tadode California,el Departamento de los Recursosdel Aire de California(CARB)secomplacenen explicarla garanfiaque cubre al sistemade control (ECS)de emisiones(evaporativasy/o de escape)de su equipoy motor(motor de equipos de exteriores)de encendidopot chispa paratodo terreno,peque_o,de exteriores del a_o2006 y a_osposterioresEn California,losnuevosmotoresde equipos de exterioresdebenestar dise_ados,construidosy equipadospara cumplircon las estrictasnormasantipoluci6ndel Estado(en otrosestados,losequipos del a_o 1997y modelosposterioresdebenser estar dise_ados,construidosy equipados...
-
Page 79: Piezas Garantizadas
8. Durante latotalidad del periodo de garantia del motor yequipo para todo t erreno arriba mencionado, MTD C onsumer Group Inc mantendr_ un suministro de piezas bajo g arantia suficiente para satisfacer lademanda esperada de tales piezas. 9. Cualquier pieza de reemplazo se podr_ usar para e lcumplimiento del m antenimiento olas reparaciones... - Page 80 (Esta p _.gina seaplica s 61o enEE.UU. yCanada.). Sears Brands M anagement Corporation, el Consejo de Recursos Ambientales de California (CARB) y la Agencia de Protecci6n Ambiental de los Estados Unidos (EPA) Declaraci6n de garantia del sistema de control de emisiones (derechos y obligaciones de la garanfia de defectos del propi=...
- Page 81 Busque el periodo de duraci6n de emisiones importantes yla informaci6n de clasificaci6n de aire en la etiqueta de emisiones de su motor Los motores cuyo cumpiimiento con los estAndares de emisi6n Tier 2 de la Comisi6n de Recursos Ambientales de California (CARB) est6 certificado deben exhibir la informaci6n relacionada con el periodo de duraci6n de ias emisiones y la clasificaci6n de aire.
- Page 82 Felicitaciones por haberrealizadouna adquisici6ninteligente.El Unavezadquiridoel Acuerdo,puedeprograrnar el serviciocon productoCraftsman@ que ha adquiridoest_ dise_adoy fabricado tan s61orealizaruna Ilarnadatelef6nica.PuedeIlarnaren cualquier para brindarrnuchosa_osde funcionarniento confiable.Perocorno mornento del dia o de la nocheo prograrnar un servicioen linea. todoslos productosa vecespuederequerirde reparaciones.Esen El Acuerdode Protecci6nde Reparaci6n es una cornprasin riesgo. esernornentocuandoel disponerde un Acuerdode protecci6npara Si ustedanula por alguna raz6nduranteel periodode garantiade reparaciones le puedeahorrardineroy problernas.
- Page 83 Esta pgtginase march6 intencionadamenteen blanco.
- Page 84 Your Home For troubleshooting, product manuals and expert advice: managernylife www.managemylife.com For repair - in your home - of all major brand appliances, lawn and garden equipment, or heating and cooling systems, no matter who made it, no matter who sold it! For the replacement parts, accessories owner's manuals that you need to do-it-yourself.
Need help?
Do you have a question about the Professional 247.88998 and is the answer not in the manual?
Questions and answers