Table of Contents
Advertisement
Advertisement
Table of Contents

Subscribe to Our Youtube Channel
Related Manuals for Samson STUDIOGT


Summary of Contents for Samson STUDIOGT
- Page 2 IMPORTANT SAFETY INSTRUCTIONS TO PREVENT FIRE OR SHOCK HAZARD. DO NOT USE THIS PLUG WITH AN EXTENSION CORD, RECEP- TACLE OR OTHER OUTLET UNLESS THE BLADES CAN BE FULLY INSERTED TO PREVENT BLADE EXPO- SURE. TO PREVENT FIRE OR SHOCK HAZARD. DO NOT EXPOSE THIS APPLIANCE TO RAIN OR MOISTURE. TO PREVENT ELECTRICAL SHOCK, MATCH WIDE BLADE PLUG TO WIDE SLOT AND FULLY INSERT.
- Page 3 IMPORTANT SAFETY INSTRUCTIONS Read these instructions. 13. Unplug the apparatus during lightening, sort or when unused for long periods of Keep these instructions. time. Heed all warnings. 14. Refer all servicing to qualified personnel. Follow all instructions. Service is required when the apparatus Do not use this apparatus near water.
- Page 4 ATTENTION: Pour éviter tout risque d’électrocution ou d’incendie, ne pas exposer cet appareil à la pluie ou à l’humidité. Pour éviter tout risque d’électrocution, ne pas ôter le couvercle ou le dos du boîtier. Cet appareil ne con- tient aucune pièce remplaçable par l’utilisateur. Confiez toutes les réparations à un personnel qualifié. Le signe avec un éclair dans un triangle prévient l’utilisateur de la présence d’une tension dangereuse et non isolée dans l’appareil.
- Page 5 PRECAUCION: Para reducir el riesgo de incendios o descargas, no permita que este aparato quede expuesto a la lluvia o la humedad. Para reducir el riesgo de descarga eléctrica, nunca quite la tapa ni el chasis. Dentro del aparato no hay piezas susceptibles de ser reparadas por el usuario. Dirija cualquier reparación al servicio técnico oficial. El símbolo del relámpago dentro del triángulo equilátero pretende advertir al usuario de la presencia de “voltajes peligrosos”...
-
Page 6: Table Of Contents
Studio GT Specifications ......16 Studio GT Dimensional Drawing ......17 Copyright 2010, Samson Technologies Corp. v1.1 Samson Technologies Corp. -
Page 7: Introduction
Samson products in the future. Also, be sure to check out our website (www.samsontech.com) for complete information about our full product line. -
Page 8: Studio Gt Features
STUDIO GT FEATURES The Samson Studio GT studio monitor system with USB audio interface provide a smooth response that’s accurate, and at the same time pleasant to listen to. Here are some of their main features: • Two-way, active studio reference monitor with ported tuned enclosure providing extremely accurate monitoring for recording studio, post-production, video gaming and multi-media applications. -
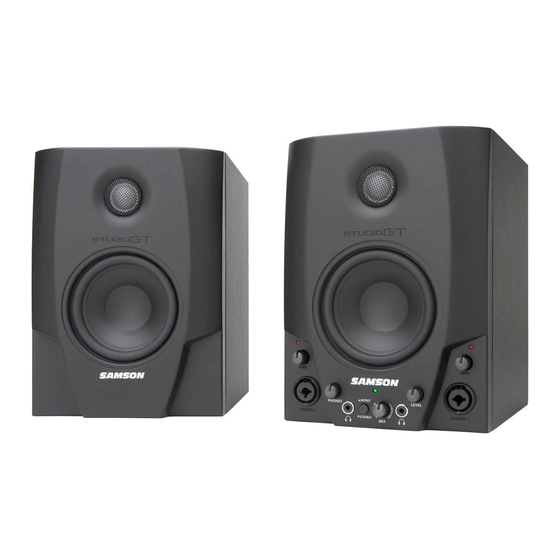
Page 9: Studio Gt Front Panel Layout
STUDIO GT FRONT PANEL LAYOUT Silk Dome Tweeter - Smooth high STEREO/MONO Button - This button frequency response produced from a allows you to select the direct input 1-inch silk dome tweeter. monitoring between stereo and mono operation. In Mono mode, the input Low Frequency Driver - Heavy duty signals will be heard equally in the 4.25”... -
Page 10: Studio Gt Rear Panel Layout
STUDIO GT REAR PANEL LAYOUT 1. 1/8” AUX INPUT – 3.5mm stereo input jack for connecting a second line level signal source, like an MP3 player. This input is not sent through the USB output. 2. RCA INPUT – Used to connect signals from unbalanced, –10dBV devices, like a mixer. -
Page 11: Studio Gt Quick Start
STUDIO GT QUICK START STUDIO GT HOOK-UP Unpack the Studio GT system components and included cables. Be sure to save the packaging in case you ever move or need to send the units for service. Set the Studio GT monitors in place near your computer or multi media center. The active speaker (the one with the front panel controls and jacks) is the right side speaker and the passive speaker (no knobs and jacks) is the left-side speaker. - Page 12 STUDIO GT QUICK START RECORDING WITH A MICROPHONE Turn the GAIN knob fully counter-clockwise. Connect a microphone to the CHANNEL 1 XLR INPUT on the front panel using an XLR cable. While singing or playing into the microphone, slowly turn the GAIN knob clockwise until the CLIP indicator turns on.
- Page 13 STUDIO GT QUICK START RECORDING A GUITAR Turn the GAIN knob fully counter-clockwise. Connect a guitar to the ¼” INPUT on the front panel using a standard ¼” instrument cable. Note: The ¼” INPUT can accept either a high impedance or low impedance soure. While playing guitar at its loudest level, slowly turn the GAIN knob clockwise until the CLIP indicator turns on.
- Page 14 STUDIO GT QUICK START RECORDING A KEYBOARD Turn the CHANNEL 1 and CHANNEL 2 GAIN knobs fully counter-clockwise. Connect a keyboard to the CHANNEL 1 and CHANNEL 2 ¼” INPUTS on the front panel using standard ¼” instrument cables. While playing the keyboard at its loudest levels, slowly turn up the GAIN knobs clockwise until the CLIP indicators turn on.
- Page 15 STUDIO GT QUICK START DIRECT MONITORING To send a mono mix from the CHANNEL 1 and CHANNEL 2 inputs to the Studio GT speakers and headphone outputs, set the MONO/STEREO button to the up, MONO position. To separate the mix from the CHANNEL 1 and CHANNEL 2 inputs to the Studio GT speakers and headphone outputs, set the MONO/STEREO button to the down STE- REO position.
-
Page 16: Setting Up The Studio Gt
SETTING UP THE STUDIO GT Background on the Studio GT Active Monitors with Studio Interface The Studio GT are near field reference monitors featuring a custom designed, 4-inch copolymer, low frequency driver and a 25mm silk dome tweeters, employing a ferro- fluid cooled voice coil and neodymium magnet. -
Page 17: Direct Monitoring And Latency
DIRECT MONITORING AND LATENCY Using the Direct Monitor The Studio GT has a simple, yet sophisticated direct monitor system, which provides zero latency monitoring. What is Latency? What is Zero Latency, and why do I need it? Latency is the delay time between recording and playback that all computer DAW’s, including yours, have when recording and monitoring simultaneously. -
Page 18: Installing The Studio Gt
Double-check this by hovering over the speaker icon in the bottom right hand corner of the screen. It should show Volume:100 and "Samson StudioGT". If it is not the default device, you can set it under the Sound Properties panel in Control Panel (figure 3). - Page 19 Driver Mode to ASIO and press APPLY. Then go to the General Tab and press the ASIO Panel button and the ASIO4ALL panel will open. Select the Samson StudioGT. If you have any setup questions or issues Figure 6 please read the FAQ/Troubleshooting section at the ASIO4ALL website.
- Page 20 USB port, Windows XP will install the universal drivers for that port. A bal- loon tip will pop up, telling you it has found the Samson StudioGT (Figure 7). When it is finished installing the driv- ers, it will say “Your new hardware is installed and ready to use”...
- Page 21 Sound preference set up. When you plug the Studio GT into the USB port you’ll see a dialog box that will ask you if you want to select Samson StudioGT. Select yes and you’re ready to go. Figure 14 Studio GT Owner’s Manual...
-
Page 22: Studio Gt Specifications
STUDIO GT SPECIFICATIONS Transducers Woofer ....4” polypropylene with santoprene surround, Tweeter....1-inch silkdome ferro fluid neodymium tweeter Frequency response. -
Page 23: Studio Gt Dimensional Drawing
STUDIO GT DIMENSIONAL DRAWING 6.6” 9” 168mm 226mm Studio GT Owner’s Manual... - Page 24 45 Gilpin Avenue Hauppauge, New York 11788-8816 Phone: 1-800-3-SAMSON (1-800-372-6766) Fax: 631-784-2201 www.samsontech.com...
Need help?
Do you have a question about the STUDIOGT and is the answer not in the manual?
Questions and answers