
Related Manuals for Schwinn AD6


Summary of Contents for Schwinn AD6
- Page 1 SCHWINN" Manual en Espafiol Latino Americano: ASSEMBLY MANUAL / OWNER S MANUAL http://www,schwinnfitness,com...
-
Page 2: Table Of Contents
Important Safety Instructions - Assembly Adjustments Safety Warning Labels / Serial Number Using the Machine Specifications Locking the Fan Assembly / Storage Before Assembly Power Up / Idle Mode Parts Initial Setup Hardware Quick Start Program Tools Custom Time Workout Assembly Pausing or Stopping Results Mode... -
Page 3: Important Safety Instructions - Assembly
This icon means a potentially hazardous situation which, if not avoided, could result in death or serious injury. Obey the following warnings: Read and understand all warnings on this machine. Carefully read and understand the Assembly instructions. • Keep bystanders and children away from the product you are assembling at all times. •... -
Page 4: Safety Warning Labels / Serial Number
• Supervision is required if equipment used in a commercial environment. Mfg.Date Serial Number MM/YY I AAAAAABBBPPPPPPLLCCCCCC 1 °, C(:/ 18225NE RiversideParkway,Portland,Or. 97230 www.nautilus.com Model:Schwinn®Airdyne®AD6 Phone:1-8OO-NAUTILUS Rating:NA Class:SA, HA. MaximumUserWeight:3901b(136kg) FitnessEquipment Madein: China NAU/FILUS 0000 004 6970... -
Page 5: Specifications
Machine Weight: 115 Ibs. (52.2 kg) 2 AA Batteries Power Requirements: (not included) 1.0 - 3.3VDC Operating Voltage: Maximum User Weight: 300 Ibs. (136 kg) Regulatory Approvals: This product conforms to the applicable EN ISO 20957 international Standards for Stationary Training Equipment, Class S DO NOT dispose of this product as refuse. -
Page 6: Parts
A decal has been applied to all right (" R ") and left (" L ") parts to assist with assembly. Item Description Item Description Frame Pedal Strap, Left Console Support Bar Pedal, Left Console Foot Peg, Left Water Bottle Holder Stabilizer, Front Handlebar, Left Foot Peg, Right... -
Page 7: Hardware
item item Qty Description Qty Description Button Head HexScrew, M 8xl.25x20 Washer, M8Black Washer, M8Lock Button Head HexScrew, M 8x1.25x12 Black Washer, M8 Tools included Not included 6 mm (recommended) 13 mm 2 AA size batteries (LR6) 15 mm 17 mm... -
Page 8: Assembly
1. Attach Stabilizers to Frame Note: Hardware is pre-installed and not on the Hardware Card ( * ). ® 2. Attach Pedals and then Pedal Straps to Frame Assembly Note: The Left Pedal is reverse=threaded. Be sure to attach Pedals on the proper side of the Bike. Orientation is based from a seated position on the bike. - Page 9 3. Connect Cables and Attach the Console Support Bar to Frame Assembly Note: Do not crimp the cables, Pull the lower cable to remove any slack as you insert the Console Support Bar. ln order to avoid possible serious injury, when inserting the tube ends into the Frame Assembly be careful to avoid fingers or hands being caught or pinched.
- Page 10 5. Connect Cable and Attach the Console Note: Do not crimp Console Cable, 6. Attach Water Bottle Holder to Frame Assembly Note: Hardware is pre-instaled and not on the Hardware Card ( * ),...
- Page 11 7. Attach Foot Pegs and Handlebar Arms to Frame Assembly , ",, ,, ',, ',, ',,, 8. Loosen and Pull the Seat Post Adjustment Knob to Attach Seat Post to Frame Assembly...
- Page 12 9. Attach Seat to Seat Post NOTICE: Be sure the Seat is straight and then tighten the hardware. 10. Final inspection Inspect your machine to ensure that all hardware is tight and components are properly assembled. Do not use or put the machine into service until the machine has been fully assembled and inspected for correct performance in accordance with the Owner's Manual,...
-
Page 13: Moving The Machine
Moving the Machine The machine may be moved by one or more persons depending on their physical abilities and capacities. Make sure that you and others are all physically fit and able to move the machine safely, Use the Rear Stabilizer to carefully lift the machine onto the transport rollers, Note: Be sure to keep the fan assembly clear of the floor. -
Page 14: Important Safety Instructions
This icon means a potentially hazardous situation which, if not avoided, could result in death or serious injury. Before using this equipment, obey the following warnings: Read and understand the complete Manual. Keep the Manual for future reference. Read and understand all warnings on this machine. If at any time the Warning stickers become loose, unreadable or dislodged, contact Nautilus ®... -
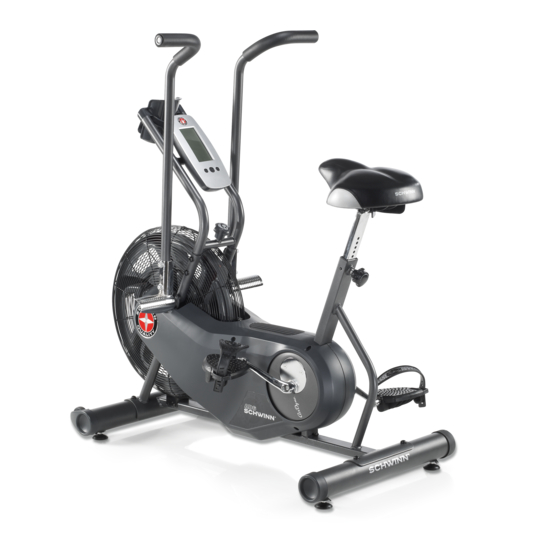
Page 15: Features
Console Air Resistance Fan Stabilizer, Rear Hand Grip Transport Roller Foot Step Pad Handlebar Leveler Seat Post Adjustment Knob Water Bottle Holder Stabilizer, Front Seat Battery Compartment Foot Peg Locking Knob Pedal Accessories Q iAirDyne® Reading Rack AirDyne ® Wind Screen Remote Heart Rate Chest Strap To order, go to www.schwinnfitness.com or call 1 (800) 605-3369. -
Page 16: Console Features
Console Features The Console provides information about your workout on the display screen. LCD Display Data The console display shows each workout value. The RPM display field shows the machine revolutions per minute (RPM). 1020406080tOO The maximum display is 100. \,',\4\\_;Q/i////// Time ,.. -
Page 17: Target Heart Rate
START/STOP button- Starts a Program workout, confirms a selection, and ends a paused workout if held down for 3 seconds. Increase (A) button- Increases a value (time or altitude) or moves through options Remote Heart Rate Monitor Monitoring your Heart Rate is one of the best procedures to control the intensity of your exercise. The Console can read telemetry HR signals from a Heart Rate Chest Strap Transmitter that operates in the 4.5kHz - 5.5kHz range. -
Page 18: Operations
What to Wear Wear rubber-soled athletic shoes. You will need the appropriate clothes for exercise that allow you to move freely. How Often Should You Exercise onsult a physician before you start an exercise program. Stop exercising if you feel pain or tightness in your chest, become short of breath, or feel faint. -
Page 19: Lockingthe Fanassembly / Storage
FullBodyWorkout: Grasp theHandGrips withyourpalms down.PushandpulltheHandlebars asyoupedal, k eeping yourelbows lowandnexttoyourbody. Upper BodyWorkout: Grasp theHandGrips firmly withpalms downandplaceyourfeetontheFootPegs. L eanslightly forward atthehipswithyourbackstraight a ndshoulders d own. N owpushandpulltheHandlebars Note:Youmayneed tosafely pusha Pedal t oassist w ithstarting theworkout. Toincrease theairresistance a ndworkload, increase yourlevel o factivity. Toexercise allthe muscle groups inyourarms, alteryourgraspto palms upforpartoftheworkout. -
Page 20: Initial Setup
Initial Setup During the initial power-up, the Console will display "AIt" and must be setup with the current workout altitude. Push the Increase/Decrease buttons to change the value for the altitude. Entering the correct value will make the calorie count more accurate. Push the START/STOP button to set. -
Page 21: Console Service Mode
TheConsole Service Mode letsyousetthe unitsof measurement toeitherEnglish or Metric, s eethetotal t imeand distance themachine hasbeenused, a djustthealtitude valuefora moreaccurate calorie count, o rfindoutwhich version of Firmware i s installed. 1. HolddowntheIncrease button andDecrease button together f or3 seconds whileintheIdleModetogointotheCon- soleService Mode. -
Page 22: Operations
Readallmaintenance instructions fullybefore youstartanyrepair w ork.Insomeconditions, anassistant i s required todo thenecessary t asks. quipment m ustberegularly e xamined f ordamage andrepairs. Theowneris responsible to makesurethatregular maintenance is done. W ornor damaged c omponents mustberepaired or replaced immediately. Onlymanufacturer supplied components canbeusedto maintain andrepair t heequipment. Toreduce theriskofelectrical shockor unsupervised usage oftheequipment, always remove thebatter- iesfromthe machine andwait5 minutes b efore cleaning, m aintaining or repairing t hemachine. -
Page 23: Replacing The Console Batteries
Replacing the Console Batteries TheConsole willdisplay "Lbatt" f ortenseconds w henthebatteries a rearound 10%oftheirrated_ower d uringpower up. Whenreplacing t hebatteries, makesurethebatteries p ointinthe+/-direction shown inthebattery bay. Note:Theconsole usesAAsizebatteries ( LR6). Donotmixoldandnewbatteries. Donotmixalkaline, s tandard (carbon-zinc), or rechargeable (Ni-Cd, N i-MH, e tc)batteries. -
Page 24: Maintenance Parts
Maintenance Parts Connector Arm Foot Peg, Right Seat Adjustment Knob Frame Arm Pivot Handlebar, Right Handlebar, Left Stabilizer, Rear Console Cable, Lower Shroud, Left Foot Peg, Left Resistance Fan Assembly Water Bottle Holder Fan Cover Crank Arm, Left Console Center Plate Leveler Pedal, Left Stabilizer, Front... -
Page 25: Troubleshooting
Condition/Problem Solution Thingsto Check Batteries Console willnotpower up/ Make surebatteries a reinstalled correctly. If batteries a re turnon/start correctly i nstalled, r eplace witha setofnewbatteries. Check datacableintegrity Allwiresincable shouldbeintact.If anyarevisibly crimped or cut,replace cable. Check datacable Makesurecableis connected s ecurely andoriented properly. connections/orientation Small l atchonconnector should lineupandsnapintoplace. - Page 26 Unitrocks/does n otsit Check leveler a djustment Leveling f eetmaybeturnedinor outto level b ike. level Check surface underunit Adjustment maynotbeabletocompensate forextremely u n- evensurfaces. Movebiketolevel a rea, Pedals loose/unit difficult Check pedal t ocrankcon- Pedal s hould betightened securely tocrank. B esureconnec- topedal nection tionis notcross-threaded.
-
Page 27: Warranty
Validation Appropriate and acceptable proof of purchase is required to validate your products warranty coverage. Coverage Nautilus, Inc. warrants to the original purchaser of this machine that it is free from defects in materials and workmanship, when used for the purpose intended, under normal conditions, and provided it receives proper care and maintenance as set forth herein and as described in the productsAssembly and Owner's manual. - Page 28 ® Nautilus® Bowflex_) Schwinn_) Fitness Universal(R) 004-4743,071512,A...
Need help?
Do you have a question about the AD6 and is the answer not in the manual?
Questions and answers