Advertisement
Available languages
Available languages
Quick Links
0
ge.com
--D
Safety Instructions
...........
2, 3
Operating Instructions
Additional
Features
................
8
Automatic
Icemaker
...........
11, 12
Care and Cleaning .............
12-13
Controls
........................
/4-5
Crispers and Pans ..................
9
Freezer
..........................
10
Replacing the Light Bulbs ..........
1/4
Shelves and Bins .................
7, 8
Water Filter ........................
6
Installation
Instructions
Installing the Anti-Tip
Floor Bracket ..................
16-17
Installing the Refrigerator
......
18-22
Installing the Water Line .......
30-32
Preparing to Install
the Refrigerator
...................
15
Removing and Replacing the
Freezer Drawers ...............
23-26
Removing and Replacing
the Doors (Double Door
Refrigerator
Models only)
......
27-29
Troubleshooting
Tips ...... 33-37
Normal Operating
Sounds
.........
33
Consumer Support
Consumer Support ........
Back Cover
Performance
Data Sheet
..........
45
Product Registration
for Canadian
Customers
.......
41,/42
Product Registration
for U.S. Customers
.............
B9,/40
State of California Water
Treatment
Device Certificate
.......
/46
Warrantg
for Canadian
Customers
.......................
44
Warrantg
for U.S. Customers
.......
4B
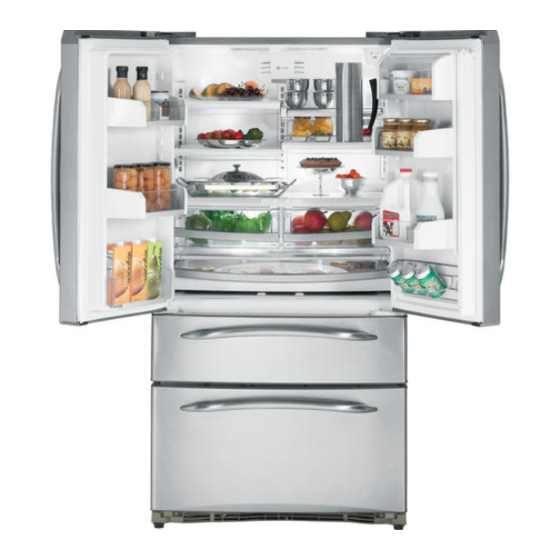
Models 21 ond 2.5 Double Freezer Drowers
¢ong_lateur inf_rieur
R frig rateurs
La section frangaise commence 6 la page 47
Congelador inferior
Refrigerodores
La secci6n
en espafial
empieza
en la p6gina
87
Write the model and serial
numbers
here:
Model #
Serial #
Find these numbers on a label
on the right side, near the top of the
refrigerator
compartment.
225D1804PO01
49-60524 !O-07JR
Advertisement

Related Manuals for GE PGSS5PJXASS


Summary of Contents for GE PGSS5PJXASS
- Page 1 Safety Instructions ... 2, 3 Operating Instructions Additional Features ....Models 21 ond 2.5 Double Freezer Drowers Automatic Icemaker ... 11, 12 Care and Cleaning ..... 12-13 Controls ....../4-5 ¢ong_lateur inf_rieur Crispers and Pans ....R frig rateurs Freezer ......
- Page 2 IMPORTANT SAFETY INFORMATION. READ ALL INSTRUCTIONS BEFORE USING. WARNING! Use this appliance only for its intended purpose as described in this Owner's Manual. SAFETY PRECAUTIONS When using electrical appliances, basic safetg precautions should be followed, including the following: ?,i: This refrigerator must be properlu installed _/i, I n refrigerators with automatic icemakers, avoid and located in accordance with the Installation contact with the moving parts of the ejector...
- Page 3 WARNING! HOW TO CONNECT ELECTRICITY Do not, under any circumstances, cut or remove the third (ground)prong from the power card. For personal safety, this appliance must be properly grounded. The power cord of this appliance is equipped with This provides the best performance and also prevents...
- Page 4 About the controls with temperature settings. EnerggSover Door Alarm (Models with controls inside the refrigerator) !_ ENERGY SAVER FREEZER J I REFRIGERATOR °__EL_J L_2LE Hold for 3 Seconds to _ctlvate LOCE (Models with controls on the door) NOTE: The refrigerator is shipped with protective film covering the temperature controls. If this film was not removed during installation, remove it now.
- Page 5 About TurboCool.'"Ion models) ge.com some How it Works How to Use TurboCool rapidly cools the refrigerator compartment in order to more quickly Press TurboCooL The refrigerator cool foods. Use TurboCool when adding a temperature displag will show bE. large amount of food to the refrigerator...
- Page 6 United States, visit our Website, display. This light will turn orange to tell you ge.com, or call GEParts and Accessories, that you need to replace the filter soon. The 800.626.2002. filter cartridge should be replaced when the...
- Page 7 About the shelves and bins. gecom Not all features are on all models. Rearranging the Shelves Shelvesin the refrigerator compartment are adjustable. Refrigerator Compartment To remove: Removeall items from the shelf. Tilt the shelf up at the front. Lift the shelf up at the back and bring the shelf out.
- Page 8 About the shelves and bins. Adjustable Bins on the Door Adjustable bins can easily be carried from The snugger helps prevent tipping, spilling refrigerator to work area. or sliding of small items stored on the door shelf. Grip the finger hold near the rear of the To remove: Lift bin straight up, then pull out.
- Page 9 About the crispers and pans. ge.com Not all features are on all models. Fruit and Vegetable Crisper Excesswater that mag accumulate in the bottom of the drawers or under the drawers should be wiped dry. Adjustable Humidity Crisper (onsomemodels) Slidethe control all the wag to the...
- Page 10 About the freezer. Not all features are on all models. Freezer Shelves and Baskets A shelf above the ice storage bin A full-width upper basket in top drawer An ice storage bin A shallow full-width upper basket in bottom drawer Appearance and features may vary A deep full-width lower basket in bottom drawer...
- Page 11 About the automatic icemaker, ge.com A newly installed refrigerator may take 12 to 24 hours to begin making ice. Power Automatic Icemoker ton somemodels) Switch The icemaker will produce seven cubes You will hear a buzzing sound each time the...
- Page 12 About the automatic icemaker. Precise Fill ton some models) Thiswater dispenser isequippedwith a feature Press the cupagainstthecradleand water calledPrecise Fill.ThisfeatureallowsUouto will begindispensing. I t willautomaticallu choose a precise amountof water.Unitsinclude stopwhenthe amount set hasbeen ounces, c ups,pintsor liters. dispensed. Thedisplauwillshowthere is no water leftto dispense, then reset.
- Page 13 Behind the Refrigerator Be careful when moving the refrigerator Lower the leveling legs until they touch the floon uwoy from the woe All tgpes of floor coverings con be dumuged, porticulorlu When pushing the refrigerator buck, make cushioned coverings ond those with sure you don't roll over the power cord or embossed surfaces.
- Page 14 Plug the refrigerator back in. Unplug the refrigerator. NOTE: Appliance bulbs may be ordered from GE Parts and Accessories, 800.626.2002. To remove the light shield, grasp the shield at the back and pull out to release the tabs at the back.
- Page 15 Installation Refrigerator Instructions Models 21 and 25 Double Freezer Drawers Questions? Call 800.GE.CARES (800.432.2737) or Visit our Website at: ge.com In Canada, call 1.800.561.3344 or Visit our Website at: www.geappliances.ca BEFORE YOU BEGIN MATERIALS YOU MAY NEED (not included) Read these instructions completely and carefully.
- Page 16 Installation Instructions INSTALLING THE ANTI-TIP FLOOR BRACKET (on 21 ft. models) A'kWARNING LOCATING THE ANTI-TIP FLOOR BRACKET Place the anti-tip floor bracket Iocator template (included inside the anti-tip kit) onto the floor up against the rear wall, within W, and in line with the desired location of the RH side of the Under certain...
- Page 17 instatlation instructions LOCATING THE ANTI-TIP CONCRETE Wall and Floor Construction: FLOOR BRACKET (cont.) • Anchors required (not provided): 4 each 1/4" x 1 1/2" lag bolts Figure 2 - Acceptable Screw 4 each 1/2" O.D. sleeve anchors Placement Locations • Drill the recommended size holes for the anchors into the concrete at the center of...
- Page 18 Installation Instructions INSTALLING THE REFRIGERATOR REFRIGERATOR LOCATION REMOVE TOP CAP (cont.} (on some models) • Do not install the refrigerator where the temperature will REINSTALLDOORS, DRAWERS AND TOP CAP go below 60°F(16°C) b ecause it will not run often enough Carefullg lower the door onto the center hinge.
- Page 19 (sleeve) onto the water supply) and check for any leaks. end of the tubing coming from the house cold water supply. If you are using the GE SmartConnect" tubing, the nuts are already assembled to the tubing.
- Page 20 instatlation Instructions INSTALLING THE REFRIGERATOR (cont.) REMOVE THE TOP AND BOTTOM [] REMOVE THE FRESH FOOD FREEZER DRAWER HANDLES DOOR HANDLE Stainless steel and plastic handles: (For placement in the installation location or reversal of the handles - on some models) O Loosenthe set screws located on the underside of the handle with the 1/8"...
- Page 21 Installation Instructions [] ATTACH THE TOP AND BOTTOM ATTACH THE FRESH FOOD FREEZER DRAWER HANDLES DOOR HANDLE Stainless steel handle: Stainless steel and plastic handles: @ Attach the handle @ Attach the handle firml Uto the mounting fasteners to the handle and tighten the set screws on the bottom of the mounting fasteners handle with a 1/8"...
- Page 22 Installation Instructions INSTALLING THE REFRIGERATOR (cont.) LEVEL THE REFRIGERATOR SET THE CONTROLS The leveling legs have 2 purposes: Set the controls to the recommended setting. 2) Leveling legs adjust so the refrigerator firmlg positioned on the floor and does not wobble.
- Page 23 Installation Instructions REMOVING THE FREEZER DRAWERS REMOVE THE DRAWER FRONT FROM The freezer drawers cGn be removed, if needed, to fit through tight areas. THE SLIDES Read these instructions completelg and carefullg. Remove the 8 hex head screws from the door and remove the door.
- Page 24 Installation Instructions REMOVING THE FREEZER DRAWERS (cont.) REMOVE THE DRAWER FRONT FROM The freezer drawers can be removed, if needed, to fit through tight areas. THE SLIDES Read these instructions completely and carefully. Remove the 10 hex head screws from the door and remove the door.
- Page 25 Installation Instructions REPLACING THE FREEZER DRAWERS REPLACE THE FREEZER BASKET this procedure. Replace the top drawer freezer basket (see Two people may be required to complete page 10), TOP DRAWER ATTACH AND SECURE THE DRAWER FRONT TO THE SLIDES Pull out the rail assemblies to the full length on each side of the cabinet.
- Page 26 Installation Instructions REPLACING THE FREEZER DRAWERS (cont.) [] ATTACH AND SECURE THE DRAWER FRONT TO THE SLIDES ICONT.} this procedure. Two people may be required to complete Drive screws fullg. (There are 10 screws, S on each side.) BOTTOM DRAWER ATTACH AND SECURE THE DRAWER FRONT TO THE SLIDES Pull out the rail assemblies to the full length on...
- Page 27 Installation Instructions REMOVING TH E DOORS onlg) (Double Door Refrigerator Models IMPORTANT NOTES REMOVE THE REFRIGERATOR DOORS Tape the doors shut with masking tape. NOTE: Door swing is not reversible. • Read the instructions all the wag through before starting. •...
- Page 28 Installation Instructions REMOVING TH E DOORS (Double Door Refrigerator Models only)(cont.) REMOVE THE REFRIGERATOR REMOVE CENTER HINGE DOORS(cont.} Using a 5/16" socket ratchet/driver, remove the bolts securing the center hinge to the cabinet. Remove the hinge cover on top of the Set the hinge and bolts aside.
- Page 29 Installation Instructions REPLACI NG T HE DOO RS onlg) (Double Door Refrigerator Models INSTALL CENTER HINGE REHANG REFRIGERATOR DOORS (cont.) Install the center hinge on each side. Hake sure the gasket on the door is flush against the cabinet and is not folded. Hake sure the door is straight and the gap between the doors is even across the front.
- Page 30 Osmosis Water System, the only approved installation refrigerator to the water supplg. If using copper, is with a GE RVKit. For other reverse osmosis water be sure both ends of the tubing are cut square. systems, follow the manufacturer's recommendations.
- Page 31 DRILL THE HOLE FOR THE VALVE • If gou are using a GE SmartConnect T' Refrigerator Drill a 1/4" hole in the water pipe (even if using Tubing kit, the necessarg fittings are a self-piercing valve), using a sharp bit.
- Page 32 Pipe Clamp \ Make sure the tubing is fully inserted into the valve. Tighten the compression nut securely. For plastic tubing from a GE SmartConnect T" Refrigerator Tubing kit, insert the molded end of the tubing into the shutoff valve and tighten...
- Page 33 Normal operating sounds, gecom Newer refrigerators sound different from older refrigerators. Modem refrigerators have more features and use newer technologg. Do gou hear what I hear? These sounds are normal. HUIVllVllVl... WHIR! --WHOOSH... _;i Thenew highefficiencycompressor may run fasterand longer than yourold refrigeratorand you may heara high-pitched hum Youmay hearthe fans spinningat highspeeds.
- Page 34 Beforeyou call for service... Troubleshooting Tips Possible Causes What To Do Motor operates for ° Wait 24 hours for the refrigerator to completelg Normal when refrigerator long periods or cgcles cool down. is first plugged in. on and off frequently. IModern refrigerators Often occurswhen large •...
- Page 35 Possible Causes What To Do Ice cubes have Food transmitting odor/taste • Wrap foods well odor/taste to ice cubes. Interior of refrigerator • See Care and cleaning. needs cleaning. • Keep an open box of baking soda in the refrigerator;...
- Page 36 Beforeyou call for service... Troubleshooting Tips Possible Causes What To Do Water has poor Water dispenser has not been • Dispensewater until all water in system is replenished. taste/odor used for a long time. Water in first glass Normal when refrigerator •...
- Page 37 Possible Causes What To Do My display is showing _c TurboCool function is activated. • SeeAbout TurboCoolfor more information. Water filter indicator This is normal. • SeeAbout the water filter for more information. light changed color Water filter indicator light Water filter indicator must •...
- Page 38 Notes. ¢J...
- Page 39 You can rest easy, knowing that all your valuable household products are protected against expensive repairs. 800.626.2224 Place your confidence in GE and call us in the U.S.toll-free at for more information. *All brands covered, up to 20 years old, in the continental...
- Page 40 Check here if you do not want to receive communications from GEA's carefully selected partners. General Electric Company Louisville, KY/40225 E Consumer&.lndustrial FAILURETOCOMPLETEAND RETURNTHIS CARDDOESNOT DIMINISH YOURWARRANTY RIGHTS. ge.com For information about GEA's privacy and data usage policy, go to ge.com and click on "Privacy Policy" or call 800.626.2224.
- Page 41 Please placein envelope andmailto: Veuillez mettredansuneenveloppe et envoyez &: OWNERSHIP REGiSTRATiON P.O. BOX1780 MISSISSAUGA,ONTARIO L4Y 4G1 (FORCANADIANCONSUMERS ONLY)
- Page 42 P;ease r egister y ourproduct t o enable usto contactyou ,,Veui[_ez enregistrer votre produitafln denouspermet_e d e inthe remote event a safety noticeisissued forthisproduct ,,communiquer avecvous sijamais unavis des_cudt6 concemant andtoa',',owforefficientcommunicationundertheterms , ceprodui[6tait6misetdecommuniquerfaci',ementavecvousen ofyourwarranty, s hould the needarise. Lver_devof_e garan_e, s ,ebe.so ns enfar_senbr. REGISTERON-LINE: www.geapp;iances.ca MA_LTO:...
- Page 43 USA. If the product is located in an area where service bg a GE Authorized Servicer is not available, you may be responsible for a trip charge or Sou may be required to bring the product to an Authorized GE Service location for service.
- Page 44 Labour How Long Warranted (From Date of Sale) Repair or Replace at Mabe's Option Sompressor GE Profile: Ten (10) Years GEProfile: Ten (10) Years GEProfile: Five (S)Years GE and All Other GE and All Other GE and All Other Brands:...
- Page 45 Performance Data Sheet SmartWater Filtration System GSWF Cartridge This system has been tested according to NSF/ANSI 42/53 for reduction of the substances listed below. The concentration of the indicated substances in water entering the system was reduced to a concentration less than or equal to the permissible limit for water leaving the system, as specified in NSF/ANSI 42/53.*...
- Page 46 Department of Health Services Water Treatment Device Certificate Number 03-1559 Date Issued: April 28, 2003 Trademark/Model Desi_.nation ..:GSWF ..GE GSWF Mannfactnrer: GeneralElectric ii)i!!_ Tile water treatment device_s_ listed on this certificate ha_e m mrsnant to Section 116830 of the Health and Safety Code for the following...
- Page 47 Mesures de s_curit_ ....48, 49 Fonctionnement Caract_ristiques suppl_mentaires ..Clagettes et bacs ....... 53, 54 Cong61ateur ....... Entretien et nettogage du rdrig6rateur ......58, 59 Le filtre 6 eau ......Les bacs _ rangement et bacs _ I#gume ...55 Les commandes .......
- Page 48 MESURES DE SECURITE-IMPORTANTES. LISEZ D'ABORD TOUTES LES DIRECTIVES. AVERTISSEMENT! N'utilisez cet dlectromdnager que pour I'usoge ouquel il est destind, comme expliqud dons le prdsent manuel. MESURES DE SdL-CURITdL Lorsque vous utilisez un opporeil dlectrique, observez toujours les mesures de sdcuritd de base, g compris/es suivontes.
- Page 49 www.electromenugersge.cu AVERTISSEMENT! RACCORDEMENT ELECTRIQUE Ne coupez ni retirez en oucun cos Io troisi_me broche (raise _ Io terre) de Io fiche du cordon d'olimentotion. Pour votre s_curit_, cet opporeil doit _tre correctement mis _ Io terre. Le cordon d'alimentation de cet appareil est muni Cette precaution est recommand_e pour garantir d'une fiche _ B broches (mise _ la terre) qui se un rendement optimum et _viter...
- Page 50 Lescommandes avec r glages de temperature. (ModUlesavec commandes 6 I'int4rieur du r4frig4roteur) @ ENERGY SAVER FREEZER REFRIGERATOR L__2LZ .rsq Hold for 3 Seconds to activate Lock (lod6les ovec commondes sur la porte) NOTE : Le r6frig6roteur est exp6di6 avec une pellicule de protection couvrant les commondes temperature.
- Page 51 AU suJet de TurboCool]" (surcertains modSles) ,,w,.electromenogersge.ca Fonctionnement La commande TurboCool acc_l@e Utilisation le refroidissement du compartiment Appuyez sur le bouton TurbaCool. L'_cran de rdrig@ation afin de refroidir plus rapidement temp@ature du r_frig@ateur indique b c. les aliments. UtilisezTurboCool quand vous Quand la commande TurboCool cessede ajoutez une grande quantit_ d'aliments darts fonctionner, le compartiment r_frig@ation...
- Page 52 Le filtre 6 eau. (surcertains modSles) du filtre 6 eau Cartouche Appugez sur la touche RESET WATER FILTER (remettre 6 z_ro le filtre d'eau) et La cartouche du filtre @ eau se trouve dans le tenez-la appuy6e pendant 3 secondes. coin droit arri6re sup6rieur du compartiment NOTE: Une cartouche de filtre _] eau r6frig6rateu,...
- Page 53 Les clayettes et les bulconnets, www.electromenagersge.ca caract4ristiques Toutes les ne sont pas disponibles sur tousles modules. Mise en place des clayettes Les clagettes du r6frig@ateur sont r6glables. Compartiment r_frig_ration Enl_vement: Soulevez la clagette 5 I'avant. Enleveztousles articles de la clagette. Soulevezla clagette 6 I'arri@eet faites-la sortie Certains...
- Page 54 Les clayettes et les balconnets. Bacs r6glables de porte Vous pouvez facilement transporter les bacs La s4paration aide a emp@cherlespetits r6glables du r6frig6rateur 5 votre surface articles qui se trouvent sur la clagette de la de travail, porte de se renverser,de couler ou de glisseE Tenez I'alv_olese trouvant _ I'arri@re de la Enl_vement: SoulevezI'avant du bac droit s@parationpar le doigt et faites bouger la...
- Page 55 Bacs6 rangement et bacs 6 I gume. www.electromenagersge Tousles modules n'ont pas routes ces caractaJistiques. Bacs 6 fruits et I_gumes Vous devez bien essuger toute eau en exc_s qui peut s'accumuler au fond des bacs ou en dessous des bacs. Bac 6 I_gume 6 humidit_ r_glable Isurcertains mod_/esJ Faites glisser le r_glage en position HIGH...
- Page 56 Cong@lateur. Tous tes mod_fes n'ont pus toutes cos caractdristiques. Clagettes et paniers du compartiment cong@lation Un p(]nier sup@rieurmince toute I(]rgeur Une cl(]gette situ&e (]u-dessus du b(]c dons le tiroir b(]s 6 gl(]gons Un p(]nier sup_rieur toute I(]rgeur dons Un p(]nier inf@rieurprofond toute I(]rgeur le tiroir hout dons le tiroir b(]s Un bac de stockage 6 glagons...
- Page 57 Machine 6 glagons automatique. qu'un gfoqons. 1flout prdvoir entre 12 et 24 heures ovont rdfrigdroteur nouveffement instoffd commence 6 produire Lo machine 6 glaqons se remplira d'eau si sa Machine 6 glagons automatique Commutateurdemarche Machine (surcertains mod61es) temperature baisse 6 -10°C (15°F). U n r@frigerateur nouvellement installe prend de 12 6 24 heures La machine 6 glaqons produit sept glaqons pour commencer 6 produire des glaqons.
- Page 58 Machine glagons automatique. Distribution precise (sur certains modules) Ce distributeur d'eau est dot@d'une fonction connue sous Appuyez la tasse contre le bras de distribution et le nom de << distribution pr@cise >>. Cette fonction vous I'eau s'_coulera. II s'arr&tera automatiquement permet de choisir une quantit@pr@cise d'eau.
- Page 59 www.electromenagersge.ca Derrigre le rgfriggrateur Abaissez les pieds d'inclinaisonjusqu'6 ce Prenez un soin particulier Iorsque vous qu'ils touchent le sol. _loignez le r_frig_rateur du mu_ Tousles types de rev_tements de sol peuvent _tre Lorsque vous remettez le r_frig_roteur endommag_s, particuli_rement ceux qui sont ploce en le poussont, veillez _ ne pos le coussin_s ou dont la surface est gaufr_e.
- Page 60 @lectrom@nagers I'arrbre de le pare-lumi@e et tirez-le pour en t@l@honantau service de pi@ces et le lib@erde ses taquets 6 I'arrbre. accessoires GE,au 1.888.261.3055. Faites tourner le pare-lumbre vers le bas, puis tirez pour lib@erlestaquets 6 I'avant de le pare-lumi@e.
- Page 61 Vous pouvez acheter IM PORTANT - Respectez toutes une trousse d'alimentation d'eau GE (contenant les ordonnances et les codes Iocau×. la tugauterie, le robinet d'arr_t, lesjoints et les Note 6 I'instelleteur - Assurez-vous de Ioisser ces instructions) chez votre revendeur ou en vous instructions au consommateur.
- Page 62 Instructions d'installation OUTILS DONT VOUS POUVEZ AVOIR BESOIN (SUITE1 Crayon Cisaille Tourne-_crou de 1/4 po Perceuse 6 main ou _lectriqueet m@che Niveau de 1/8 po !@tre INSTALLATION DU SUPPORT DE SOL DU MECANISME ANTI- BASCULEMENT (sur les modules de 21 pi) AVERTISSEMENT POSITIONNEMENT DU SUPPORT DE...
- Page 63 Instructions d'installation POSITIONNEMENT DU SUPPORT DE Construction de mur etsol en CIMENT : SOL ANTI-BASCULEMENT (suite) • Manchonsd'ancragerequis(nonfournis) /4tire-fonds1/4 pox 1 1/2 po 4 manchonsd'ancrageDE1/2 po Figure 2- Emplacement • Percez lestrousde taillerecommand6e pour lesmanchons acceptable des vis d'ancragedansle cimentau centredestrous marquis dans I'_tape2.
- Page 64 Enlevez les deux vis situ6es d'eau pr@sdu rdrig6rateur. Si vous utilisez une de chaque c6t6 _ I'arri_re du capuchon du haut. trousse GE SmartConnect T"Refrigerator Tubing, Soulevez et enlevez le capuchon du haut. vous aurez besoin d'un tugau additionnel Enlevez la porte du compartiment aliments frais.
- Page 65 I'ulimentution d'euu froide de la muison. pr6sence defuites. Si vous utilisez un tugau GE SmartConnectj" les 6crous sont d_j6 assembl6s au tuyau. BRANCHEZ LE CORDON DU Si vous utilisez un tugau de cuivre, ins@ez aussi loin que possible I'e×tr6mit6 du tugau REFRIGERATEUR DANS LA PRISE dans le raccord 6 I'arri@e du rdrig@ateur.
- Page 66 Instructions d'installation INSTALLATION DU REFRIGERATEUR (suite) ENLEVEZ LES POIGNISES DES TIROIRS ENLEVEZ LA POIGNI_E DE PORTE DU HAUT ET BAS DU COMPARTIMENT COMPARTIMENT POUR ALIMENTS FRAIS CONGISLATION IPour placer dans I'emplacement I'installation ou changer le sens d'ouverture Poign_es en acier inoxgdable et en mati_re plastique: des portes - sur certains modules)
- Page 67 Instructions d'installation FI×EZ LES POIGNI:ES DES TIROIRS FIXEZ LA POIGNI:E DE LA PORTE DU HAUT ET BAS DU COMPARTIMENT COMPARTIMENT ALIMENTS FRAIS CONGI_LATION Poign_e en acier inoxydable: O Fixezla poign_e uux fixations de montage de la Poign_es en acier inoxgdable et en mati_re plastique: poign_e et resserrez Q Fixezbien Iopoign@e ouxfixutions de montuge de Io lesvis de I'ensemble...
- Page 68 Instructions d'installation INSTALLATION DU REFRIGERATEUR (suite) RI_GLEZ LES C;OMMANDES METTEZ LE RI_FRIGI_RATEUR DE NIVEAU R6glez les commandes selon les recommandations. Les pieds de nivellementjouent deux r61es : 1) Elles peuvent _tre r_gl_es de mani@e 6 permettre (_ I'appareil de reposer solidement sur le sol.
- Page 69 Instructions d'installation ENLEVEMENT DESTIROIRSDU COMPARTIMENT CONGELATION ENLEVEZ L'AVANT DU TIROIR Vous pouvez enlever les tiroirs du compartiment cong_lation0 si n_cessaire, pour passer par des DES GUIDES endroits _troits. Enlevez les huit vis 6 t@e hexagonale de la Lisez ces instructions avec soin et compl_tement.
- Page 70 Instructions d'installation ENLEVEMENT DESTIROIRSDU COMPARTIMENT CONGELATION (suite) ENLEVEZ L'AVANT DU TIROIR Vous pouvez enlever les tiroirs du compartiment cong_lation, si n_cessaire, DES GUIDES pour passer par des endroits _troits. Enlevez les dix vis 6 t@te hexagonale de la Lisez ces instructions avec soin et compl_tement.
- Page 71 Instructions d'installation REMISE EN PLACE DESTIROIRS DU COMPARTIMENT CONGELATION REMISE EN PLACE DU PANIER DU COMPARTIMENT CONGI_LATION personnes pour terminer cette procedure. Vous aurez peut-_tre besoin de deux Remettez en place le panier du tiroir haut du TIROIR HAUT compartiment cong@lation (voir page 56).
- Page 72 Instructions d'installation REMISE EN PLACE DESTIROIRS DU COMPARTIMENT CONGELATION {suite} PLACEMENT ET FIXATION DE L'AVANT personnes pour terminer cette procedure. DU TIROIR AUX GUIDES (suite) Vous aurez peut-_tre besoin de deux Vissez compl@ement les vis (il g a 10 vis, 5 de TIROIR BAS chaque c6t@).
- Page 73 Instructions d'installation ENLEVEM ENT DES PORTES (modUles de r_frig_rclteurs 6 deux portes uniquement) ENLI_VEMENT DES PORTES DU NOTES IMPORTANTES COMPARTIMENT RIeFRIGIeRATION NOTE : Vous ne pouvez pas changer le sens d'ouverture des portes. Fermez les portes et attachez-les avec le ruban masque.
- Page 74 Instructions d'installation ENLEVEMENT DES PORTES (modUles de r_frig_rateurs 0 deux portes uniquement)(suite) ENLI_VEMENT DES PORTES DU ENLEVEZ LA CHARNIERE DU CENTRE COMPARTIMENT RI_FRIGI_RATION(suite) _, I'aide d'une cl6 6 douille de 5/16 po, enlevez les boulons qui tiennent la charni@e du centre Enlevez le couvercle de la charni@e du haut 6 I'armoire.
- Page 75 Instructions d'installation REMISEEN PLACEDES PORTES (modUles de r_frig_rateurs 6 deux portes uniquement) INSTALLATION DE LA CHARNI_:RE RE-SUSPENSION DES PORTES DU COMPARTIMENT RI_FRIGERATION {suite} DU CENTRE Assurez-vousque lejoint de la porte soit align6 contre Instailez la charni_re du centre de chaque c6t6. I'armoire et ne soit pas tordu.
- Page 76 Osmosis dans votre rdrig@ateur, la seule installation I'alimentation d'eau. Si vous utilisez un tugau en approuv_e est celle de la trousse GE RVKIT,Pour les cuivre, assurez-vous que les deux extr_mit_s autres sgst_mes d'osmose de I'eau, suivez les tugau soient couples bien droit.
- Page 77 Percez un trou de 1/4 po dans le tugau d'eau, 6 I'aide d'un foret dur. Enlevez toute barbure due compression. Ne coupezjamais I'extr6mit6 finie d'un tugau de la trousse GE SmartConnecf" Refrigerator au pergage du trou dans le tugau. Tubing.
- Page 78 Collier de serrage Assurez-vous que le tugau soit bien ins@r@ dans le robinet. Serrez fort 1'6crou de compression. Pour le tugau en mati@re plastique d'une trousse GE SmartConnect T' Refrigerator Tubing, ins@rez I'extr6mit@ moul6e du tugau dans le robinet Robinet d'arr_t...
- Page 79 Bruits de fonctionnement normaux, www.electromenagersge.ca Les rdrigdrateurs plus rdcents font des bruits diffdrents de ceux des anciens. Les rdfrigdmteurs modemes prdsentent plus de fonctions et sont plus avancds sur le plan technologique. Entendez-vous ce que j'entends ? Ces bruits sont normaux. OUIR ! HUMMM...
- Page 80 Avant d'appeler un r parateur... Correctifs Causes possibles Lemoteur fonctionne Ceciest normal Iorsquele • Attendez24 heurespour que le rdrigerateurrefroidisse pendantde Iongues r_frig_rateur vient d'etrebranch& compl_tement. p_riodesou d_marreet Ceciarrive souventIorsque • C'estnormal. s'arrgtefr_quemment, une grande quantit_ d'aliments _Les r_frig_rateurs a _t_ raiseau r_frig_rateur. moderneset leurs cong_lateurs_tantplus Portelaiss_eouverte.
- Page 81 www.electromenagersge.ca Causes possibles Correetifs Odeur/saveur Desalimentsant transmis leur • Emballez bien lesaliments. anormaledesg!a_ons odeur/go_t au×gla_ons. II faut nettoger I'int_rieur du • Consultez Entretien et nettogage. r_frig_rateur. • Gardez une boite de bicarbonate de soude ouverte dans votre r@frig@ateu_ Remplacez-la tousles trois mois. Formationlentedes Portelaiss_e ouverte.
- Page 82 Avant d'appeler un r parateur... Causes possibles Correctifs Mauvais goElt/odeur Le distributeur d'euu n'u pus • Faitescouler I'eaujusqu'6 ce que I'eau du sgst#me soit de I'eau _t_ utilis_ depuis Iongtemps. remplac6e par de I'eau fraTche. L'eau vers_e dens le Normal Iorsque le r_frig_ruteur •...
- Page 83 www.electromenagersge.ca iiii !! i!i!ilii!!!ii!!!!! ili!iiiiiiiiiiii!ii I Correctifs Causes possibles La fonction TurboCool est active. • Consultez la section TurboCool pour de plus amples Man #.cran indique b c informations. Le vogant!umineuxdu C'est normal. • Consultez la section Filtre d'eou pour de plus amples fi!tre d'eau a chang_ de informations.
- Page 84 (_ partir de la R@aration ou date d'achat) remplacement choix de Habe Compresseur GE Profile : Dix (10) arts GE Profile : Dix (10) arts GE Profile : Cinq (5) arts GE et toutes autre GE et toutes autre GE et toutes autre...
- Page 85 Feuillet de donn6es relatives _ la performance Cartouche GSWF du sgst_me Filtration d'eau GE SmartWater Ce sgst#me a #t# essag# selon les normes NSF/ANSI 42/53 pour une r#duction des substances #num6r#es ci-dessous. La concentration des substances indiqu6es dons I'eau qui entre dons le sgst_me...
- Page 86 Moncton, N.B. E1C 9M3 Prolongation de gorontie www.dectromenegersge.ce Achetez un contrat d'entretien GE avant que votre garantie n'expire et b6n_ficiez d'un rabais substantiel. Ainsi le service apr_s-vente GE sera toujours 18apr_s expiration de la garantie. Visitez notre site Web ou appelez-nous au 1.800.461.3636.
- Page 87 Informaci6n de seguridad ..88,89 Instrucciones de operaci6n Caracteristicas adicionales ....C6mo reemplazar las bombillas de luz ....Congelador ......Cuidado g limpieza del refrigerador ...... 98, 99 El filtro de agua ......Gavetas preservadoras g contenedores ......Los controles del refrigerador ..90-91 Los estantes g compartimientos del refrigerador ......
- Page 88 INFORMACIONES IMPORTANTES DE SEGURIDAD. LEA PRIMERO TODAS LAS INSTRUCCIONES. iADVERTENCIA! Use este aparato s61opara los fines que se describen en este Manual del propietario. PRECAUCIONES DE SEGURIDAD Cuando use electrodomdsticos, siga los precauciones bdsicas de seguridad, inclublendo los siguientes: iJi:: Antes de usarse, este refrigerador deber6 estar ::J_:, Si su refrigerador tiene un dispositivo autom6tico instalado y ubicado de acuerdo con las...
- Page 89 ,It,iADVERTENCIA! COMO CONECTAR LA ELECTRICIDAD Ba]o ninguna cimunstancia debe cortar o quitar la temera punta (tierra) de la clavija. Pore su seguridad personal, este apomto deberd conectorse debidamente a tierra. El cable el@ctricode este aparato est(i equipado con Esto garantiza la mejor ejecuci6n y evita la...
- Page 90 Los controles con niveles de temperaturas. (Nodelos con controles dentro del refrigerodor) @ E.ERGV SAVER FREEZER ] [ REFRIGERATOR L_fiiL_J L__2Lfi__. Hold for 3 Seconds to oct[vote Lock fl'4odelos con controles en Io puerto) NOTA: El reffigerador se envfo con uno pelfcula de protecci6n que cubre los controles de la temperatura.
- Page 91 Acerca de TurboCooL (en algunos moddos) ge.com C6mo funciona Turbo Cool C6mo usar TurboCool enfria r@idamente el compartimiento del refrigerador para PresioneTurboCool. La temperatura enfriar los alimentos m6s rdpidamente. del refrigerador mostrar6 be. Use TurboCool cuando agregue grandes Despu6s de que TurboCool sea completado,...
- Page 92 Estedos Unidos, visite nuestro sitio Web, hacer hielo. ge.eom, o llama a GE pare purtes aecesorios el 800.626.2002. En los modelos con dispensadores externos, podr6 verse "ReplaceWater Filter"(Cambie Modelo GSWF el filtro de ague) en la parte superior de la pantalla de LCD.
- Page 93 Sobre los estantes y compartimientos, ge om No todas las caracteristicas estdn presentes en todos los modelos. Reorganizaci6n de los estantes Los estantes en el compartimiento del refrigerador son ajustables. Compartimiento del refrigerador Para quitar: Quite todos los elementos del estante.
- Page 94 Sobre los estantes y compartimientos. Compartimientos ajustables en la puerta Loscompartimientos ajustables pueden El reborde auuda a evitar la caida, derramamiento o deslizamiento de IlevarsefScilmente del reffigerador al 5tea de trabajo. elementos pequeSos que se almacenen en el estante de la puerta. Agarre el retenedor del Para retirarlos: Levante el estante recto U dedo cerca de la parte posterior del reborde U luego h@lelo.
- Page 95 Sobre las gavetas preservadoras g contenedores. No toclas las caracteristicas estdn presentes en toclos los modelos. Gaveta preservadora de frutas g vegetales El exceso de agua que pueda acumularse al fondo de las gavetas debe retirarse g se deben limpiar las gavetas. lenalgunos Gaveta preservadora...
- Page 96 Sobreel congelador. No todas las caracteristicas estdn presentes en todos los modelos. Estantes y canastas del cangeladar Un estante par encima del recipente para Una canasta superior poco profunda de hielo ancho completo en la gaveta inferior Una canasta inferior profunda de ancho Una canasta superior de ancho completo en el estante superior completo en la gaveta inferior...
- Page 97 Sobre la m6quina de hielo autom6tica. refrigerador recientemente instalado puede tomar entre J2 y 24 horas para empezar a hacer hielo. M6quina de hielo autom6tica Interruptor de corriente H6quina (on dgunos moddos) Escuchar6 un zumbidocadavez que la m6quina La m6quinade hielosproducir6sietecubos por de hielosseIlenede agua.
- Page 98 Sobrela m6quina de hielo autom6tica. Llenodo preciso (en algunos modelos) Este dispensador de agua tiene una funci6n que se llama Coloquela taza presion6ndola contra el brazo "llenado preciso'. Esta funci6n le permite seleccionar la g comenzar6 a salir agua. Se detendr6 cantidad precisa de agua.
- Page 99 Atrds del refrigerador Se deber6 tener cuidado al retirar el Baje las patas niveladoras hasta que toquen refrigerador de la pared. Todos lostipos de el piso. recubrimiento de pisos se pueden da_ar, AI empujor el refrigerodor o su lugor,...
- Page 100 Conecte de nuevo el refrigerador. NOTA:Lasbombillas del artefacto pueden O Para retirar el protector de la luz, tome solicitarse en Piezas g Accesorios de GE, el protector per la parte posterior g hale 800.626.2002. hacia fuera para liberar las pestahas en la parte posterior.
- Page 101 I "e'rige IMo, a InstaJaci6n Gavetas de congelador dobles I iPreguntas? Llame al 800.GE.CARES (800.432.2737) o bien Visite nuestra p6gina Web: ge.com ANTES DE INICIAR MATERIALES QUE NECESITA (no incluidos) Lea estas instrucciones completa y cuidadosamente. • IMPORTANTE - Guarde...
- Page 102 Instrucciones para la instalaci6n COMO INSTALAR EL SOPORTE DE PISO ANTI-VOLCADURAS (en modelos de 21 pies) [] C6MO UBICAR EL SOPORTE DE PISO ANTI-VOLCADURAS Coloque la plantilla de ubicaci6n del soporte de piso anti-volcaduras (incluida en el kit anti- volcaduras) sobre el piso contra la pared trasera, dentro de W, alineada con la ubicaci6n En ciertas circunstancias,...
- Page 103 instrucciones ara ia instalaci6n C6MO UBICAR EL SOPORTE Construcci6n de pared y piso de HORMIGON: (cont.) DE PISO ANTI-VOLCADURAS • Anclajes requeridos (no incluidos): 4 pot cada perno de fijaci6n de 1/4" x 1 1/2" Figura 2 - Ubicaciones de tornillos 4 por cada anclaje de manguito de 1/2"...
- Page 104 instrucciones ara ia instalaci6n NSTALACION DEL REFRIGERADOR UBICACI6N DEL REFRIGERADOR RETIRO DE LA TAPA SUPERIOR (continuaci6n) (en algunos modelos) • No instale el refrigerador donde la temperatura baje de 60°F(16°C)ga que no correrd con suficiente frecuencia REINSTALACION DE LAS PUERTAS, para mantener las temperaturas apropiadas.
- Page 105 instrucciones ara ia instalaci6n ACTIVE LA CONEXI6N DE AGUA C6MO CONECTAR EL REFRIGERADOR LA LJNEA DE AGUA DE LA CASA (cont.) (modelos con la m6quina de hielos o el Si usted est6 usando tuberia de cobre, inserte el extremo de la tuberia en la conexi6n del refrigerador, Hagapasarla corrientede en la parte posterior del refrigerador, hasta don@ aguaenla v61vula decierre(el...
- Page 106 instrucciones ara ia instalaci6n INSTALACION DEL REFRIGERADOR (cont.) RETIRE LAS MANIJAS DE LAS [] RETIRE LA MANIJA DE LA PUERTA GAVETAS DEL CONGELADOR DE ALIMENTOS FRESCOS SUPERIOR E INFERIOR (Para la colocaci6n en el lugar instalaci6n o la inversi6n de las manijas Nanijas de acero inoxidable g pl6stico: en algunos...
- Page 107 instrucdones ara ia instalad6n [] SUJETE LAS MANIJAS DE LAS SUJETE LA MANIJA DE LA PUERTA GAVETAS DEL CONGELADOR DE ALIMENTOS FRESCOS SUPERIOR E INFERIOR Manija de acero inoxidable: Q Sujete lamanija Manijas de acero inoxidable g pl6stico: a los tornillos de Q Sujete la manija firmemente a lostornillos de montaje g ajuste montaje g ajuste lostornillos de fijaci6n en la parte...
- Page 108 Instrucciones para la instalaci6n INSTALACION DEL REFRIGERADOR (cont.) C6MO NIVELAR EL REFRIGERADOR AJUSTE LOS CONTROLES Las patas niveladoras tienen dos prop6sitos: Ajuste los controles donde se recomienda 1) Las patas niveladoras se ajustan para que el refrigerador est@colocado firmemente en el piso g no tambalee.
- Page 109 instrucciones ara ia instalaci6n COMO RETIRAR LAS GAVETAS DEL CONGELADOR RETIRE EL FRENTE DE LA GAVETA Si es necesario, es posible retirar las gavetas del DESDE LAS CORREDERAS congelador para que el refrigerador quepa en 6reas estrechas. Saque los 8 tornillos hexagonales de la puerta Lea estas instrucciones completa...
- Page 110 instrucciones ara ia instalaci6n COMO RETIRAR LAS GAVETAS DEL CONGELADOR (suite) RETIRE EL FRENTE DE LA GAVETA Si es necesario, es posible retirar las gavetas del congelador para que el refrigerador quepa en DESDE LAS CORREDERAS 6reas estrechas. Saque los 10 tornillos hexagonales de la puerta Lea estas instrucciones completa g cuidadosamente.
- Page 111 instrucdones ara ia instalad6n COMO REEMPLAZARLAS GAVETASDEL CONGELADOR REEMPLACE LA CANASTA para completar este procedimiento. DEL CONGELADOR Es posible que sean necesarias dos personas Reemplace la canasta del congelador de la GAVETA SUPERIOR gaveta superior (yea pagina 96), UNA YASEGURE EL FRENTE DE LA GAVETA A LAS CORREDERAS Halelasensambladuras de lascorrederashasta la m6ximaIongituden cada lado delgabinete.
- Page 112 Instrucciones para la instalaci6n COMO REEMPLAZARLAS GAVETASDEL CONGELADOR (suite) UNA Y ASEGURE EL FRENTE DE LA para completar este procedimiento. GAVETA A LAS CORREDERAS (cont.) Es posible que sean necesarias dos personas Ajuste los tornillos por completo. (Hay 10 GAVETA INFERIOR tornillos, 5 en cada lado).
- Page 113 instrucdones ara ia instalad6n RETIRAR LAS PUERTAS COMO (Modelos de refrigerador de doble puerta 6nicamente) NOTAS IM PORTANTES RETIRE LAS PUERTAS DEL REFRIGERADOR NOTA: El vaiv_n de la puerta no es reversible. Pegue las puertas por completo con cinta. • Lea las instrucciones completas antes de empezar. •...
- Page 114 instrucciones ara ia instalaci6n RETIRAR LAS PUERTAS COMO (Modelos de refrigerador de doble puerta 6nicamente) (cont.) RETIRE LA PUERTA [] C6MO QUITAR LA BISAGRA CENTRAL DEL REFRIGERADOR (cont.) Hediante una Ilave de cubo de 5/16", quite los pernos que sujetan la bisagra central al Saque la tapa de la bisagra en la parte superior gabinete.
- Page 115 Instrucciones para la instalaci6n COMO VOLVER A COLOCAR LAS PUERTAS (Modelos de refrigerador de doble puerta t_nicamente) VUELVA A COLGAR LAS PUERTAS DEL INSTALE LA BISAGRA CENTRAL REFRIGERADOR (CONT.) Instale la bisagracentralencadalado. En las puertas de la derecha, pase los cables y linea de agua a trav6s del perno de la bisagra central.
- Page 116 Instrucciones para la instalaci6n COMO VOLVER A COLOCAR LAS PUERTAS (Modelos de refrigeradorde doble puerta Onicamente) (cont.) ALINEAR LAS COMO PUERTAS DOBLES Si la parte superior de las puertas est6 desigual, primero intente levantar la puerta m6s baja girando la pata niveladora en el mismo costado de la puerta hasta que las puertas est_n niveladas.
- Page 117 • Un kit de suministro de agua de GE (contiene tuberia, m6quina de hielos est_ en la posici6n O (apagado), v61vula de apagado Uaccesorios enumerados abajo) No instale la tubefia de la m6quina de hielos en lugares...
- Page 118 [] SELECCIONE LA UBICACI6N • Si est6 usando un kit de tuberia para el refrigerodor DE LA VALVULA SmartConnect T'de GE,los accesorios necesarios ga vienen preinstalados en la tubefia. Seleccione una ubicaci6n para la v61vula que sea f6cilmente accesible. Es mejor conectarla en el costado de una tuberfa vertical de agua.
- Page 119 Apriete la tuerca de compresi6n firmemente. Para tubeHa de pl6stico de un kit de tuberfa para el refrigerador SmartConnect _M de GE, inserte el V61vula de Tuberia vertical extremo moldeado de la tuberia en la v61vula de...
- Page 120 Sonidos normales de la operaci6n. mds nuevosproducen sonidosdiferenteso los modelos mds ontiguos. Los refrigemdores refrigerodoresmodemos tienenmds funcionesy uson tecnologio mds reciente. _Usted escucha Io que yo escucho? Estos sonidos son normales. HMMMM... iWHIR! WHOOSH ..:_ El nuevocompresor de alta eficiencia puedefuncionar m6s r6pido Udurar m6s que el de su refrigerador anterior U puede escuchar un zumbido de tono alto o un sonido _s: Puedeescucharlos ventiladoresmovi_ndosea gran...
- Page 121 Causas Posibles Qu_ hacer Vibraciones o sacudidas Las patas niveladoras • Yea C6mo nivelar el refrigerador. (una vibraci6n ligera requieren un ajuste. es normal) Elmotor opera durante Es normal cuando • Espere24 horas para que el refrigerador se enfrie...
- Page 122 Antes de solicitor un servicio... Causas Posibles Qu_ hacer Sonido de zumbido El interruptor del suministro • Coloqueel interruptor en la posici6n 0 (opagado}. frecuente el_ctrico de la m6quina de Mantenerlo en la posici6n I (encendido)dafiar6 la hielos est6 en la posici6n vSIvula de agua.
- Page 123 Causes Posibles Qu_ hacer La puerta/gaveta no se Las patas niveladoras • Consultela secci6n Instoloci6n del refrigerado_ cierra solo necesitan ajuste, La puerta/gaveta del Esto es normal si despu_s de • Esto indica qua hag un buen sellante en la puerta/gaveta...
- Page 124 Antes de solicitor un servicio... Causas Posibles Qu_ hacer La pantalla muestra L € La funci6n TurboCool • Ver Sabre TurboCoolpara m6s informaci6n. se encuentra activada. La iuz del indicador del Esto es normal. • Ver Sabre el filtro de agua para m6s informaci6n. filtro de agua cambi6 de color La luz del indicador del...
- Page 125 A partir de la fecha tuberfas de conexi6n) que fallen debido a defectos en los materiales o fabricaci6n. Durante esta garantia limitada de cinco ahos del sistema sellado de refrigeraci6n, GE tambi6n proporcionarc], de !a compra original sin costa alguno, toda la mano de obra g el servicio relacionado para reemplazar partes defectuosas del sistema sellado de refrigeraci6n.
- Page 126 Hoja de Datos de Funcionamiento Sistema de Filtraci6n GE SmartWater Cartucho GSWF Este sistema se ha sometido a las pruebas NSF/ANS142/53 a fin de reducir las sustancias presentadas a continuaci6n. Se redujo la concentraci6n de las sustancias indicadas en el agua...
- Page 127 Soliciteuna reparaci6n ge.com El servicio de expertos GE est6 a tan s61oun paso de su puerta, iEntre en linea y solicite su reparaci6n cuando le venga bien 24 horus al dia cualquier dia del ar_o!O Ilame al 800.GE.CARES ( 800.432.2737)durante horus normales de oficina.
- Page 128 Contact Us ge.com In the U.S.: If you are not satisfied with the service you receive from GE,contact us on our Website with all the details including your phone number, or write to: General Manager, Customer Relations GE Appliances, Appliance Park Louisville, KV 40225 In Canada: www.geappliances.ca,...
Need help?
Do you have a question about the PGSS5PJXASS and is the answer not in the manual?
Questions and answers