Table of Contents
Advertisement
Available languages
Available languages
Quick Links
Download this manual
See also:
Operator's Manual
Advertisement
Table of Contents

Related Manuals for Craftsman 172.26729


Summary of Contents for Craftsman 172.26729
- Page 1 Owner's Manual ICRAFTSMAN 31/4-1N. PLANER Model No. 172.26729 • SAFETY CAUTION: Read, understand and follow • OPERATION • MAINTENANCE all Safety Rules and Operating Instructions in this manual before using this product, • ESPANOL, PAGINA 21 Sears, Roebuck and Co., Hoffman Estates, IL 60179 U.S.A.
-
Page 2: Work Area Safety
to follow all ip_ructions listed below may result in electric shock, fire and/or J Z_ WARNING: BE SURE to read and understand all instructions. Failure serious personal injury. WORK AREA SAFETY 1. ALWAYS keep your work area clean and well IlL Cluttered and dark areas Invite accidents. -
Page 3: Personal Safety
PERSONAL SAFETY 1. ALWAYS stay alert, watch what you are doing and use common sense when operatlng s power tool. DO NOT use tool while tired or under the influence of drugs, alcohol or medication. A moment of inattentionwhile operating power tools may result in serious personal injury. 2. -
Page 4: Service Safety
TOOL USE ANDCARE SAFETY cont. WARNING: USEOF ACCESSORIESTHAT ARE NOT RECOMMENDED I FOR USEWITHTHISTOOL MAYCREATEA HAZARDOUSCONDITION. 8. ALWAYS use only accessorles that are recommended for this tool. Accessories that may be suitable for one tool can become hazardous when used on another tool. SERVICE SAFETY I. - Page 5 ADDmONAL RULES FOR SAFE OPERATION cont. 6. ALWAYS check for damaged parts. Before further use of the toot, a guard or other part that is damaged should be carefully checked to determine If it will operate properly and perform its intended function. Check for misallgnment or binding of moving pads, breakage of parts, and any other condition that may affect the tool's operation.
- Page 6 ADDITIONAL RULES FOR SAFE OPERATION cont. /_ WARNING: The operation of any planer can result in foreign objects being thrown intoyour eyes, which can result in severe eye damage. Before beginning powertool operation,ALWAYS wear safety goggles or safety glasses with side shield and a full face shield when needed. We recommend A Wide Vision Safety Mask for use over eyeglasses or standard safety glasses with side shield, available at Sears Retail Stores.
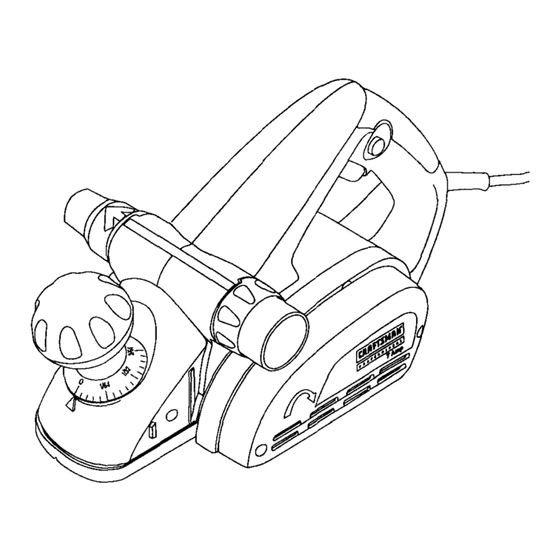
- Page 7 KNOWYOUR PLANER (SeeFig.1) Before attempting to use any tool, be ,sureto familiarize yourself with all the operating features and safety instructions. Your planer has many built-inconveniencefeatures for fast, efficientcutting. It is compact and lightweightfor easy, comfortableuse. The depth adjustment knob is conveniently located at the front of the planer and allows easy depth adjustments from 0 to 1/8-in.
- Page 8 input 7 Amps 3 1/4 in. Cutting Width Cutting Depth 0 to l/B-in. Max. Rabbet Cut 15/16-in. Rating 120 volts, 60 Hz AC No-Load Speed 12,000 RPM...
-
Page 9: Preparing For Operation
when you are assembling parts,makingadjustments, c hanging beltsor blades, cleaningplaner,or when not in use,Disconnecting planerwillpreventaccidental I/Jk WARNING: Your planer s hould NEVERbeconnected t opower s upply startingthatcouldcauseseriousinjury. PREPARING FOR OPERATION Your planer has a rear handle and front assist handle for ease of operation.They provide the two-hand operation which is necessary to maintain proper controlof the planer.ALWAYS keep both hands clear of the blades and the cutting area. - Page 10 THECORRECT WAY TOUSE YOUR PLANER (SeeFig,2)cont. 4,ALWAYS o perate t heplaner w iththe chipchute exhaust turned so it points away from your face and eyes. All visitors should wear safety glasses and be kept a safe distance from the work area. 5, ALWAYS hold your planer so the blades DO NOT come in contact with the work piece BEFORE you squeeze...
-
Page 11: General Cutting
GENERAL CUTTING 1. Adjust planer to desired depth. 2. ALWAYS grip the planer with your left-hand holdingthe front handle and your right hand holdingthe top handle. 3, Place front shoe fiat on the work piece, ALWAYS make sure that the blades are not touchingthe work piece. - Page 12 ACCESSORIES INCLUDED WITH YOUR PLANER To make yourplaner even more versatilewe have included 2 special accessories. They are an Edge Guide and a Rabbeting Plate. ATTACHINGTHE EDGE GUIDE (See Figure 5) 1. Unplug your planer. your planer could resultin accidental I /_ WARNING: Failureto unplug I...
- Page 13 TO ADJUSTTHE DEPTH OF RABBEt" CUT 1. Unplug your planer. I /_ starting, causingserious injury. WARNING: Failureto unplugyour planer could result in accidental 2. Place planer on a flat board or work piece. 3. Loosen the screw and positionthe bottom surface of the Rabbet Guide above the board the same distance as the desired depth of cut.
- Page 14 REPLACINGTHE BLADES (See Figures 7 to 9) conL I Z_ CAUTION: Blades are very sharp. ALWAYS handle bladesvery carefully Failureto do so could result in possibleseriousinjury. NOTE: DO NOT remove the blade clamp.This could alter the factory setting for cuttingheight and blade height. NOTE: DO NOT adjust the height adjusting screws.
- Page 15 SERVICE personnel may result In misplacingof Internal wires and components, w hich k WARNING: Preventativemaintenanceperformedby unauthorized could causea serioushazard. • All service that requires opening the planer MUST only be performed by a Seam Service Center. All motor parts represent an important part of the double insulation system and MUST only be serviced by a Sears Service Center.
-
Page 16: Double Insulation
LUBRICATION All of the bearings in this tool are lubricatedwith a sufficientamount of high-grade lubricantfor the life of the tool under normal operating conditions, Therefore, no further lubrication is required. I Z_ WARNING: shieldswhenusing thistoolorblowing dust.Ifoperation i sdusty, alsoweara dustmask. ALWAYS wearsafetygoggles or safetyglasses withside DOUBLE INSULATION Double insulationis a safrty feature in safety in electric power tools, that... - Page 17 POWER PLANER - MODEL NUMBER 172.26729 The Model Numberwillbe foundonthe Nameplate.Alwaysmentionthe Model Number in all correspondenceregardingyourtool Qu_mty Part No. Quantity Part No. Ducdptlon D_mcrlptlon SB19.0.02-00 Handle SW57,24.0-00 Screw SW55.58.0-00 Self-tanolna screw SB19.1.04-00 Upper blade hiD Rated lable SB19.1.08-00 Blade SB19.0.15-00 SB19.0.05-00 SB19.1.05-00 Lower blade nlv...
- Page 18 POWER P LANER - MODEL N UMBER 1 72.26729...
- Page 19 NOTES...
- Page 20 Manual del Usuario CEPILLADORA DE 31/4 PULG. Modelo No. 172.26729 ATENCION: Antes de usar esta herramienta, • SEGURIDAD lea, comprenda y siga todas las reglas de seguridad y las instrucciones de funcionamiento • FUNCIONAMIENTO incluidas en este manual. • MANTENIMIENTO Sears, Roebuck and Co., Hoffman Estates, IL 60179 U.S.A.
- Page 21 DE UN AI_IO DE LA CEPILLADORA CRAFTSMAN PROFESSIONAL 31/4 PULGADAS Siesta cepilladora CRAFTSMAN falla debido a un defecto de material o de fabricaci6n dentro de un aSo de la fecha de compra, Sears la reparara gratuitamente EL SERVICIO BAJO LA GARANT|A PUEDE OBTENERSE SIMPLEMENTE...
-
Page 22: Seguridad En El Lugar De Trabajo
las Instrucciones. El Incumplimlento de todas las Instrucclones slgulentes podr'a producir un choque el_trico, Incendlo y/o leslones ADVERTENCIA: ASEGURESE de leery comprender todas personales graves. SEGURIDAD EN EL LUGAR DETRABAJO 1. SIEMPRE mantanga el Iugar de trabaJo Ilmplo y blen Ilumlnsdo. Las dreas de trabaJodesordenadae favomcen los accidentes. - Page 23 SEGURIDAD PERSONAL 1. SIEMPRE mant6ngase alerta, observe Io que es tl haclendo y use s entldo comt_n cuando es|6 usendo una herramlente eldctrlca. NO use la herramlente cuando set6 cansedo o ba|o la Influencla de drogas, alcohol o medicines. Un momento de distracci6n cuando est_ tmbajando con las han'amientas alectricas, puede ocasionar una tasibn personal grave.
- Page 24 USOY CUIDADO DE LA HERRAMIENTA cont. ADVERTENCIA: EL USO DE ACCESORIOS QUE NO HAN SIDO RECOMENDADOS PARA USAR CON ESTA HERRAMIENTA PUEDE CREAR UNA SITUAClON DE PEUGRO. 8. SIEMPRE use solamente los accesorlos recornendados por el fabrlcante para este modelo. Los aecesorios qua pueden ser adecuados pars una herramienta, pueden set peligrosoe si se utilizan en otra.
- Page 25 REGLAS ADICIONALES PARA FUNCIONAMIENTO SEGURO cont, 6. SIEMPRE inspeccione las piezas dai_adas. Antes de segulr utilizando Is herramienta, Inspeccione pare determinar si algun protector o cualquler pieza que est6 datiada funclonar_ debldamente. Verlflque el allneamlento delas plezas m6vlles, sl est6n atascadas o si hay rotura de plezes y cualquler otro estado que pueda afectar el funclonamlento de la herramlenta.
- Page 26 REGLAS ADICIONALES PARA FUNCIONAMIENTO SEGURO cont. Z_ ADVERTENCIA: Lautillzaci6n decualquler cepUladom puedecausar la proyecci6n de objetosextraiios susojos, Io cual puedeocasionarda_os ocularesseveros. Antesde comenzara usarla herramientamec_mica, SlEMPRE usesus lentesprotectores o galas de seguridad con protecci6n lateraly una mdscaracompletacuandosea necesario. R ecomendamos una Mdscarade Visi6nAmplia para usar sobresuslentesprotectores o suslentesde seguridadestdndar, c on proteccibn lateral,disponible en los AlmacenesSears.
- Page 27 CONOZCA SU CEPILLADORA (Ver Fig. 1) Antes de usar cualquier herramienta, familiarlcesecon todas las caracterfsUcas de funcionamiento e instruccionesde seguridad. Su cepilladora tiene muchas caractedsticasOtiles incorporadaspara cortar rdpida y eficientemente. Es compacta y liviana pare comodidad y facilidadde uso. La periUade ajuste de la profundidadestd convenientementecolocada en la parte delantera de la cepilladora y permite ajustar fdcilmente la profundidad de 0 a 1/8 pulg.
- Page 28 • • • • i o]I,[IjI=JI_O] Potencia Nominal 7 Amps Anoho de corte 3 1/4 pulg. Profundidad de corte 0 a 1/8 pulg. Corte de rebajo m_Lx. 15/16 pulg. Potencia nominal 120 voltios, 60 Hz CA Velocidad sin carga 12.000 RPM...
- Page 29 fuentede alimentaddn cuandoest6instalando piezas,haciendo ajustes, c ambiando correasu hojas, I I'mpi_ndola o cuandonoestden uso.AIdesenchufar sucepilladora _ ADVERTENCIA: Sucspilladora NUNCAdebeestarenchufada en la evitard la puesta en marcha accidental quepedda provocar u nalesi6n personal grave. PREPARACION PARA LA UTILIZACION Para facilidadde uso su cepilladora est&equipada con una manijatrasera y una manija delantera.
- Page 30 LA MANERA CORRECTA DE USAR SU CEPILLADORA (Ver Fig. 2) cont. 4, SIEMPRE trabaje con la cepilladora de modo que el conductopara descarga de virutasquede dirigido lejosde su cara y de sus ojos. Todos los espectadores deben usar lentes protectores y mantenerse a una distaneia prudente del &rea de trabajo.
- Page 31 CEPILLADO GENERAL 1. Ajustesu cepilladoraa la profundidad de corte deseada. 2. SIEMPRE sostengala cepilladoracon su mano izquierdasujetandota perilla delantera y su mano derecha sosteniendola manija superior. 3. Colocjuela placa frontal plana sobra la pieza de trabajo. SIEMPRE asegurese de que las hojasno est_n tocandola pieza de trabajo. 4.
- Page 32 ACCESORIOS INCLUIDOS CON SU CEPILLADORA Para mayor versatilidadde su cepilladorahemos incluido2 accosorios especiales: ana gufa de borde y una placa para rebajos. INSTALACION DE LA GUIA DE BORDE (Ver Figura 7) 1, Desenchufe la cepilladora, Z_ ADVERTENCIA: Sino desenchufasu cepilladora,se pueda producirla puesta en marcha accidentalcausando una lesi6n grave.
- Page 33 AJUSTE DE LA PROFUNDIDAD DE CORTE DE REBAJOS 1. Desenchufe la cepilladora Z_ ADVERENClA: Si no desenchufasu cepilladora,se puede producir la puesta an marcha accidentalcausando una lesi6ngrave. 2. Coloque la cepilladora an una pieza de tmbajo o tabla plana. 3. Afloje el tornilloy coloque la superficie inferiorde la gufa para rebajos sobre la tabla a la misma distancia que la profundidaddeseada de corte, 4.
- Page 34 REEMPLAZO DE LAS HOJAS (Ver Flguras 7 a 9) cont, ATENCION: Las hojas son muyafiladas,SIEMPRE manipule las hojas con muchocuidado.De Io contradose puede causar una posiblelesi6n grave. NOTA: NO retire la abrazadera de la hoja, Esto puede alterar el ajuste de tdbrica para la altura de corte y altura de la hoja.
- Page 35 SERVICIO personal no autorlzado puede resultar en colocacl_n Incorrecta de los ,/_ ADVERTENCIA: El mantenlmlanto preventive efectuado per cables y componentes Internes, Io ¢ual podn'acausar un rlesgo grave. • Todo Upo de servicio que recJuiera tener que abrir la cepilladora DEBE set realizado solamante per un Centre de Servicio Sears, Todes las piezas del motor representanuna parte importante del sistema de aislamientodeble y DEBEN set reparadas solamente per un Centre de Servicio Sears.
- Page 36 LUBRICACION Todos l os cojinetesen esta herramienta han side lubricados con suficiente cantidad de lubricantede alta calidad para durar toda la vida Otilde la herramienta, bajocondicionesnormales de funcionamiento. Pot Io tanto, no se requiera lubricaci6nadicional. conprotectores l ateralescuando utUico estaherramianta o cuando seresoplando A DVERTENCIA: SlEMPREuselentesprotectores o lentes de seguridad polvo.
- Page 37 CEPILLADORAELECTRICA- MODELO NUMERO172.26729 El N_merode ModeloIo emcontmrd e n la placade fabdcante. Siempremenctone el N,_mero de Modelocuando haga unaconsulta sobmsu herrandenta. Cantldad PleBs No. Pleza No. Ducrlpclon CanUdsd Deam'Ipclon SW57.24,0-00 Tomillo SB19.0.02-00 Manija SW55.58.0-00 Tomllloautormscante Reteneder sul)edorde 18hola SB19.1.04-00 SB19.1.08-00 HoJa SB19.0.15-00 Etiquetade PotenclaNominal...
- Page 38 Your Home For repair in your home of all major brand appliances, i!ii_i_iiii! lawn and garden equipment, or heating and coolingsystems, no matter who made it, no matter who sold it] For the replacement parts, accessories and i!iii!i+i!i!! owner's manuals that you need to do-it-yourself. +:::.:_: ::::::::::::: For Sears professionalinstallationof home appliances...
Need help?
Do you have a question about the 172.26729 and is the answer not in the manual?
Questions and answers