Advertisement
Quick Links
Operator's Manual
®
P R O F E S S I O N A L
7 Amp
3
/
-in. Planer
1
4
Model No.
172.267290
CAUTION:
Read, understand and follow
all Safety Rules and Operating Instructions
in this manual before using this product.
Sears Brands Management Corporation,
Hoffman Estates, IL 60179 U.S.A.
www.sears.com
3025736
Double Insulated
• WARRANTY
• SAFETY
• UNPACKING
• DESCRIPTION
• OPERATION
• MAINTENANCE
7/6/12
Advertisement

Related Manuals for Craftsman 172.267290


Summary of Contents for Craftsman 172.267290
- Page 1 Operator’s Manual ® P R O F E S S I O N A L 7 Amp -in. Planer Model No. 172.267290 Double Insulated CAUTION: Read, understand and follow all Safety Rules and Operating Instructions • WARRANTY in this manual before using this product.
-
Page 2: Table Of Contents
SAFETY ALERT SYMBOL: Indicates DANGER, WARNING, OR CAUTION. May be used in conjunction with other symbols or pictographs. CRAFTSMAN PROFESSIONAL ONE YEAR LIMITED WARRANTY DANGER: Indicates a hazardous situation which, if not avoided, will result FOR ONE YEAR from the date of purchase, this product is warranted against any in death or serious injury. - Page 3 SAFETY INSTRUCTIONS cont. SAFETY INSTRUCTIONS TOOL USE AND CARE SAFETY WARNING: Read all safety warnings and instructions. Failure to follow WARNING: the warnings and instructions may result in electric shock, fire and/or BE SURE to read and understand all instructions before operating this planer.
-
Page 4: Safety Symbols
SAFETY INSTRUCTIONS cont. SAFETY INSTRUCTIONS cont. SAFETY SYMBOLS FOR YOUR TOOL ELECTRICAL SAFETY cont. The label on your tool may include the following symbols. WARNING: Double insulation DOES NOT take the place of normal safety precautions when operating this tool. V...............Volts A..............Amps 3. -
Page 5: Safety Instructions
7. If any of the parts are damaged or missing (refer to PARTS LIST below), return the WARNING: planer to your nearest Sears store or Craftsman outlet to have the planer replaced. BE SURE to read and understand all instructions. -
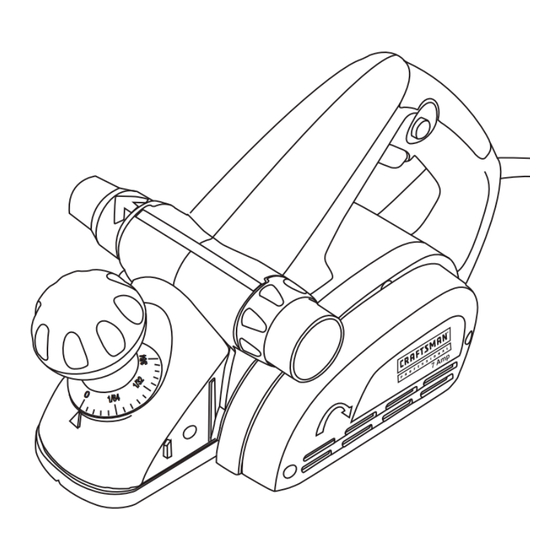
Page 6: Description
DESCRIPTION DESCRIPTION cont. KNOW YOUR PLANER This Professional Planer has the following features: NOTE: Before attempting to use your planer, familiarize yourself with all of the Fig. 1 Rear Handle operating features and safety requirements. Trigger Switch Left or Right Dust/ Chip Extraction Your planer has a precision-built electric motor and it should be connected to a 120-volt,... -
Page 7: Operation
OPERATION OPERATION cont. THE CORRECT WAY TO USE YOUR PLANER WARNING: Fig. 2 Your planer should NEVER be connected to power supply when you (See Fig. 2) cont. are assembling parts, making adjustments, changing belts or blades, cleaning planer, 4. ALWAYS operate the planer with the chip chute or when not in use. -
Page 8: Operation
OPERATION cont. OPERATION cont. ACCESSORIES INCLUDED WITH YOUR PLANER GENERAL CUTTING 1. Adjust planer to desired depth. To make your planer even more versatile we have included 2 special accessories. They are an Edge Guide and a Rabbeting Plate. 2. ALWAYS grip the planer with your left-hand holding the front handle and your right hand holding the rear handle. - Page 9 OPERATION cont. OPERATION cont. TO ADJUST THE DEPTH OF RABBET CUT REPLACING THE BLADES (See Figures 7 to 9) cont. 1. Unplug your planer. CAUTION: Blades are very sharp. ALWAYS handle blades very carefully. WARNING: Failure to do so could result in possible serious injury. Failure to unplug your planer could result in accidental starting, causing serious injury.
-
Page 10: Maintenance
LUBRICATION adjustments MUST be performed by a qualified service technician at a Sears Service Center. Your Craftsman Planer has been properly lubricated and is ready to use. ® No further lubrication is needed under normal operating conditions. All bearings in the planer are lubricated for the life of the tool. -
Page 11: Parts List
PARTS LIST PARTS LIST cont.
Need help?
Do you have a question about the 172.267290 and is the answer not in the manual?
Questions and answers