Craftsman 351.226712 Owner's Manual

Craftsman 351.226712 Owner's Manual

1 x 6" belt & disc sander
SAVE THIS MANUAL
FOR
FUTURE REFERENCE
OWNER'S
MANUAL
MODEL NO.
351.226712
CAUTION:
READ ALL
INSTRUCTIONS
CAREFULLY!
/£RRFrSHRN®
l x 6" Belt & Disc Sander
• safety instructions
= operating instructions
• replacement parts
Sold by SEARS, ROEBUCK
AND CO., Chicago,
IL 60684 U.S.A. ©
Part No. 3899.01
AUGUST
1993
Table of Contents
loading

Frequently Asked Questions (6)

  • How do I use the Craftsman 351.226712 sander?

    The Craftsman 351.226712 sander can be used for various tasks:

    • Abrasive Belt Finishing: The abrasive belt can be used to sand wood, deburr metal, or polish plastic and glass. Its 1" belt size is convenient for getting into corners and concave curved edges.
    • Adjusting Belt Platen: The belt platen can be adjusted for sanding or grinding straight, even lines.
    • Polishing and Contour Sanding: With the platen removed, the flexible belt can follow the contour of curved parts.
    • Sharpening: The belt table can be adjusted to a desired sharpening angle.
    • Horizontal Belt Sanding: The belt housing can be tilted to a horizontal position, allowing the drive wheel to serve as a contact wheel for sanding curved surfaces.
    • Abrasive Disc Finishing: Abrasive disc sanding is suited for finishing small flat surfaces and convex curved edges, with the outer edge removing more material and moving fastest.
    • Using the Miter Gauge: The miter gauge is used on the disc table for securing work and holding the proper angle during disc sanding.
    Was this helpful?
  • How do I clean and maintain the Craftsman 351.226712 sander?

    To clean and maintain your Craftsman 351.226712 sander:

    Cleaning

    Lubrication

    General Repair

    • If the power cord is worn, cut, or damaged, have it replaced immediately.
    • Replace worn abrasives as needed.
    • Replace any damaged or missing parts by ordering from the parts list.
    • Any motor repair should be performed by a qualified service technician.
    Was this helpful?
  • How do I replace the sanding pad on the Craftsman 351.226712 sander?

    The term "sanding pad" is not used in the manual. This sander uses an abrasive disc. To replace the abrasive disc:

    1. Remove the disc table.
    2. Peel the old abrasive disc from the aluminum disc. It is not necessary to remove the aluminum disc from the motor shaft.
    3. Clean the aluminum disc if necessary.
    4. Select the proper abrasive disc and apply it to the aluminum disc.
    5. Replace the disc table.

    For more information, see page 8 of the manual.
    Was this helpful?
  • What are the common replacement parts for the Craftsman 351.226712 sander?

    Common replacement parts and recommended accessories for the Craftsman 351.226712 sander include:

    Replacement Parts (from the Parts List)

    • Abrasive disc (Key No. 1)
    • Aluminum disc (Key No. 2)
    • Disc table (Key No. 4)
    • Disc guard (Key No. 5)
    • Dust chute (Key No. 8)
    • Line cord (Key No. 17)
    • Switch with key (Key No. 22)
    • Abrasive belt 42" (Key No. 40)
    • Belt table (Key No. 47)
    • Work stop (Key No. 48)
    • Belt platen (Key No. 52)
    • Tracking wheel (Key No. 56)
    • Handle assembly (Key No. 65)

    Recommended Accessories (Consumables)

    • Abrasive Belts 1 x 42": Fine, Medium, Coarse
    • Abrasive Discs 6": Fine, Medium, Coarse
    • Miter Gauge
    • Belt Cleaner
    • Multi Purpose Stand

    For more information, see page 11 of the manual.
    Was this helpful?
  • What are the key features of the Craftsman 351.226712 sander?

    The Craftsman 351.226712 sander is a 1 x 6" Belt & Disc Sander with the following key features:

    • Motor: It is equipped with a 120 Volt AC permanent split capacitor motor that has 1/2 Max. Developed Horsepower and operates at 3450 RPM. The motor and wiring are an integral part of the tool.
    • Power Control: The power supply is controlled by a single pole locking rocker switch and includes a key to prevent unauthorized use.
    • Electrical: It comes with a 3-conductor cord and ground type plug.
    • Belt Sanding: The abrasive belt can be used for sanding wood, deburring metal, or polishing plastic and glass. Its 1" belt size is suitable for corners and concave curved edges. It features an adjustable belt platen for straight sanding and a flexible belt for polishing and contour sanding when the platen is removed. The belt housing can be tilted to a horizontal position for using the drive wheel as a contact wheel for curved surfaces.
    • Disc Sanding: The disc table is adjustable from 45° to 90° for beveled work. Abrasive disc sanding is effective for finishing small flat surfaces and convex curved edges.
    • Dust Management: It includes a dust chute (Key No. 8).
    • Warranty: It comes with a full one-year warranty on material or workmanship.
    Was this helpful?
  • How do I turn on the Craftsman 351.226712 sander?

    The sander's power supply is controlled by a single pole locking rocker switch, which includes a key to prevent unauthorized use.

    To turn on the sander:

    1. To avoid accidental start-up, ensure the machine is in the "off" position before plugging it in.
    2. After turning the switch on, allow the belt to reach full speed before beginning sanding or grinding.

    To turn off, turn the switch off and disconnect power whenever the sander is not in use.

    Was this helpful?
Need help?

Need help?

Do you have a question about the 351.226712 and is the answer not in the manual?

Summary of Contents for Craftsman 351.226712

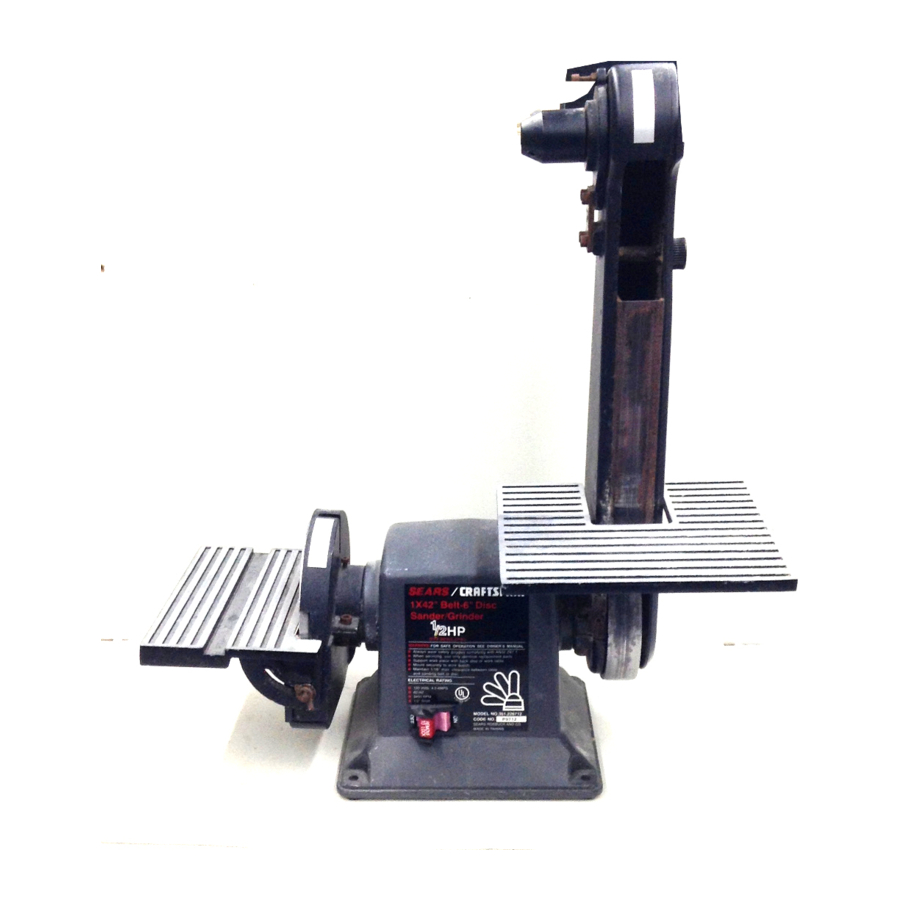
  • Page 1 SAVE THIS MANUAL FUTURE REFERENCE OWNER'S MANUAL MODEL NO. 351.226712 /£RRFrSHRN® l x 6" Belt & Disc Sander CAUTION: READ ALL • safety instructions INSTRUCTIONS = operating instructions CAREFULLY! • replacement parts Sold by SEARS, ROEBUCK AND CO., Chicago, IL 60684 U.S.A. © Part No.
  • Page 2: Safety Instructions

    FULL ONE YEAR WARRANTY ON SEARS/CRAFTSMAN 1 x 6" BELT & DISC SANDER if within one full year from tile date of purchase, this Sears Craftsman 1 x 6" Belt & Disc Sander fails due to a defect in material or workmanship, Sears will repair it, free of charge.
  • Page 3 CONTENTS Warranty ........ Unpacking and Checking Contents ... Tools Needed ......General Safety Instructions for Power Tools ...... Assembly ....... Operation ....... Safety Instructions for Belt & Disc Sander ....Maintenance ......8 & 9 Motor Specifications Trouble Shooting ......and Electrical Requirements ....
  • Page 4: Motor Specifications

    MOTOR SPECIFICATIONS AND ELECTRICAL REQUIREMENTS PROPERLY GROUNDED MOTOR The belt and disc sander is assembled with motor and OUTLET "_ wiring insta!led as an integral part of the tool.. The 120 Volt AC permanent split capacitor motor' has the following specifications: Max..Developed Horsepower ......
  • Page 5: Electrical Connections

    ELECTRICAL CONNECTIONS The motor is assembled with an approved three conduc- WARNING; MAKE SURE THE UNIT IS OFFAND DIS- tor cord to be used on 120 volts as indicated, CONNECTED FROM POWER The power supply to the motor is controlled by a single SOURCE BEFORE INSPECTING...
  • Page 6 ASSEMBLY Be sure that the gap between the disc and disc table is CAUTION: ATTEMPT ASSEMBLY 1/16" or'less. Secure guard and table position by tighten- PARTS ARE MISSING. US_E OWNER'S ing the socket head bolts and hex nuts (Key Nos. 11, 13 MANUAL TO ORDER REPLACEMENT PARTS, and 9).
  • Page 7 OPERATRNG UNSTRUCTIONS (Continued) ABRASIVE BELT FINISHING REPLACING ABRASIVE BELT The abrasive belt can be used to sand wood, deburr Remove belt table (Key No. 47) by removing socket head bolt, lock washer and flat washer (Key Nos. 49, 50 & 51)_ metal, or polish plastic and glass, Remove the belt guard (Key No_38) by removing thumb The belt is most efficient when used with the table, The...
  • Page 8: Maintenance

    OPERATING INSTRUCTIONS (Continued) Also, abrasive used can be changed to a different grit by replacing the aluminum disc. Additional aluminum discs are available. Use a separate aluminum disc for each grit size used. interchange the aluminum disc to change grit size, Replace disc table°...
  • Page 9: Troubleshooting

    MAUNTENANCE (Continued) Replace any damaged or missing parts Use the parts LUBRICATION list to order parts. The shieIded ball bearings inthis sander are permanently Any attempt to repair the motor may create a hazard lubricated at the factory, They require no further lubrica- unless repair is done by a quatified service technician.
  • Page 10 Figure 4- Replacement Parts Illustration_...
  • Page 11: Replacement Parts List

    REPLACEMENT PARTS LIST PART PART KEY i NO, i NUMBER DESCRIPTION NUMBER DESCRIPTION 9.28309 ® Abrasive disc 160600 i Capacitor clamp 2 ,, 8285.00 Aluminum disc 8273.00 Knob STD502502 "1/4-20 x 1/4" Set screw 8274.00 Stand off 8263.00 Disc table 8275.00 Belt cover 8264.00...
  • Page 12: How To Order Repair Parts

    1 X 6" Belt & Disc Sander OWNER'S MANUAL SERVICE Thank you for' purchasing your Belt & Disc Sander from Sears. This unit will provide you with many years of reliable service. Should the need exist for' repair parts or service, simply contact any Sears Service Center and most Sears, Roebuck and Co.

Table of Contents