Table of Contents
Advertisement
Advertisement
Table of Contents

Related Manuals for Craftsman 137.219080


Summary of Contents for Craftsman 137.219080
- Page 1 ® Model No,. 137;2i9080 Safety Instructions Insta!lation Before using this Dri!l Press, ® read this manua! and fol;low all its Safety Rules and Operating instructions. Parts List ® Espa_ol Customer Help Line t -800-843-!682 Sears, Roebuck and Co. Hoffman Estates, IL 60!79 Pad NO.
- Page 2 Warranty Product Specifications Safety _ns_ructions ..Car_on Contents .... Know Your Dri!! Press ..Glossary of Terms ... Assembiy and Adjuslment_ Ope_'a_on ...._aintenan,ce ....Troubleshooting guide ..Parts ............ £spaSol ....FULL ONE YEAR WARRANTY this produC_ fai_s due to a deiect in ma_eda_ o_ workmanship within one year _rom the date of pu_hase, Sears wi _epair _ flee of cha_ge, Co '_lact a Sears Service Center f_r repair,...
- Page 3 GENERAL SAF Y i4o REMOVE ADJUSTING KEYS AND WRENCHES. _rom the habit of checking to see that keys and BEFORE USING THE DRILL PRESS adjusting wrenches are rem#_ed from the too_ _fore Safety is a combination of common sense_ s_aying a_ert and knowing how to use your dr#[ press, 15 NEVER LEAVETOOL RUNNING UNATTENDED, TURN THE POWER "OFF',...
- Page 4 SPEC F'|C SAFETY INSTRUCTIONS 14. SECURE WORK. Use clamps or a vise to hold the FOR THE DRILL PRESS work when practical it's safer than using _ur hand and it frees both hands _o _eral[e _tool, 15. WHEN us_n9 a ddJ_press wse, e_ways fasten to the table.
- Page 5 This too4 is intended _or use on a circuit thai has a GROUNDING iNSTRUCTIONS receptacae }_kethe ore ilhJatrated in F_GUR_ A, FIGURE A Shows a 3°prong electrical plug and receptacle INTHE EVENT OF A MALFUN_N OR BREAKDOWN. that _,:¢Sa grounding conductor, tf a properly grounded grouna_n9 provides a path ot least _reslsta_'_ce _ or electric receotac_e _s not availaMe, an adapfer (FIGURE B) can curcent and reduces lhe r_sk of electric shock This tool...
- Page 6 TOOLS NEEDED FOR ASSEMBLY UNPACKING AND CHECKING Adiusta_e wrench • Hammer and _ock el weed Combinatioe square It any part as mmss_ng or damaged, do not plug the drill pre_ _r until Ihe rn_ssmg or damaged pa_t is replaced, ana _embly _s_mplele.
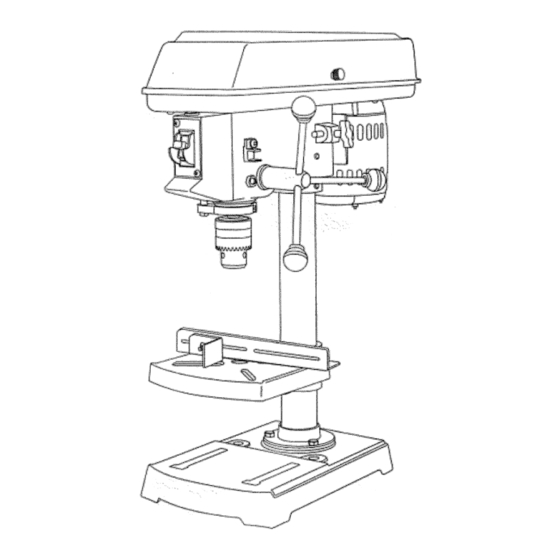
- Page 7 Spindle Motor pulley pulley Gore[ Depth ON/OFF pointer switch w/key Feed stop rod Be_t tension kaob Head _oekscrews ChuCk Bevel _ock Suppo_ lock handle Base Coiumn suppoA...
- Page 8 BASE - Supports dd# press, For additional stability, holes DRILL BIT -The cutting too_ used in fl'_edrill cress i[o ,are provided in base to bott drill press to floor. ma_e holes in a workp_ece, (See, _Specific Safety Instructions for Dr_JlPros,sos°'.) DRILL ON/OFF SWITCH - Has Iockieg feature.
- Page 9 ASSEMBLY INSTRUCT|ONS HEAD/MOTOR ASSEMBLY (F|G. C) CAUTION: The headJmotor assembly (!) is heavy, BASF.JCOLUMN (FIG, A) Set Eheba_ rloe floor, Place the column (2} on the base: align the ho_es _n Lift above _e column (2)o slide down the column as far _.hecolumn suppor_ w_ththe base holes.
- Page 10 CHUCK (F_G. E, F) SPINDLE SPF_EDS (FIG.H) i. #1_peet and dean the holeinthechuck {I)and the ThisddH offers 5 spindle speeds from 620 b 3100 R.RM, spindb (2)° The h ghentspeed isobtained when _e be_ isposition_ Remove al_ grease, coatings_ and pa[_ c_es from the en the largest motor pulley step and the smallest spindle chuck and spindle serrates w_th a clean cbth Open the c:huck iaws (3}_ by bsrning me chuck: barre!
- Page 11 (_G. L) TO MOVE THE TABLE Raise or lower the _ab_e(1) by _oosening the suppo_ Disconnect thedd_l press from the power source before lo_ handle (2)_ making any adiustments, Move _he table to the desired _sitJon and tighten the support lock handle TO TiLTTHE TABLE (FIG, J) Fig, L...
- Page 12 ANGULAR PLAY OFTHE SP|NDL_ (FIG, O) Move the spindle to _he bwest downward posifloni,take it in your hands, and t_ to make it revolve abo_ its axis, i| NOTE: AH necessary adjustments #r the proper functier_i_ _here is too much play, pr_eed as fo_s: Ot your driii press have been made at the _ctory.
- Page 13 INSTALLING DRILL 8!TS {F_G Q) Depth scale method (FIG, S} Open the chuck jaws by hand turning the barrel ,of For this meth_, wi_h _e _ind_e in the up _tL_, the chuck (1) c_ockwise, the dtil_b_:tip (2) sHgh_ytouches _e _ _ 'the (I).
- Page 14 G_NERAL DRILLING GUIDELINES #OSIT!ONINGTABLE AND WORKPiECE (FIG.T. U) Always p_ace a piece of pack up matedal _1 } _wood, NOTE: Use scrap matena_ to get the feel of _he machine plywood) on the _bb underneath the workoiece [2I, before attempting regular work. This wi_ preven_ splintering on l_heunder:side ot _he Drilling spuds...
- Page 15 Fig, V To prevent the werkpiecs or backup materia from being _orn from your hands while dri_ing, you MUST _osition the work£_ece against the LEFT side of the eokcmn. I:!the workpiec_ or the backup mate rial _snot long enough to roach the column, clamp them to the table or use the fence provided w_ the drill press to brace _he workpieee.
- Page 16 Lubricate mhechuck and quiii assembly peri_ca_ly: Squi_ or wJ_ a thin f!!m o_ !igh_eight m_chine oil on the For _ut own safety, turn switch "OFF" arid rem_e plug outside of the spindle shaA and [he jaws of the chuck. from power source out_et before maietaining or Raise and iower the quill and iaws to distribute the oi_ _ubticati_lg dr[Jr press.
- Page 17 TRCUBLESHOOTING GUIDE To a'_oid inju_ from an a_identa_ sta_, turn #_e switch "OFF and always remove the p_ug#ore _he po_er source before making any adiustments. Consult your io_ Sears Serv_c_ Cente_ if for any reason _he moto_ wii_net run PROBLEM PROBABLE CAUSE REMEDY...
- Page 18 8" DR|LL PRESS PARTS MST MODEL NO. 137,219080 When servicing use only CRAFTSMAN replacement parls. Use of any other par_s may create a HAZARD or _use product damage° Any a_empt to :repair Or replace el_dcal pari_ on this Dril_ Press may ¢_ea_e a Hi_ZARD unless repair is done by a...
- Page 19 ;8" DRILL PRESS PARTS LIST MODEL NO, !37,219080 7(>...
- Page 20 For in-home major brand repair service: Call 24 hours a day, 7 days a week 1- 800=4°MY° (1o800_69_663) HOME Pare ped_r se_iclo de epetact6n a demteillo 1_00-676-581 In Canada for alt your service and pa_s needs ca!_ Au Canada pour tout _esewice ou ies pi_ces For the epa_r or replacement pa_s you need:...
Need help?
Do you have a question about the 137.219080 and is the answer not in the manual?
Questions and answers