Table of Contents
Advertisement
Available languages
Available languages
INSTALLATION
INSTRUCTIONS
NOTICE TO INSTALLER: Leave these instructions with the appliance.
NOTICE TO CONSUMER: Retain these instructions for future reference.
*
Blower may be
rotated for horizontal
or vertical direction by
loosening nuts
around blower inlet.
Accessible inside
ventilation chamber.
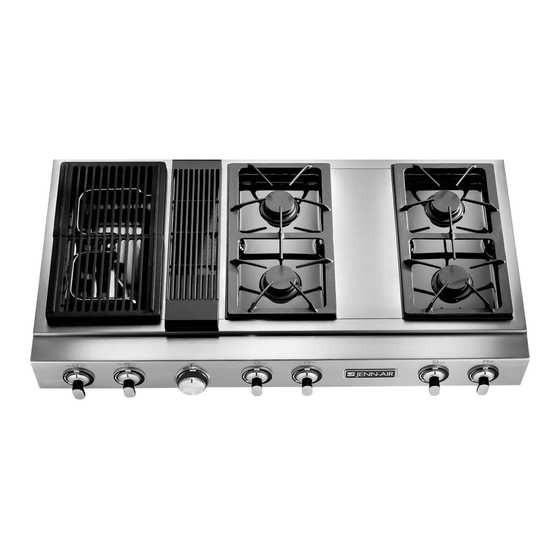
Triple Bay Conventional Gas
Prostyle J J J J Grill Cooktop
Model JGD8348BDP
Dimensions shown in both inches and centimenters
INSTRUCTIONS TO INSTALLER:
S Dimension "A" - provide 2² min. (5.08 cm) cabinet clearance to motor for cooling purpose.
S NOTE: Where possible, 6² (15.54 cm) is recommended for motor/blower service.
S Side Clearance: Grills installed near a side wall must allow a minimum clearance of
8² (20.32 cm).
S Access must be provided to remove and empty grease container.
403 WEST FOURTH STREET, NORTH D NEWTON, IA 50208
SELECT APPROPRIATE
DUCT CUTOUT
(SEE DUCTING
INSTALLATION INSTRUCTIONS.)
8101P399-60
(09-01-00)
Advertisement
Table of Contents

Related Manuals for Jenn-Air Prostyle JGD8348BDP


Summary of Contents for Jenn-Air Prostyle JGD8348BDP
- Page 1 Triple Bay Conventional Gas INSTALLATION Prostyle J J J J Grill Cooktop INSTRUCTIONS Model JGD8348BDP 403 WEST FOURTH STREET, NORTH D NEWTON, IA 50208 Dimensions shown in both inches and centimenters NOTICE TO INSTALLER: Leave these instructions with the appliance. NOTICE TO CONSUMER: Retain these instructions for future reference.
- Page 2 CABINET and COUNTERTOP CUTOUTS EXISTING EXISTING OPENING OPENING See cutout suggestions 1-4 on page 6. COUNTERTOP CUTOUT AREA ² 13/16 (118.90 cm)
- Page 3 Installing Cabinetry Over Your Jenn-Air Grill Minimum horizontal clearance between the edge of the Avoid use of cabinets above cooktop for storage space to appliance and combustible construction extending from eliminate associated potential hazards such as reaching the cooking surface to 18² (45.7 cm) above the cooking over open flames.
-
Page 4: Installation Of Appliance
Installation Of Appliance Follow accompanying ducting instructions carefully. NOTE: For some cabinet styles, it may be necessary to reinforce the front of the cabinet by attaching a brace This appliance is designed to always be vented outdoors. from front to rear inside the cabinet under the Burner Box. The Countertop Cutout, Cabinet Front Cutout and Duct Install ductwork per ducting instructions provided. -
Page 5: Air Shutter Adjustment
Air shutters fit snugly, with an open flame. so a screwdriver blade or needle nose pliers may be required to make this adjustment (see illustration). CAUTION: WARRANTY IS VOID ON JENN-AIR EQUIPMENT INSTALLED OTHER... -
Page 6: Low Flame Adjustment
Important Installation Suggestions Pressure Testing 1. Chamfer all exposed edges of decorative laminate to The maximum gas supply pressure for the appliance prevent damage from chipping. pressure regulator supplied on this appliance is 14² W.C. The test pressure for checking this appliance pressure 2. -
Page 7: Conversion To Lp Gas
Conversion To LP Gas Control Settings This appliance is shipped from the factory equipped for The size and type of cookware and the amount and type use with Natural Gas. To convert it from Natural Gas for of food being cooked will influence the setting needed for use with LP Gas, perform steps 1 through 4. - Page 8 WARNING WARNING ELECTRICAL POWER AND GAS MUST BE Propane Gas conversion is to be performed by a Jenn-Air Authorized Service Contractor (or TURNED OFF PRIOR TO CONVERSION other qualified agency) in accordance with the manufacturer’s instructions and all codes and...
-
Page 9: Conversion Instructions
Natural Gas conversion is to be performed by a hoods with .0520 (#55 orifice) stamped on them are for Jenn-Air Authorized Service Contractor (or the left front and left rear burners. The four hoods with other qualified agency) in accordance with the the .0595 (#53 orifice) stamped on them are for the two... - Page 10 MINIMUM SPACING REQUIREMENT GAS GRILL COOKTOPS For installing a Triple Bay Downdraft Cooktop in combination with another Downdraft Cooktop, the mini- mum spacing between adjacent units must be provided, as shown, for satisfactory performance.
- Page 11 If a problem exists with the downdraft system, check the ducting installation to make sure it conforms to the Jenn-Air specifications. Most downdraft system problems are attributed to poor ducting practices. Contact your installer if the ventilation system will not remove smoke or cooking fumes from well trimmed cuts of meat.
- Page 12 403 WEST FOURTH STREET, NORTH · NEWTON, IA 50208...
-
Page 13: Instrucciones De Instalación
INSTRUCCIONES Superficie convencional para cocinar de gas con parrilla Prostylet t t t de módulo triple INSTALACIÓN 403 WEST FOURTH STREET, NORTH D NEWTON, IA 50208 Modelo JGD8348BDP Las dimensiones se muestran en pulgadas y centímetros AVISO AL INSTALADOR: Deje estas instrucciones con el electrodoméstico. AVISO AL CONSUMIDOR: Conserve estas instrucciones como referencia futura. - Page 14 RECORTES DEL GABINETE y DEL MOSTRADOR LÍNEAS DE CORTE (SOLAMENTE DEL FRENTE) HUECO HUECO EXISTENTE EXISTENTE *Se recomiendan 8² (20.32 cm) para los gabinetes a la medida. NOTA: SE REQUIERE UN PANEL INFERIOR DE CONTROL SI ESTA DIMENSIÓN EXCEDE 5 3/4² ² ² ² (14.60 cm). VEA LA PÁGINA 3 EN RELACIÓN AL REFUERZO DE LA PARTE DELANTERA DEL GABINETE...
- Page 15 Instalación de gabinetes encima de la parrilla Jenn-Air El espacio libre horizontal mínimo entre el borde del electrodoméstico y la construcción combustible que se extienda de la superficie para cocinar a 18² (45.7 cm) por encima de la superficie para cocinar es: Las líneas punteadas...
-
Page 16: Instalación Del Electrodoméstico
Instalación del electrodoméstico Siga cuidadosamente las instrucciones adjuntas acerca NOTA: En algunos estilos de gabinetes, podría ser de los ductos. necesario tener que reforzar la parte delantera del gabinete sujetando una abrazadera del frente a la parte Este electrodoméstico está diseñado para ventilarse posterior del gabinete por dentro desde debajo de la caja siempre hacia el exterior. -
Page 17: Ajuste Del Obturador De Aire
PRECAUCIÓN: LA GARANTÍA QUEDA ANULADA EN Obturador de aire del quemador de la parrilla y EL EQUIPO JENN-AIR CUANDO SE INSTALE PARA quemador de la superficie para cocinar OTRO FIN QUE NO SEA EL RECOMENDADO POR (si así... -
Page 18: Prueba De Presión
Sugerencias importantes de instalación EN EL SENTIDO DE LAS MANECILLAS DEL RELOJ 1. Achaflane todos los bordes expuestos del laminado PARA REDUCIR EL decorativo para evitar daños por desportilladuras. TAMAÑO DE LA LLAMA 2. Haga radiales en las esquinas de los recortes y líjelas para asegurarse que los bordes queden lisos y evitar que se quiebren las esquinas. -
Page 19: Ajustes De Control
Conversión a gas butano Este electrodoméstico se embarca de fábrica equipado para usarse con gas natural. Para convertirlo de gas LLAVE natural a gas butano, realice los pasos 1 al 4. ESPAÑOLA DE 1/2² 1. Quite las campanas de orificio de gas natural. Instale las campanas adjuntas de orificio codificadas por color. - Page 20 LA ENERGÍA ELÉCTRICA DEBE ESTAR La conversión a gas butano debe realizarla un APAGADA Y EL GAS CERRADO ANTES DE contratista autorizado de servicio de Jenn-Air REALIZAR LA CONVERSIÓN (u otra agencia calificada) de acuerdo con las instrucciones del fabricante y todos los códigos...
- Page 21 La conversión a gas natural debe realizarla un original de gas natural). Página 5, ilustración “E”. Las contratista autorizado de servicio de Jenn-Air dos campanas marcadas con el número .0520 (orificio (u otra agencia calificada) de acuerdo con las #55) son para los quemadores izquierdo delantero e instrucciones del fabricante y todos los códigos...
- Page 22 REQUISITOS MÍNIMOS DE ESPACIAMIENTO SUPERFICIES PARA COCINAR CON PARRILLA DE GAS Para instalar la Superficie para cocinar de módulo triple con tiro invertido en combinación con otra superficie para cocinar con tiro invertido, debe mantenerse el espaciamiento mínimo entre las unidades adyacentes, según se muestra, para obtener un desempeño satisfactorio.
- Page 23 Si existe un problema con el sistema de tiro invertido, revise la instalación de los ductos para asegurarse que esté en conformidad con las especificaciones de Jenn-Air. La mayoría de los problemas con el sistema de tiro invertido son debido a los procedimientos incorrectos de la instalación de los ductos.
- Page 24 403 WEST FOURTH STREET, NORTH · NEWTON, IA 50208...
-
Page 25: Mise En Service
Plaque de cuisson à grilloir MISE EN Prostylet t t t à triple baie SERVICE Modèle JGD8348BDP 403 WEST FOURTH STREET, NORTH D NEWTON, IA 50208, ÉTATS--UNIS Dimensions montrées en pouce et en centimètres À L’INTENTION DE L’INSTALLATEUR : Veuillez laisser ces instructions avec l’appareil. À... - Page 26 DÉCOUPES DANS L’ARMOIRE ET LE COMPTOIR LIGNES DE DÉCOUPE (DEVANT SEULEMENT) OUVERTURE OUVERTURE *8 po (20,32 cm) EXISTANTE EXISTANTE recommandés pour les armoires personnalisées. REMARQUE : UN PANNEAU DE COMMANDE PLUS BAS EST EXIGÉ SI CETTE DIMENSION EST SUPÉRIEURE À 5 3/4 PO (14,60 CM).
- Page 27 Pose d’armoires au-dessus de votre grilloir Jenn-Air Le dégagement horizontal minimum entre le bord de Éviter l’utilisation d’armoires de rangement au-dessus de la l’appareil et des structures combustibles dépassant de la surface de cuisson pour éliminer les risques potentiels qui surface de cuisson jusqu’à...
-
Page 28: Mise En Service De L'appareil
Mise en service de l’appareil Suivre les instructions concernant les conduits fournies REMARQUE : Certains styles d’armoires pourront exiger avec ceux-ci avec soin. le renforcement de l’avant de l’armoire en fixant un renfort de l’avant vers l’arrière à l’intérieur de l’armoire, sous la Cet appareil est conçu pour que l’air aspiré... - Page 29 PRUDENCE : LA GARANTIE EST ANNULÉE POUR fois réglé. TOUT MATÉRIEL JENN-AIR INSTALLÉ AUTREMENT QUE TEL QUE RECOMMANDÉ PAR LE FABRICANT. LES CAPUCHONS DE MUR ET LES Obturateur du brûleur du gril et brûleur de la plaque TRANSITIONS RECOMMANDÉS DOIVENT ÊTRE...
-
Page 30: Vérification De La Pression
Suggestions de mise en service importantes 1. Arrondir les angles de tous les rebords des laminés DANS LE SENS HORAIRE POUR décoratifs pour éviter qu’ils ne s’écaillent. RÉDUIRE LA FLAMME 2. Arrondir les coins de la découpe et les limer pour assurer des rebords lisses et éviter que les coins ne se fendillent. - Page 31 Conversion au GPL Cet appareil est équipé pour le gaz naturel en usine. Pour le convertir du gaz naturel au GPL, effectuer les étapes 1 CLÉ À FOURCHE à 4. DE 1/2 PO 1. Enlever les capuchons d’orifice pour gaz naturel. Poser les capuchons d’orifice à...
- Page 32 ATTENTION FERMER LE GAZ ET L’ÉLECTRICITÉ AVANT La conversion au propane doit être effectuée par un prestataire de service agréé Jenn-Air DE PROCÉDER À LA CONVERSION (ou tout autre service qualifié) conformément aux consignes du fabricant et à tous les codes Modèles JGD8348BDP...
- Page 33 POUR CONVERTIR L’APPAREIL AU GAZ NATUREL Conversion du propane (GPL) au gaz naturel Modèle JGD8348BDP Si cet appareil a été converti au GPL, chacune des Rampe - pression requise pour le gaz naturel - 5 po de modifications suivantes doit être effectuée pour le colonne d’eau.
- Page 34 ESPACEMENT MINIMUM REQUIS PLAQUES DE CUISSON AVEC GRILLOIR Pour poser une plaque de cuisson triple à aspiration descendante combinée à une autre plaque de cuisson à aspiration descendante, l’espace minimum entre les appareils adjacents doit être tel qu’indiqué pour un fonctionnement optimum. TOUTE PLAQUE DE CUISSON À...
- Page 35 S’il se présente un problème au niveau de l’aspiration descendante, vérifier que la pose des conduits est bien conforme aux caractéristiques techniques de Jenn-Air. La plupart des problèmes rencontrés au niveau de l’aspiration descendante sont dus à de mauvaises méthodes de pose des conduits.
- Page 36 403 WEST FOURTH STREET, NORTH · NEWTON, IA 50208, ÉTATS- UNIS...
Need help?
Do you have a question about the Prostyle JGD8348BDP and is the answer not in the manual?
Questions and answers