Table of Contents
Advertisement
Advertisement
Table of Contents

Related Manuals for Craftsman 137.224140


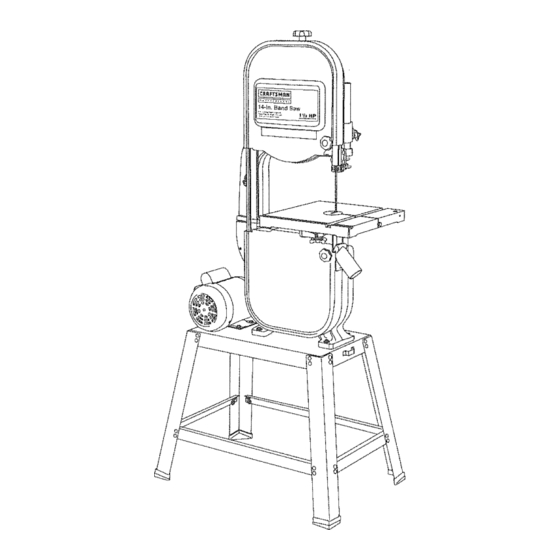
Summary of Contents for Craftsman 137.224140
- Page 1 CAUTION: o Safety Instructions o nnstallation Before using this band saw, read this manual and follow o Operation all its Safety Rules and o Maintenance Operating Instructions. o Parts List Customer Help Line t °80@°843°1682 Sears, Roebuck and Co., Hoffman Estates, BL 60179 Part No.
- Page 2 PAGE SECTION 11. WEAR PROPER APPAREL. DO NOT wear loose GENERAL SAFETY _NSTRUCTIONS clothing, gloves, neckties, rings, bracelets, or other jewelry which may get caught in moving parts. BEFORE USING THE BAND SAW Warranty ..............Non-slip footwear is recommended. Wear protective Product Specifications .............
- Page 3 GUIDEUNES FOR EXTENSION CORDS GROUNDING INSTRUCTIONS 20. NEVER 1t. PLAN intricate and small work carefully to avoid LEAVE TOOL RUNNING UNATTENDED. pinching the blade, Avoid awkward operation and TURN THE POWER OFF. Don't leave the tool until it USE PROPER EXTENSION CORD. Make sure your hand positions to prevent accidental contact with the comes to a complete stop.
- Page 4 UNPACKING YOUR BAND SAW UNPACKING AND CHECKgNG CONTENTS AVAILABLE ACCESSORIES To avoid injury from unexpected starting, do not plug the Do not attempt to modify this tool or create accessories power cord into a power source receptacle during unpacking recommended for use with this tool.
- Page 5 LEADING EDGE - The end of the workpiece pushed into CRAFTSMAN BAND SAW TERMS the cutting tool first. Upper blade wheel Lower blade Upper cover support bearing BLADE GUIDES - Support the blade and keep it from MITER CUT - An angle cut made across the width of a workpiece.
- Page 6 MOUNTING THE MOTOR (FIG. C) Place the pulley cover plate (4) over the pulley shaft (2) onto the flat surface of the collar. NOTE: The use of rubber grommets is essential for Align the screw holes in the collar (1) and the pulley eliminating excessive motor vibration, cover plate (4).
- Page 7 INSTALLING THE SAW DUST PORT (FIG. L) Install the pulley cover (FIG. J) Align the pulleys (FIG. H) Fig. N The saw dust port has a 2" opening that can be attached 17. Place the pulley cover (17) over the pulleys and belt, 1 !.
- Page 8 INSTALLING AND REMOVING BLADES (FIG. Q) Fig. Q ADJUSTMENT INSTRUCTnONS Fig. T To avoid injury from accidental starting, always turn the To avoid injury, turn the switch OFF and unplug the band switch OFF and remove the plug from the power source saw from the power source before making any before moving, replacing, or adjusting the blade, adjustments.
- Page 9 UPPER BLADE GUIDES AND BLADE SUPPORT Support bearing (Fig.Y) UPPER BLADE GUIDE ASSEMBLY (FIG.W) BLADE TRACKING (FIG. V) Loosen the thumb screw (6). BEARING (FIG. X, Y) 10. Turning the rear knob (7), move the support beadng (8) in or out, until the bearing is t/64" behind the blade. To avoid injury, turn the switch OFF and disconnect the !1.
- Page 10 LOWER BLADE GUIDES AND SUPPORT BEARING Fig. AA (FIG. Z, AA) BASIC SAW OPERATIONS To avoid twisting the blade do not turn sharp corners; saw To avoid injury, turn the switch OFF and disconnect the around corners. saw from the power source before making any "ON/OFF"...
- Page 11 Curve Cutting 1/8, I/4 Do not allow filth to build up on the table, the guides, or the support bearings. Clean them with Craftsman Gum and Pitch Remover. NOTE: Do not immerse the support bearings in the gum and pitch remover.
- Page 12 MOTOR Problem Probable Cause Remedy Noisy operation. 1. Incorrect belt tension. Adjust tension. See ASSEMBLY AND ADJUSTMENTS section "INSTALL THE BELT'. TROUBLESHOOTING GUUDE 2. Loose motor pulley. Readjust and tighten motor pulley set screw, 3. Loose pulley cover. Readjust and tighten pulley cover mounting screws.
- Page 13 137.224140 137.224140 CRAFTSMAN BAND When servicing use only CRAFTSMAN replacement parts. Use of any other parts may create a HAZARD or cause product damage, Any attempt to repair or replace electrical parts on this band saw may create a HAZARD unless repair is done by a quaIified service technician.
- Page 14 BAND SAW LEG STAND 137=224140 When servicing use only CRAFTSMAN replacement parts. Use of any other parts may create a HAZARD or cause product damage. Any attempt to repair or replace electrical parts on this band saw may create a HAZARD unless repair is done by a qualified service technician.
- Page 15 :.:÷:.:.:.:+_ For repair of ma or brand ances in your own home... ,:,o:::,,:,-.::: ..no matter who made it, no matter who sold it! ..,X+_;,2 ..1 800 4 MY HONESMAn v,'.',.;;,..::::::::::::::: ..ytime, day or n ;:":" -:.a-;:.:.: v:z;.,.;...
Need help?
Do you have a question about the 137.224140 and is the answer not in the manual?
Questions and answers